¶ 1. Quick Start
¶ 1.1 Introduction to the RAY5 10W
¶ 1.1.1 Product Specification
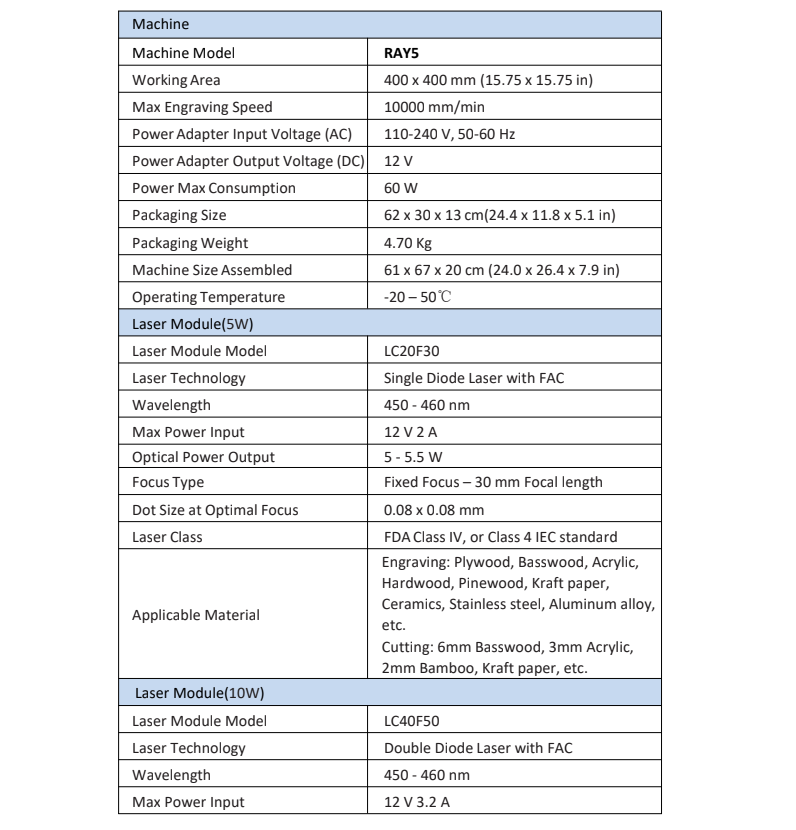
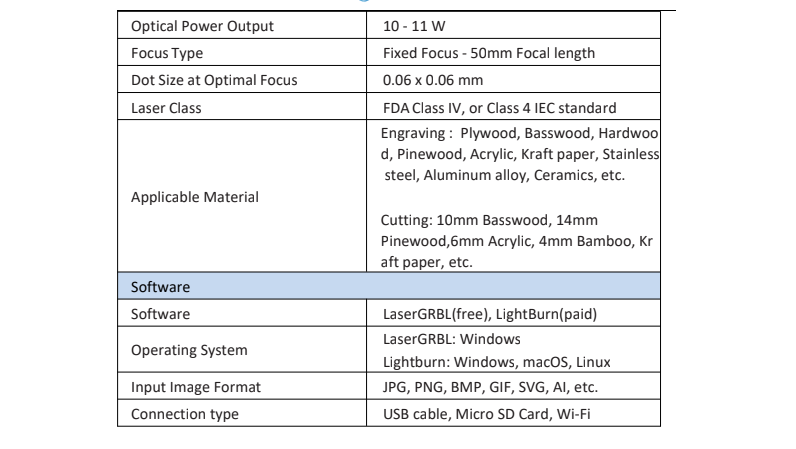
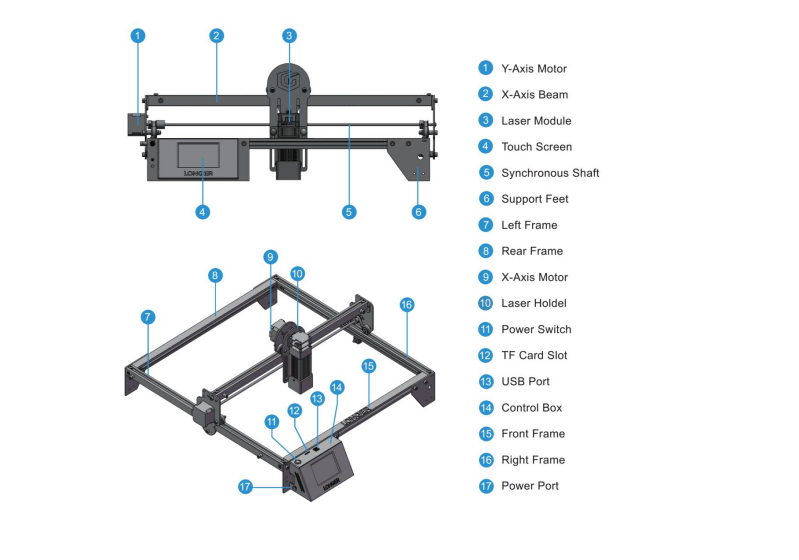
¶ 1.1.2 Introduction to RAY5 10W
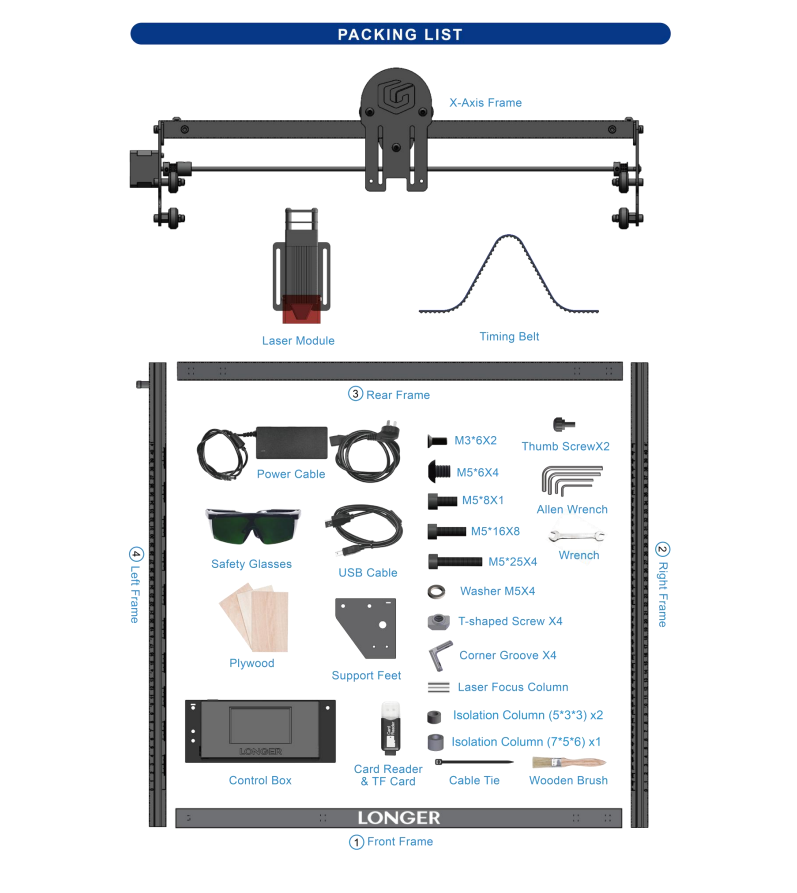
¶ 1.1.3 Supplementary instructions for accessories in the box
¶ 1.1.4 Quick Start Guide
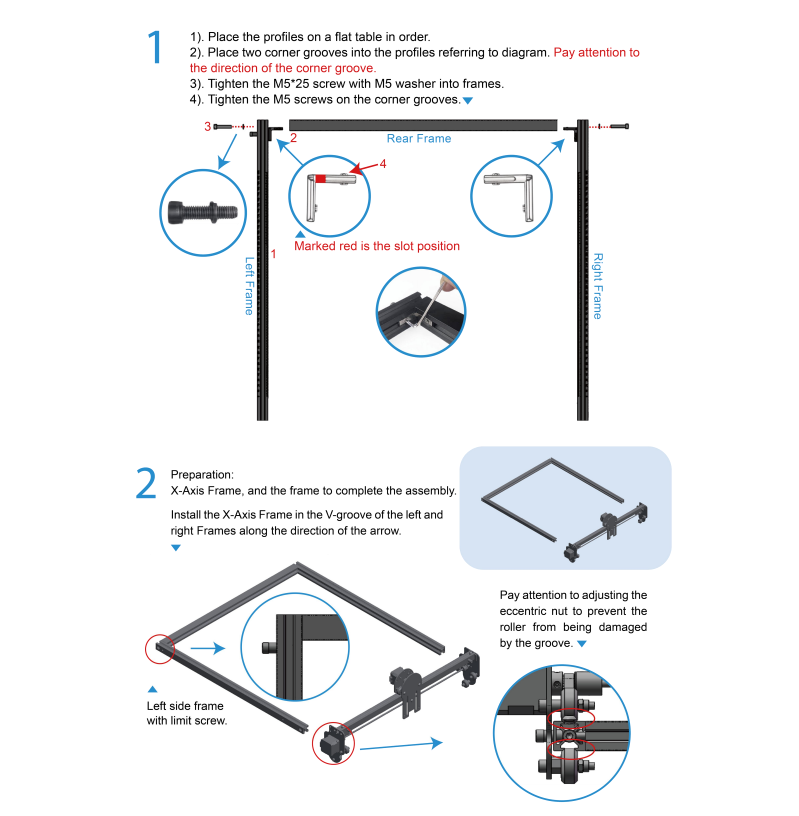
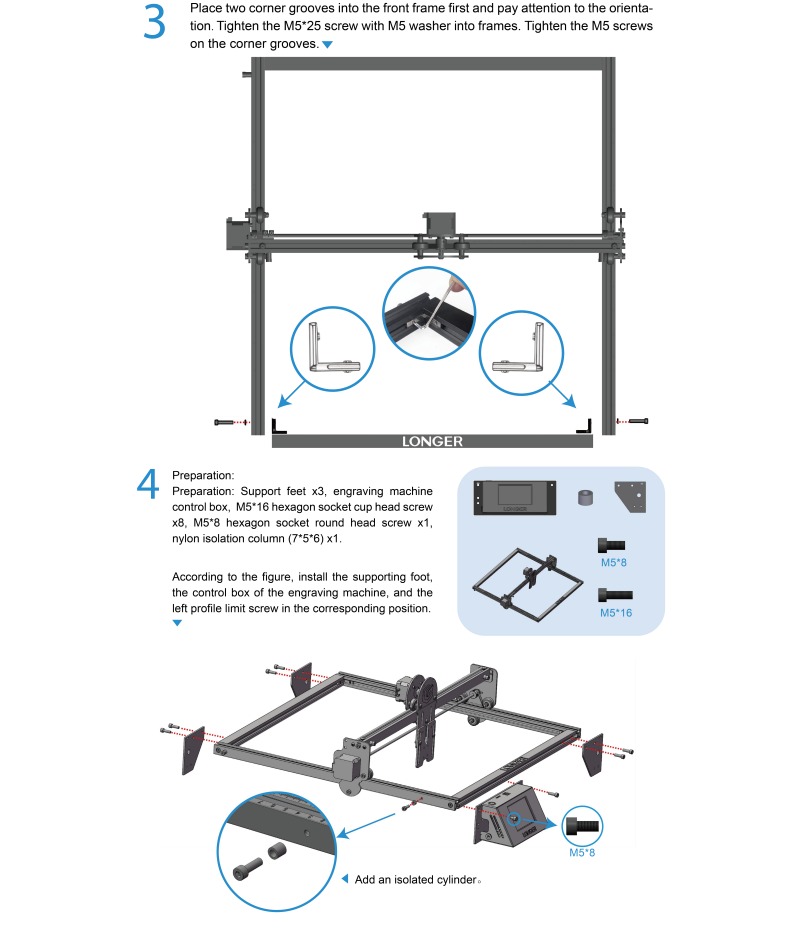
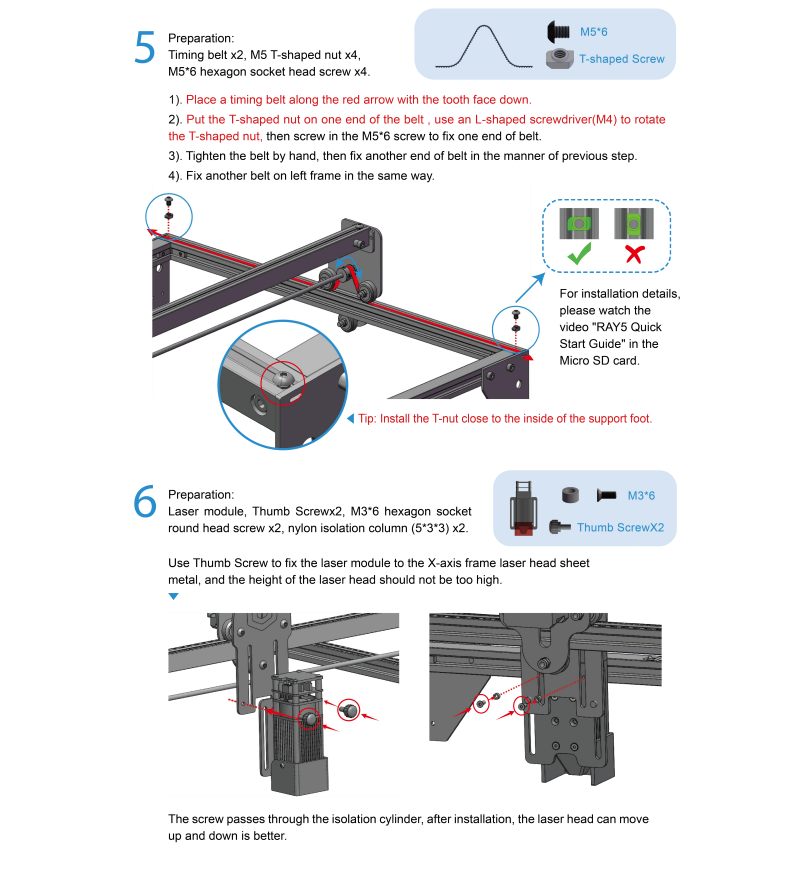
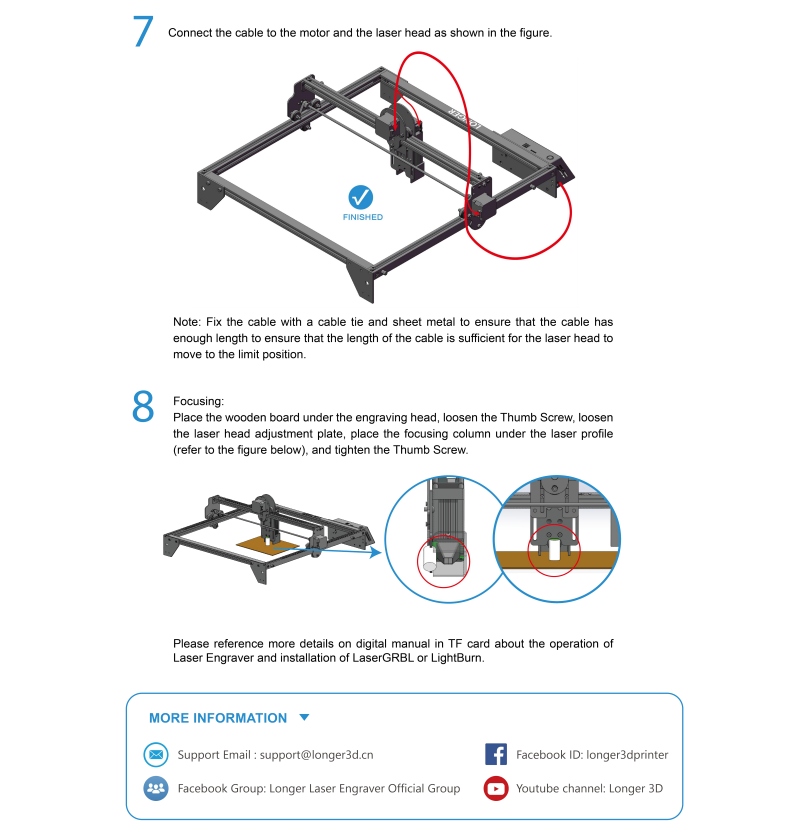
The machine step-by-step assembly process is described in the document “RAY5 Quick Start Guide”. Please follow the guide to assemble machine.
• During the machine assembly, if there is any unclear place, please refer to the video “RAY5 Quick Start Guide”.
• Each unit of the engraving machine has been inspected and tested. Therefore, in some cases, very small traces may be left on the profile and the metal shell. These will not affect the quality. It is normal that it does not affect normal engraving. Thank you very much for your understanding.
• Be cautious during assembly as some parts may have sharp edges.
• If you have any questions after receiving the product, please contact our customer service first.
¶ 1.1.5 RAY5 10W Series FAQ
Question 1: Are there recommended engraving and cutting parameters?
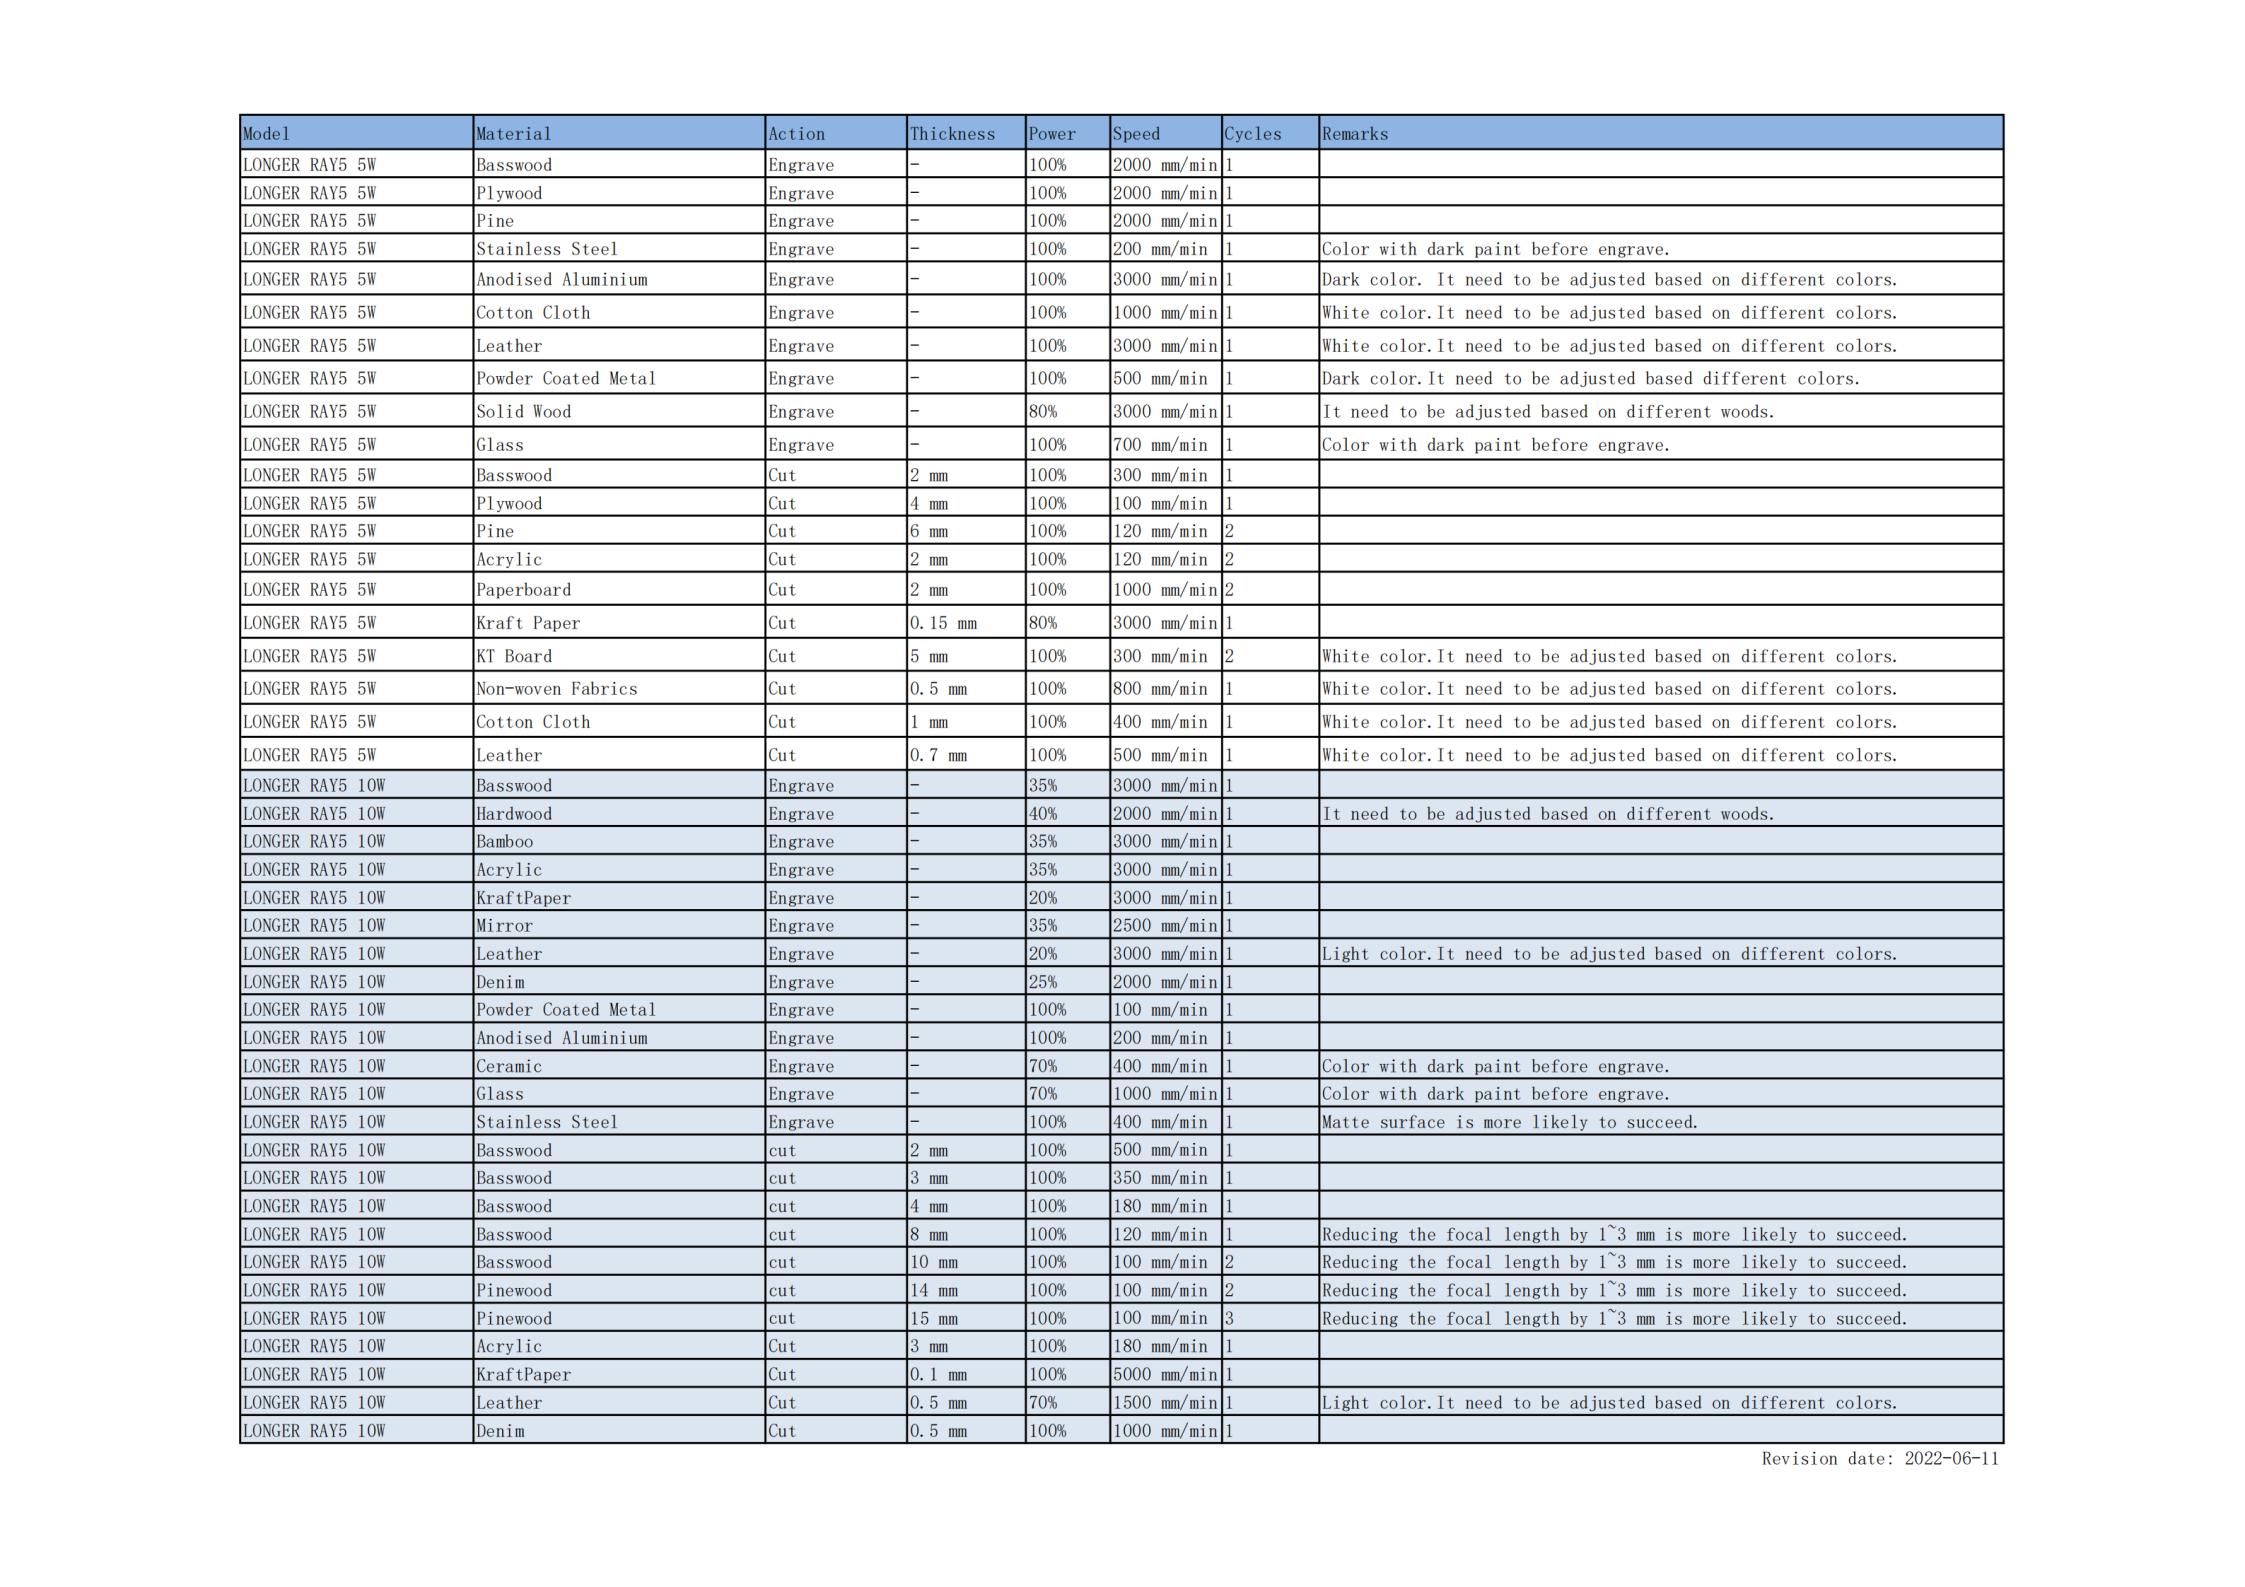
Please refer to the table “LONGER Laser Engraver Material Profiles” which describes the common materials engraving and cutting parameters for RAY5.
If there is no information you need. Please wait for our updates in the future.
Question 2: The engraved pattern appears jittery, or not closed circles?
· Adjust the eccentric nut to make the parts move smoothly without shaking.
· Re-tension the timing belt. · Adjust the synchronous wheel to prevent the synchronous belt
from rubbing against the side of the synchronous wheel during movement.
Question 3: How about the warranty policy?
For LONGER official stores and LONGER designated distributors, RAY5 has a One-year International Limited Manufacturer warranty from the date of purchase of RAY5.
Please note the following warranty terms. One-year International Limited Manufacturer Warranty means that LONGER will provide the following free warranty services:
• Diagnostics and Evaluation.
• Technical Support.
• Replacement Parts under Warranty terms. How to handle a warranty case:
Any warranty case must be submitted to our official support channels (Email: support@longer3d.cn). In case the product was bought from a reseller, contact us first so that we can help you diagnose the problem, then turn to your reseller for spare parts if needed. Documentation needed for a warranty case:
. Machine purchase order number and channel, nameplate number on the machine.
. A brief description of the problem along with the clear evidence of its presence (e.g., photos or videos).
. On the initial contact for Customer Support further tests and diagnostic steps might be required to identify the root cause of the problem.
. Some parts of the RAY5 inevitably “get used up” over time. For these parts, specific conditions apply, unless failure has occurred due to a defect in materials or workmanship.
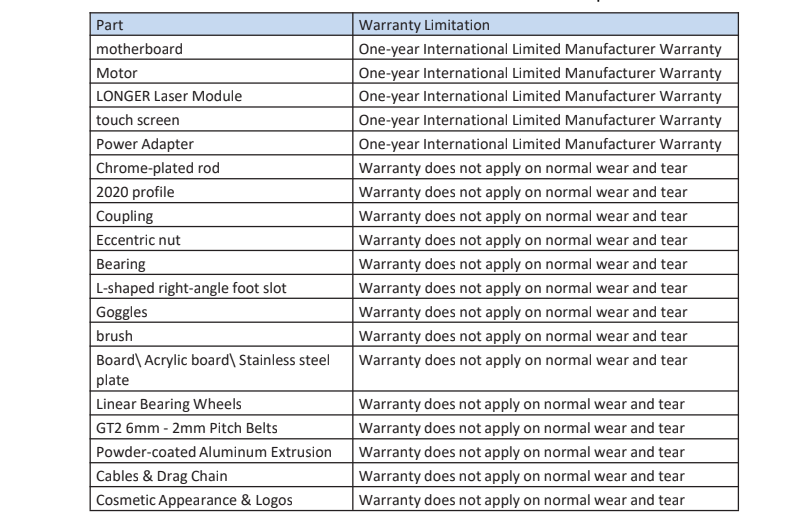
· The warranty does not cover normal, expected wear and tear caused by using the RAY5 for its intended purpose.
· In case we have provided a free replacement part, the warranty does not reset. The original warranty period still applies.
This warranty is voided by:
· Any damages caused by improper assembly of the product.
· Any damage caused by improper use, maintenance, or operation of the engraver.
· Any damage caused by long-term lack of maintenance.
· Using the RAY5 in improper conditions (temperature, dustiness...).
· Upgrades, modifications, or add-ons that are not officially supported. Rest assured that our Technical Support Team is always available to help you out under any circumstances, even if the issue is not covered under warranty.
Please feel free to contact us(email: support@longer3d.cn) with any questions or inquiries with.
Question 4: How to maintain RAY5 laser module?
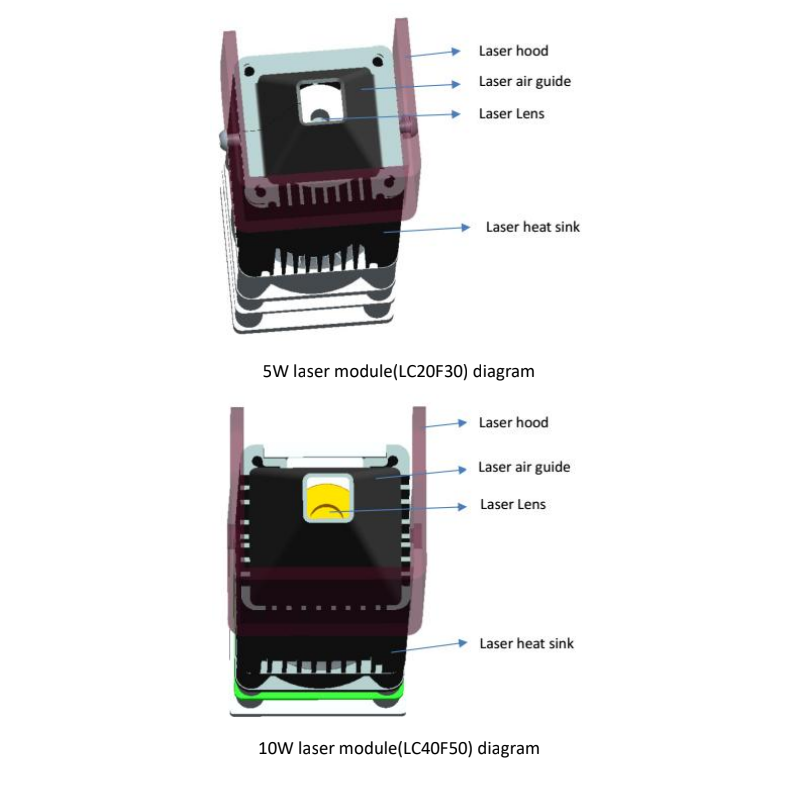
RAY5's lasers are carefully designed to resist stains, but after
long-term use, there may still be dust and grease on the laser hood, air guide, and even the lens. This will affect the appearance and performance. It is recommended that you clean it regularly laser to
keep it in top condition. You need to perform the following steps to clean the laser.
Preparation: hex wrench, non-woven fabric, alcohol/isopropanol
solution.
Start:
. Remove the laser hood and air guide
. Dip a little alcohol/isopropyl alcohol solution with a
non-woven fabric
. Carefully wipe the laser lens with a non-woven fabric
. Reinstall the laser hood and air guide
Warning: Excess solution may immerse inside the laser and cause damage to the laser.
Question 5: How to solve the upload error of the APP?
To use APP for engraving, it needs to insert the SD card into the motherboard firstly to ensure that the data can be received normally; otherwise it will prompt upload error.
Thank you for purchasing LONGER products! Under normal usage and service, the products and its parts have a warranty period up to one year. If you encounter any problems, please send an email to
support@longer3d.cn to report any issue with LONGER products. Our professional after-sale service would respond within 24 hours and help you to solve the issues.
¶ 1.1.6 LONGER Laser Engraver Material Profiles
¶ 1.2 Laser Engraver Setup
¶ 1.2.1 Machine Operation
(1) Calibrating Laser
a) Place the machine on a flat table and make sure that the machine is stable and will not shake. b) Place the wood board to be engraved or cut under the laser
c) Loosen the two thumb screws on the front of laser head by hand. Then place the focusing column vertically on the bottom of the laser head form the rear side, and manually lift the laser head so that the bottom of the rear side of the laser is close to the upper surface of the calibration column.
d) Tighten the two laser thumbscrews, then remove the focusing column.
(2) Power Up
a) Find the adapter and power cable and connect them.
b) Connect the power cord to the power supply and connect the other end of the adapter to the power port of the motherboard.
c) Connect the computer and the engraving machine through a USB computer (or insert a Micro SD card).
d) To Turn ON your RAY5 by press the power switch (To Turn OFF your RAY5 by press the power switch once again.)
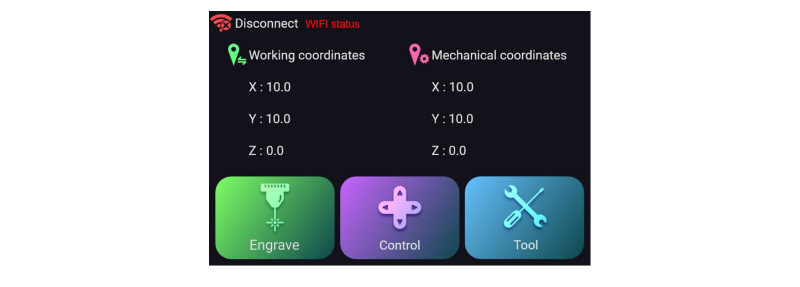
(3) Touch Screen Operation
RAY5 has a full-color 3.5-inch touch screen with a user-friendly user interface. Engraving and cutting work can be operated with touch screen and SD card.
a) Home page
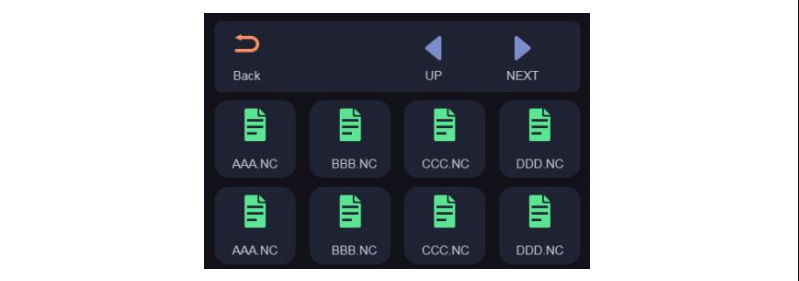
b) Engraving page
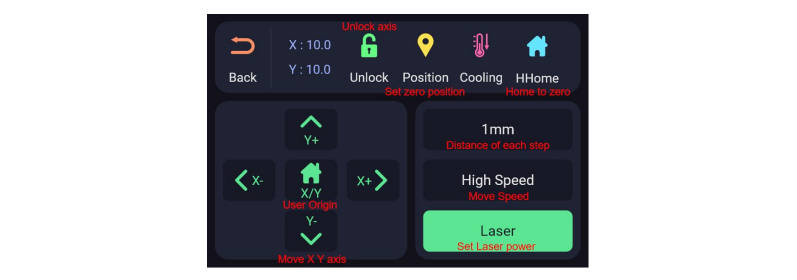
c) Control page
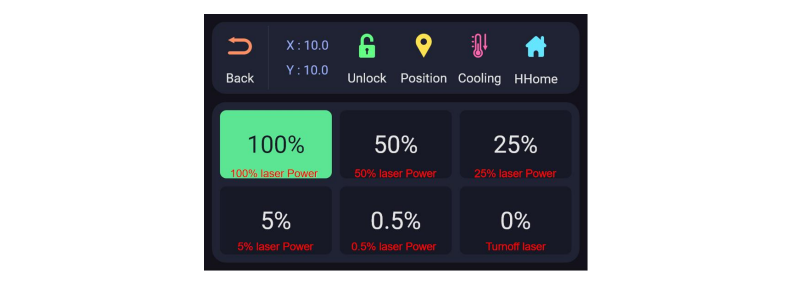
d) Laser page
e) Ready to engraving/cutting page
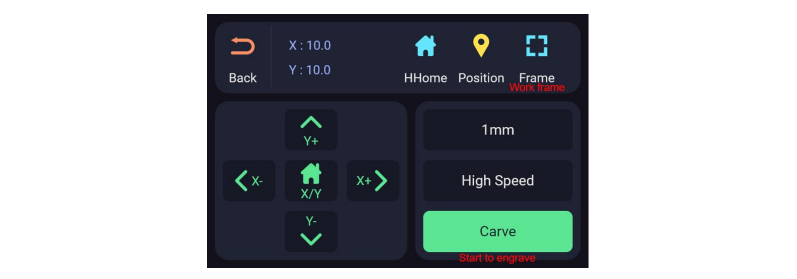
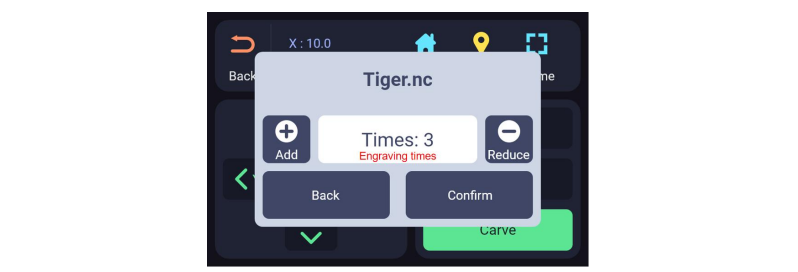
f) Ready to engraving/cutting page/Carve
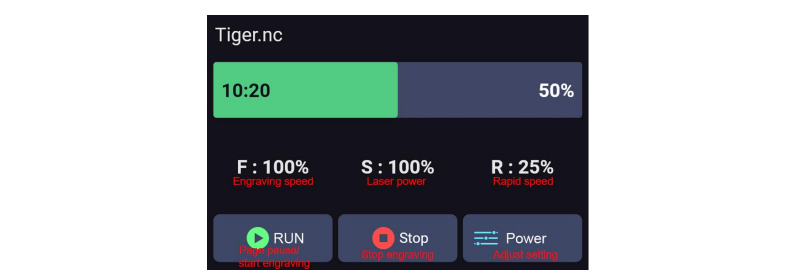
g) Engraving/cutting working
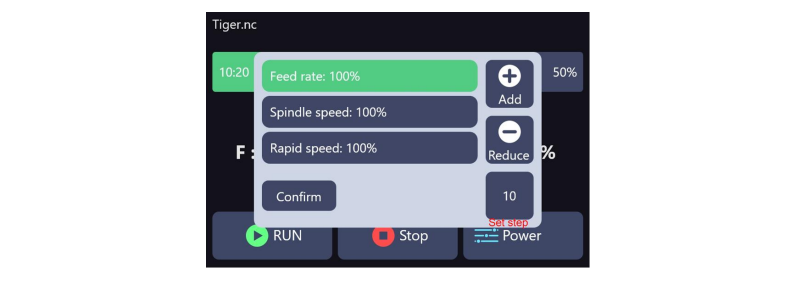
a) Power page
(4) Wi-Fi Control operation
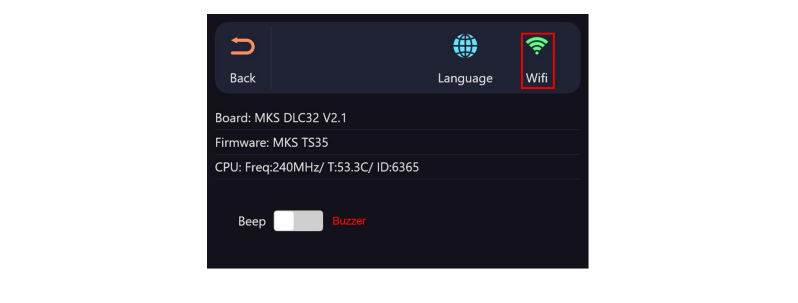
a) Tap tool icon  on the home page
b) Click on the ‘Language’ icon  to change the language (Chinese, German, Spanish, English, Portuguese).Tap Wi-Fi icon on the top right corner of tool page
a) Select Wi-Fi name on Wi-Fi list page

b) Enter password and waiting for connect to the Wi-Fi you select.(The WIFI name and password cannot contain special symbols, otherwise the WIFI cannot be connected normally)
c) Check the current connected Wi-Fi status.(pay attention to IP address)

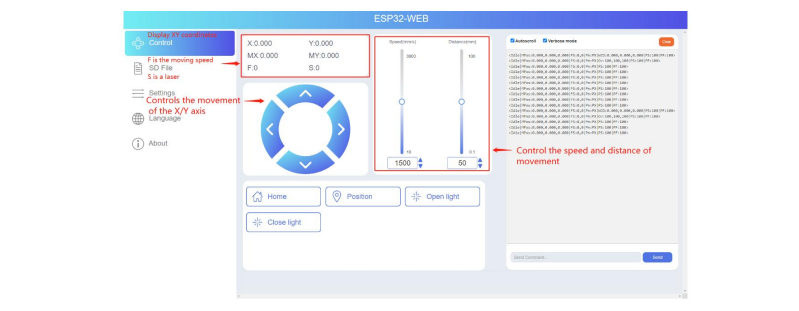
f) Enter the IP address in the browser of mobile phone or computer, then the control interface will pop up.
g) Click SD File tag, it will change to SD file page.
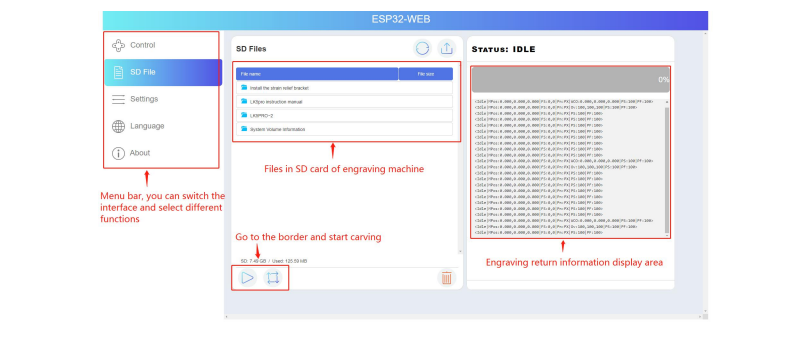
h) Upload “.gcode/.nc” files generated by “LaserGRBL” or “LightBurn” software(The two software are introduced in the following sections). Then go and play!
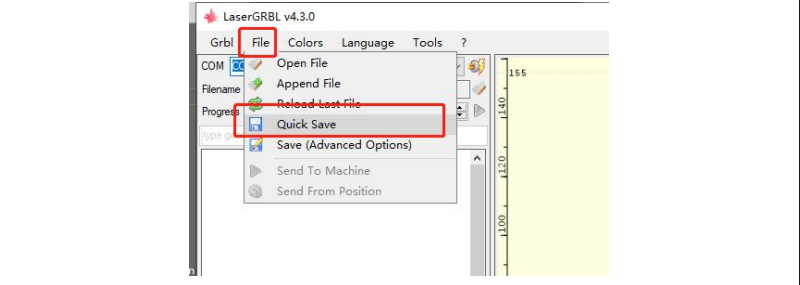
¶ 1.2.2 Operation of the laserGRBL software
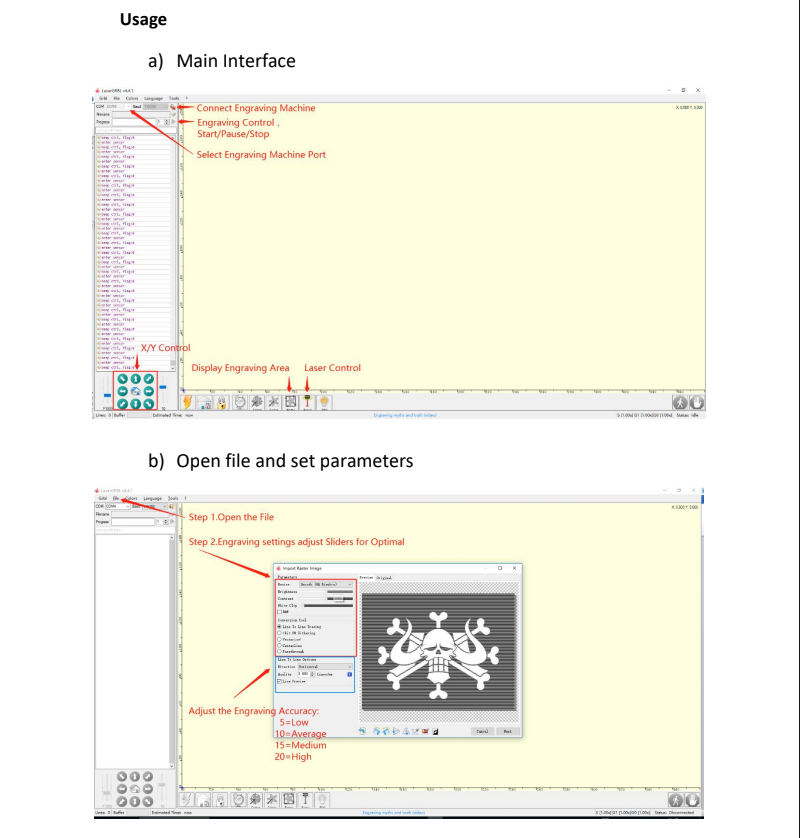
LaserGRBL is an easy-to-use and fully free software for laser engraver only running on Windows. Setup
a) Find LaserGRBL software in attached SD card(path:/software), Or download from the link:
https://lasergrbl.com/download/
b) After installing laserGRBL, power up the RAY5, press the power switch button, and connect the laser engraver and computer via USB cable.
c) Open LaserGRBL, select correct port(depend on your PC), baud rate: 115200. Then click connect button.(If you cannot find correct port, please install CH340 driver manually by click Menu >> Tools >> Install CH340 Driver in LaserGRBL)
More help information about LaserGRBL, please refer to the link:
https://lasergrbl.com/usage/
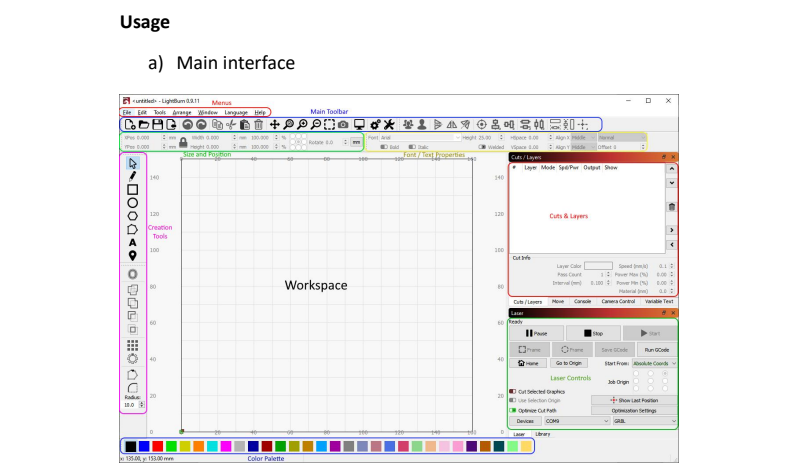
¶ 1.2.3 Operation of the LightBurn software
LightBurn is a professional software for engraver, a charging software running on Windows, macOS, and Linux. It provides a trial period. You could pay for it afterward if you like it. Setup
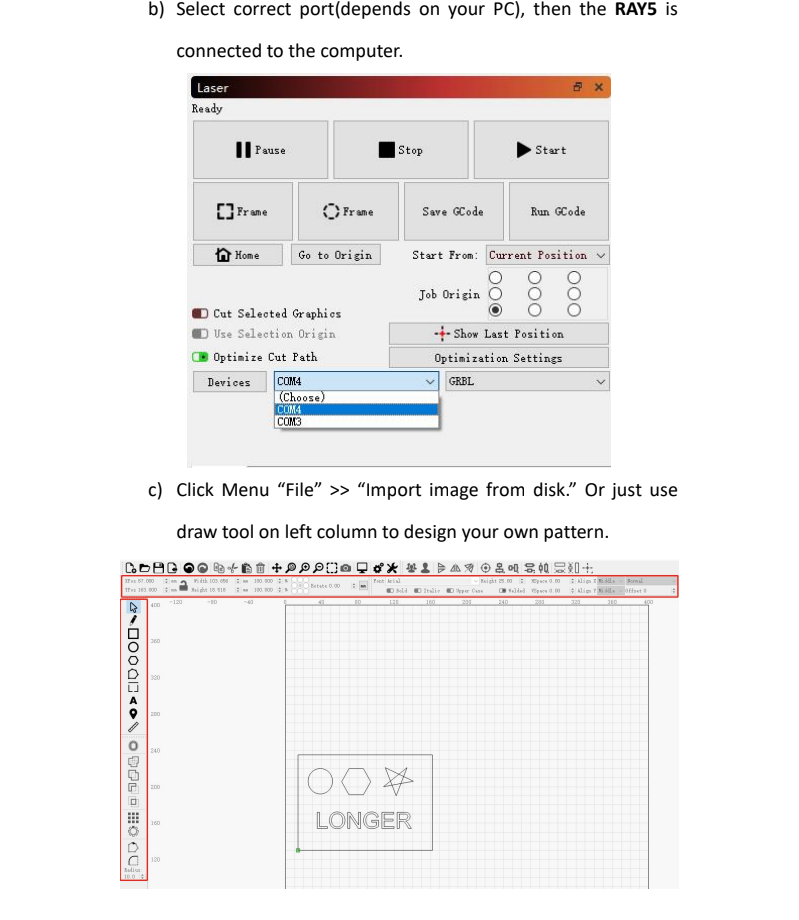
a) Find LightBurn software in SD card(path: /software) came with the package. Or just download from the link: https://lightburnsoftware.com/download/
b) After installing LightBurn, power up the RAY5, press the Power Switch button, and connect the laser engraver and computer via USB cable.
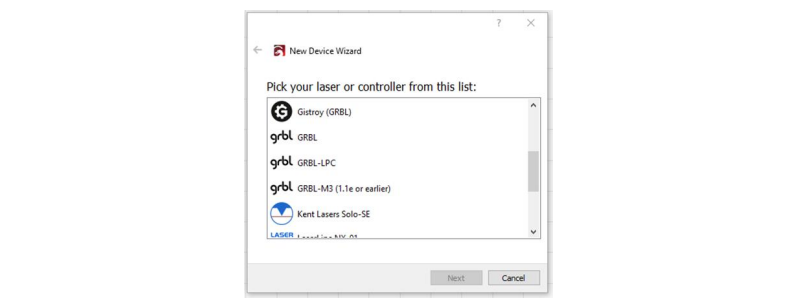
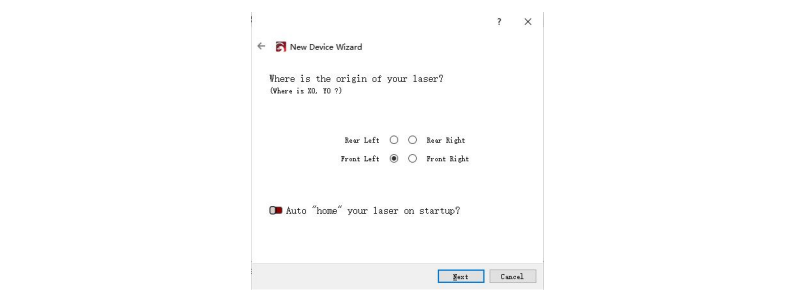
c) For the first time launching LightBurn, it will prompt a “New Device Wizard” for help you setup machine.
d) Select GRBL form the list, then click “Next” button
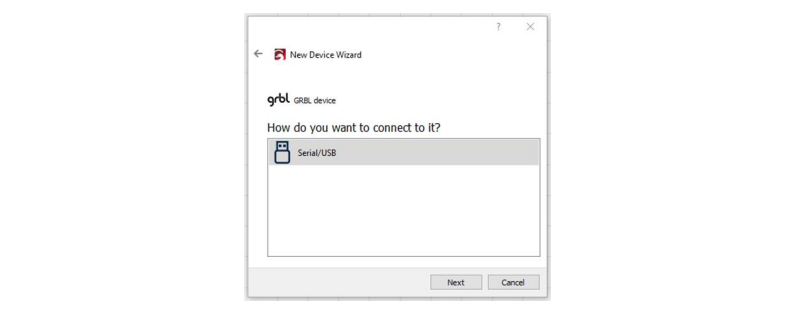
e) Select Serial/USB and press “Next” button.
f) Fill your Device Name, X, Y axis, then click “Enter” button
Name: RAY5
X = 400
Y = 400
g) Select “Front Left” as your Origin X,Y and deactivate “Auto ‘Home’”, then click “Next” button.
h) Select RAY5 and press Make Default. Your RAY5 is ready to be used in LightBurn software.

More help information about LightBurn, please refer to the link:
https://lightburnsoftware.com/pages/tutorials
¶ 1.2.4 APP Operation
RAY5 can be controlled or engraved through MKSLaser APP when the engraver and APP are connected to the same WIFI. Please refer to page 20 about the operation of connecting the engraver to WIFI.
a) How to download the MKSLaser APP
Please search for "MKSLaser" in Google play or app store or visit the address below to download Android system
https://play.google.com/store/apps/details?id=makerbase.com.mkslaser
Please search for "MKSLaser" in the app store or visit the addressbelow to download
https://apps.apple.com/us/app/mkslaser/id1542756280?uo=4&at=11l6hc&app=itunes&ct=fndforApplesystem
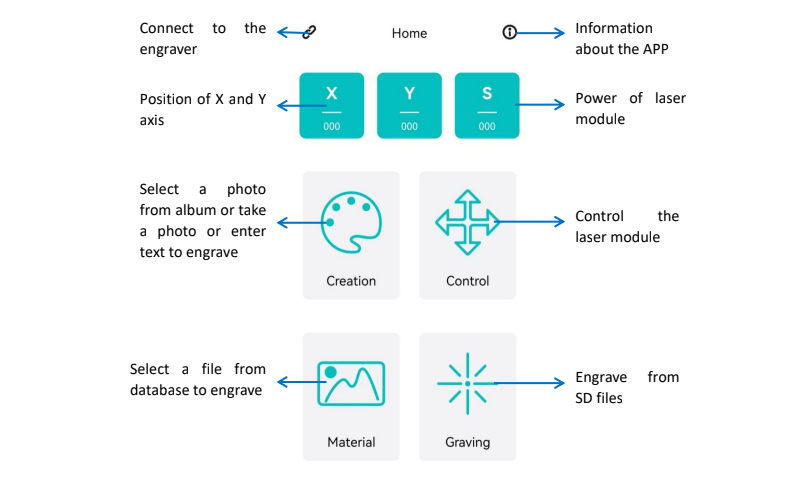
b) Home page about the APP
c) Connect APP to WIFI
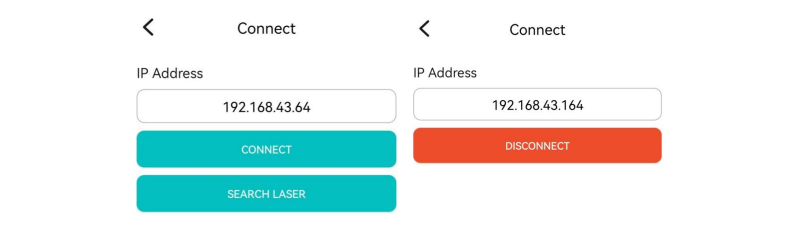
When the RAY5 engraver is connected to wifi, we will get an IP address, click the connect button in the upper left corner of the APP, enter the IP address, and click CONNECT.
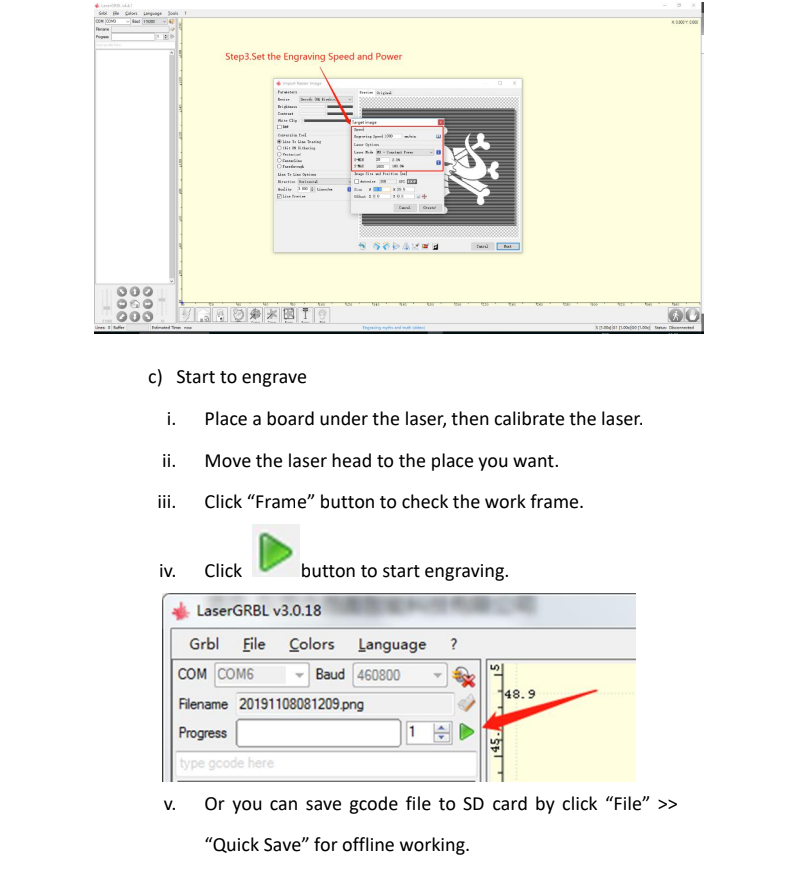
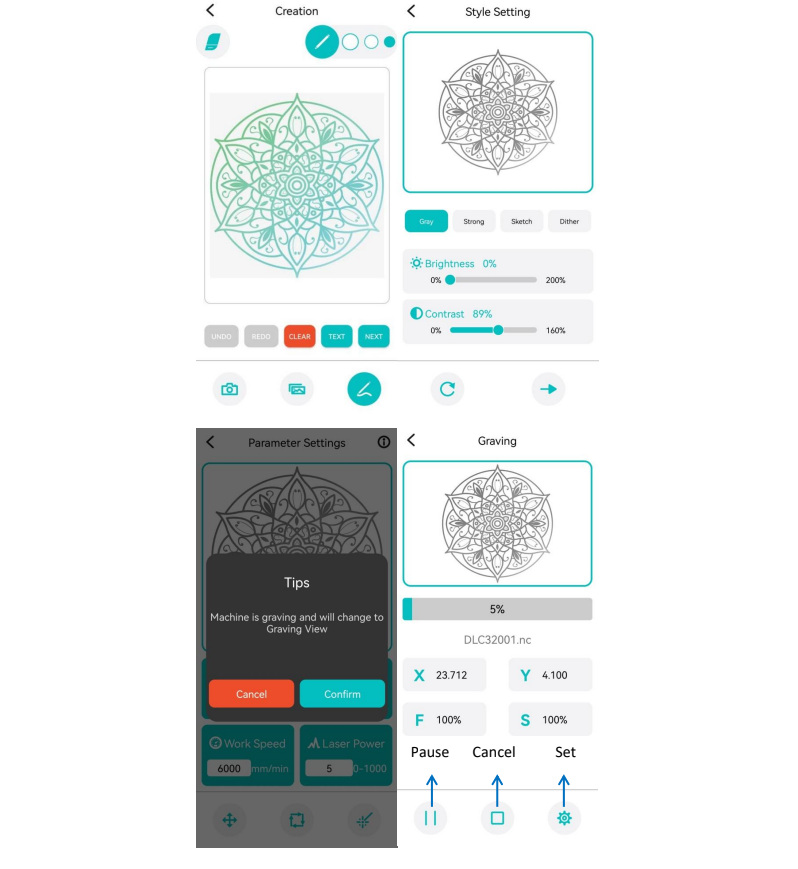
d) Enter text or take a photo to engrave
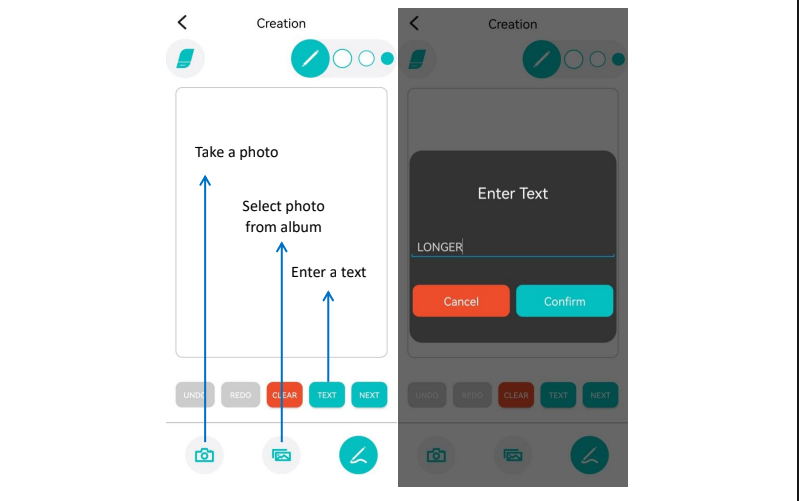
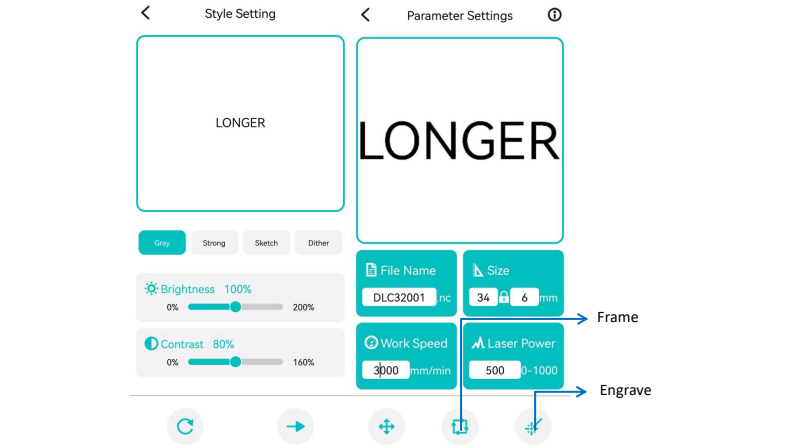
Click Creation, choose free drawing or input text, click Next, adjust the brightness and contrast, click Next, set the size, engraving speed, laser power (such as input 1000 for 100% power, and so on), click Frame to confirm the engraving range, click Engrave for working. For picture, it can click Creation, choose camera or album to take or select a photo, click Next, adjust the brightness and contrast, click Next, set the size, engraving speed, laser power (such as input 1000
for 100% power, and so on), click Frame to confirm the engraving range, click Engrave for working. After engraving, click Confirm to enter the Graving View to check the engraving progress, adjust parameters, pause or cancel the engraving process.
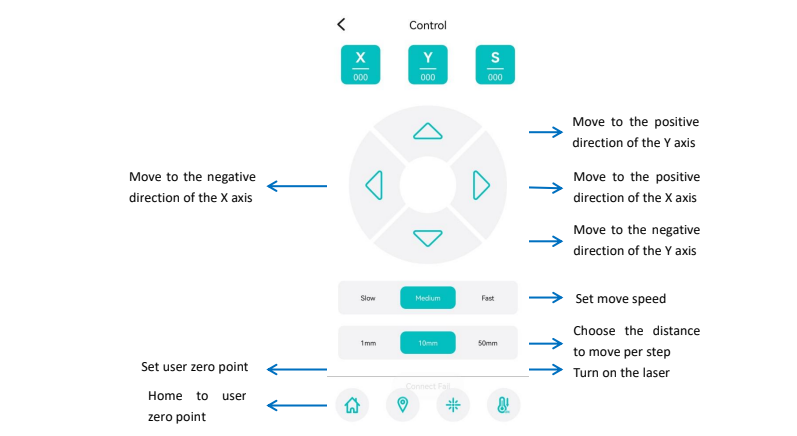
e) Control the engraver from APP
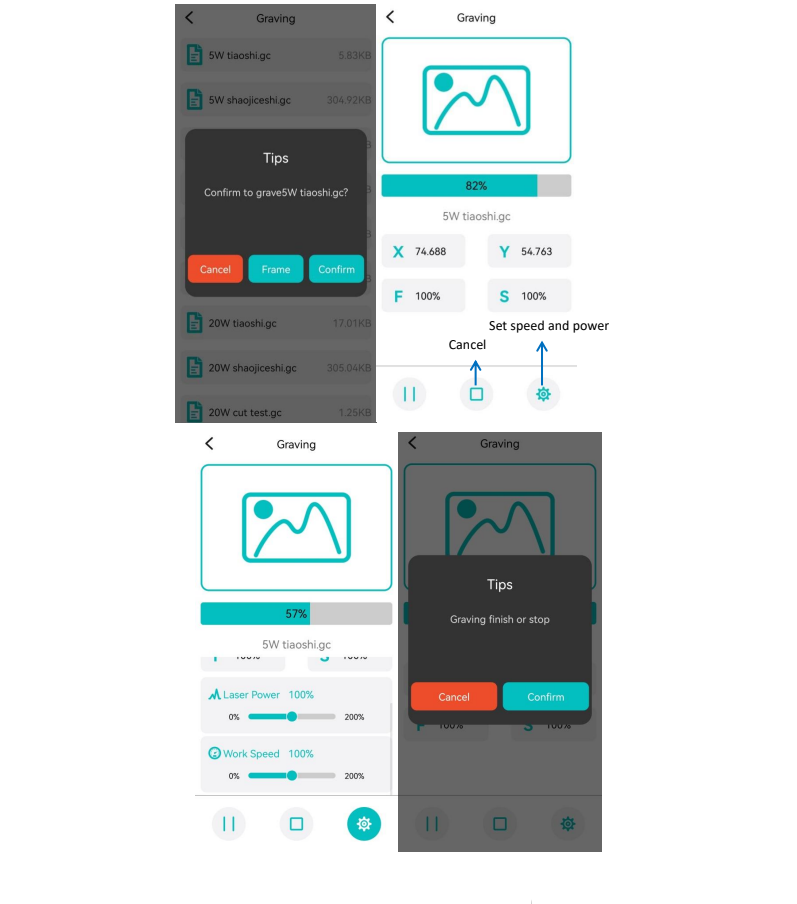
e) Engrave from SD files
Click Graving on the home UI, the APP will read the engraving file in the SD card, select the engraving file, click Frame to determine the engraving range, and click Confirm to start engraving.
In the Graving View UI, it can check the engraving progress, adjust speed and laser power, pause or cancel the engraving process. Note: To use APP for engraving, it needs to insert the SD card into
the motherboard firstly to ensure that the data can be received normally; otherwise it will prompt upload error.
¶ 2. Laser Engraver Features
In the Laser Engraver Features section, you can find detailed guides related to various features available on the Laser RAY5 10W Laser Engraver.
¶ 2.1 Laser RAY5 10W Touch Screen Instructions
¶ 2.2 Download of network firmware
Download of network firmware(Without limit switch)
¶ 2.3 Upgrade firmware
Upgrade firmware(Firmware Upgrade Tutorial)
¶ 3. Operation Guide
¶ 4. Troubleshooting & Solutions
In the Troubleshooting & Solutions section, you can find guides related to the RAY5 10W Series where potential issues are listed with solutions on how to solve them.
¶ 4.1 Troubleshooting
¶ 4.1.1 How to fix the problem of laser module
The failures of laser head engraving mark is shallow, the power is insufficient or the laser does not emit light may be due to incorrect focus, mismatch of parameters and materials, damage of laser driver board, laser module or motherboard, etc. Please refer to the following steps to check.
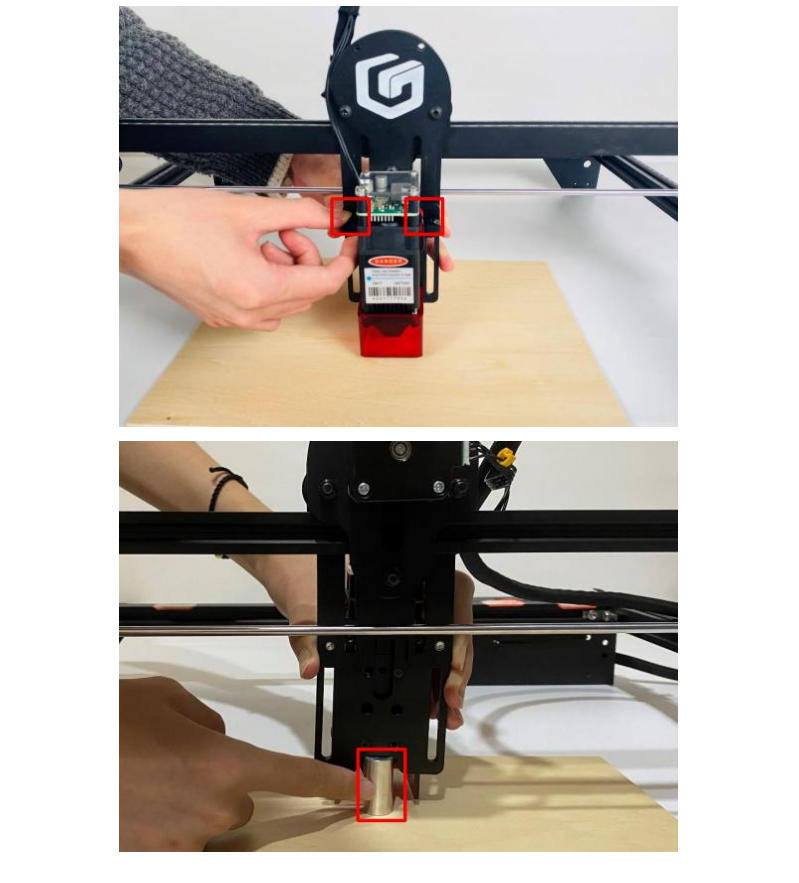
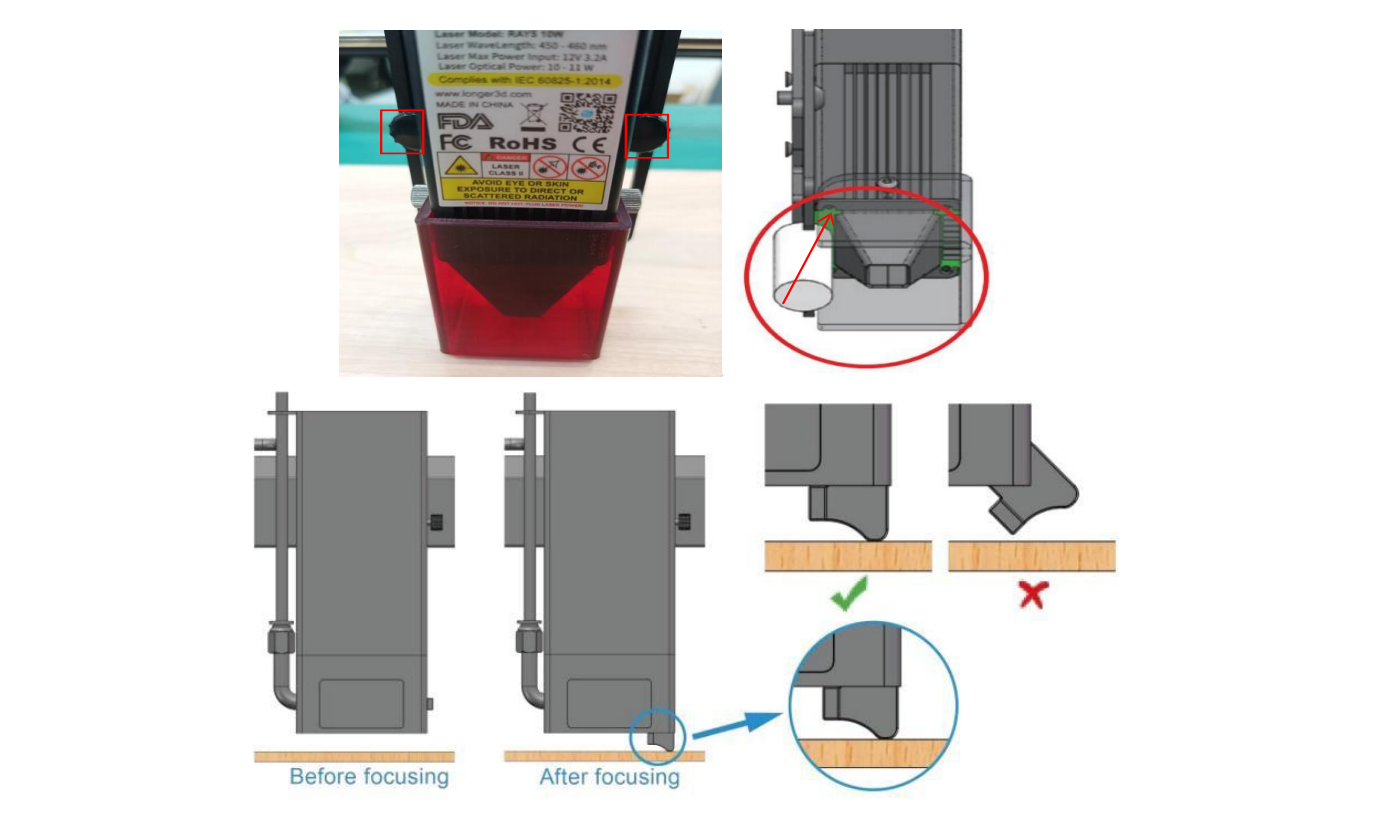
- First make sure the focus is correct.
The focal length of the 5w laser is 30mm, and the focal length of the 10w laser is 50mm. Loosen the thumb screw to allow the laser module to move up and down freely. For RAY5 5W or 10W module, when adjusting the focus, note that the end face of the focus column should be in contact with the bottom surface of the laser head profile as shown below, rather than the end face of the sheet metal.
- Check if the S value in LightBurn
That is click LightBurn-Edit-Device Setting and check whether the S-value MAX is 1000.

- Check the parameters
To check whether the engraving parameters are correct, please refer to the link of the parameter table:
For RAY5 5W or 10W laser module please refer to:
https://drive.google.com/file/d/1MpcLi34TjIQvJSA73h3Cbu-gVLvouWY-/view?usp=drive_link
For RAY5 20W, B1 20W or B1 30W laser module please refer to
https://drive.google.com/file/d/1EoaRusoPqQxd-5Zx1dlMNw9ieiDAW6kt/view?usp=drive_link
For B1 40W laser module please refer to
https://drive.google.com/file/d/1Z3lnyAcVIQe8Y_HeTF9YAbqI-EtH3eZX/view?usp=drive_link
Regarding parameter settings, it should be noted that the default speed unit is mm/min. If mm/s or inch/s is used as the unit, corresponding calculation conversions are required. Taking 1000mm/min as an example: 1000mm/min=10000÷60mm/s=16.67mm/s=10000÷25.4inch/min=39.37inch/min
inch/min For cutting thicker material, it needs to reduce the focal distance, that is, lowering the laser module a certain distance after normal focus adjustment. - Check the window mirror
Check whether the window mirror of the laser head is contaminated. If there is contamination, use a dust-free cloth dipped in alcohol to clean the lens or replace the window mirror directly.

5.Check the laser module
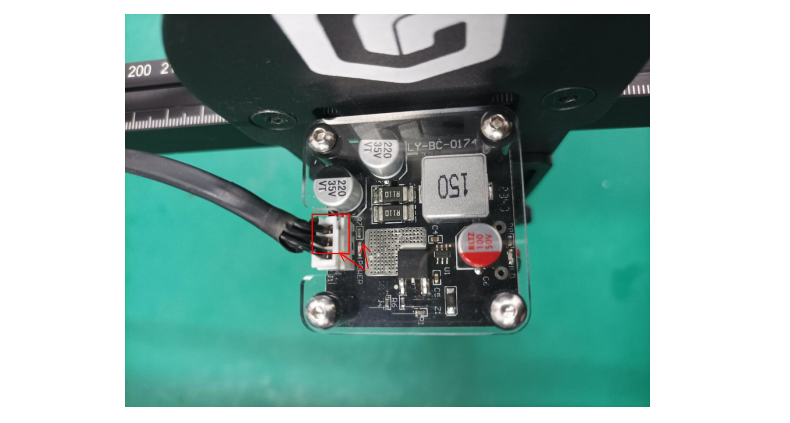
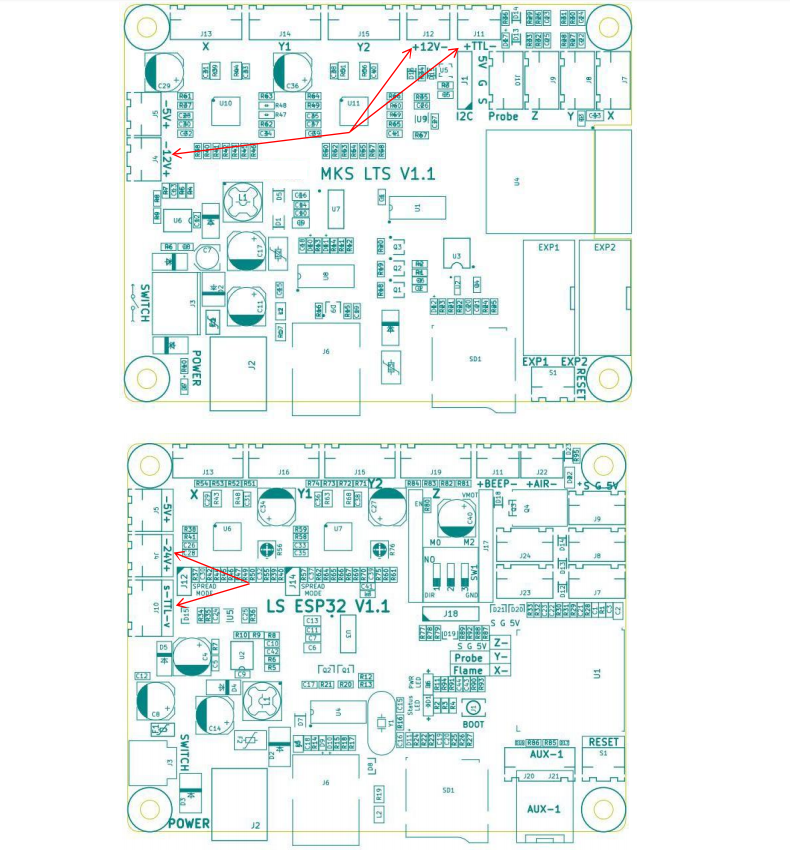
1)Connect the laser cable to the laser module, and turn on the engraver. Check if the indicator light shows red light, if there is no red light, turn off the engraver, check whether the wiring of the laser head and the main board wiring are loose (as shown by the red arrow,that are 12V and TTL terminals for RAY5 engravers, 24V and TTL terminals for B1 engravers).
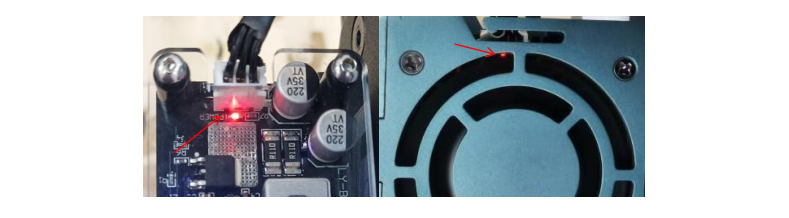
2)If during the engraving process, the main board of the laser module only lights up the red light but not the blue light, the driver board is damaged and which needs to be replaced.
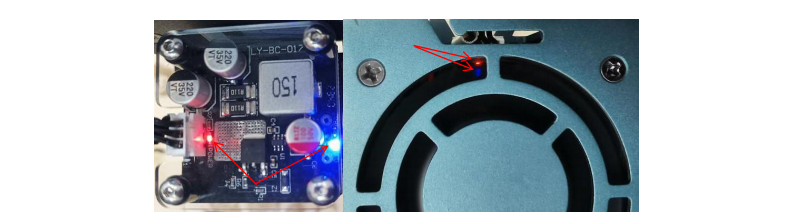
3)If during engraving process, the red and blue lights are on and there is no blue laser or no engraving marks, it means that the diode of the laser head is damaged. Contact after-sales service support@longer.net and provide the screenshot of order number.
Note: When checking and using laser engraver, please wear protective goggles and avoid pointing the laser module directly at the body, and someone must be on duty when engraver is working to avoid accidents.
¶ 4.1.2:The engraver automatically home when turned on
Regarding the problem of home automatically, please connect the engraver to PC through a USB cable, run the LightBurn software, and turn off the Auto-home on startup option in the Edit-Device setting.
¶ 4.1.3 The laser module does not emit laser when framing
If the laser module does not emit light during edge scanning, it may be due to a settings issue, loose cables, or a damaged laser head. First, please check that the laser head cable is properly connected. Run the LightBurn software, and in the Move interface, enter 2-5% power in the Power input box at the bottom right corner. Click Edit - Device setting, enable the Enable laser fire button and Laser on when framing options. At this time, clicking frame will make the laser module emit low-power blue light. If you only enable the Enable laser fire button, you need to hold down the shift key on your keyboard and then click the frame button. If the settings are correct but there is still no light, please refer to the link to check the status of the laser head, and provide a video or image along with an order screenshot to customer service for further confirmation of the specific reason. https://drive.google.com/file/d/1APoRRcN-9wpSOho-4dFvCtrzZIPm9x5L/view?usp=drive_link
¶ 4.1.4 The flame protection or alarm 3 is triggered
The flame sensor can be easily triggered. When the flame sensor is triggered, the LightBurn console will display an alarm 3. This may be due to ignition during use, strong light exposure, settings issues, short circuit, or damage. Please refer to the following settings for inspection: Avoid open flames during the engraving process. If an open flame occurs, please reduce the laser power. Place the engraving machine in a normal indoor environment, avoiding direct exposure to strong lights such as flashlights or sunlight. Adjust the flame trigger threshold. First, run the LightBurn or LaserGrbl software, connect the engraving machine to the PC via USB, and enter $42=1300 in the control command panel and press Enter to lower the trigger threshold. If it still triggers, you can continue to reduce the $42 threshold and send it. If the flame sensor is triggered at the start of engraving, it may be due to a short circuit between the sensor’s metal pins and the metal casing. Please manually adjust the position of the flame sensor behind the control box to prevent contact between the metal pins and the casing (the flame sensor is a black cylindrical probe located at the back of the RAY5 control box); if ineffective, you can send the
command $38=0 in the LightBurn or LaserGrbl console to disable the flame sensor function (to 30 enable it again, send the command $38=1)
¶ 4.1.5 The movement protection is triggered
The motion sensor may be triggered due to machine movement during use, settings issues, or sensor damage. Please refer to the following settings for inspection: Check that the engraving machine is placed on a stable surface to avoid movement during operation. Adjust the motion sensor trigger threshold. First, run the LightBurn or LaserGrbl software, connect the engraving machine to the PC via USB, and enter and send the commands $40=200 and $41=40 in the control command panel to lower the sensor trigger threshold. If the motion sensor is continuously triggered at the start of engraving, it may be due to sensor damage. You can send the command $39=0 in the LightBurn or LaserGrbl console to disable the motion sensor function (to enable it again, send the command $39=1)
¶ 4.1.6 Found that the laser skipped some areas during engraving and cutting.
Please check if the machine is installed correctly:
Adjust the eccentric nuts to ensure that all parts move smoothly without obstruction.
Retighten the timing belt.
Adjust the position of the timing pulleys to prevent friction between the timing belt and the pulleys. Check if the X-axis timing pulley, Y-axis coupling, and timing pulley screws are loose.
Ensure that the upper and lower timing belts are aligned.”
¶ 4.1.7 I cannot open all the information on the TF card.
This may be caused by an incompatible file format or missing device drivers. Insert the USB drive into the computer to check if the SD card is recognized. If it is not recognized, use a formatting tool to format the Micro SD card. The SD card format should be FAT32 with a 4096-byte allocation unit size, and then reload the files. Formattingtoollink:https://drive.google.com/drive/folders/1TgCT1CBsjI4-7prSu1nEUXxQ6vhsJz ms?usp=drive_link
¶ 4.1.8 LightBurn will continuously send the code 'ad:??', where the question marks represent what seems to be a random number between 35 and 45.LightBurn

The error 'AD' requires restarting the machine and reconnecting the flame sensor. Disconnect the cables at positions Y and Z on the control box corresponding to the motherboard“
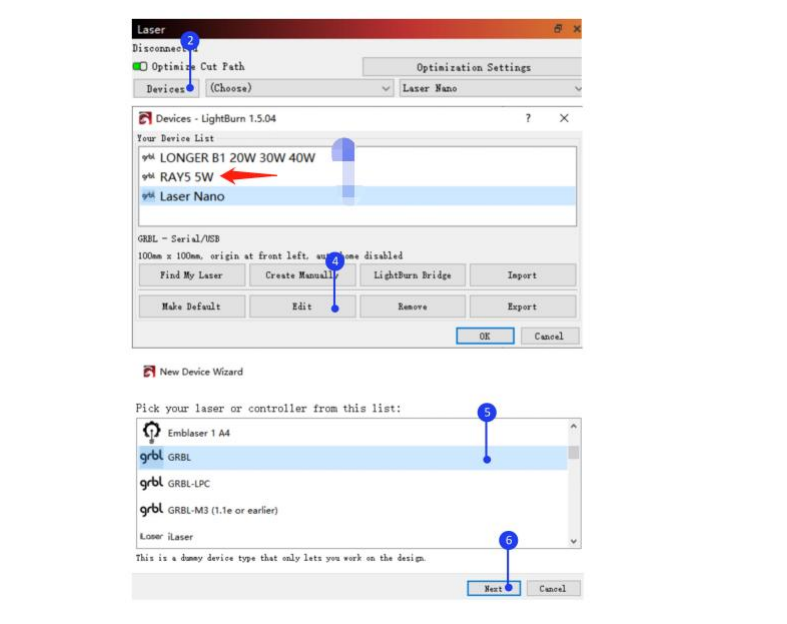
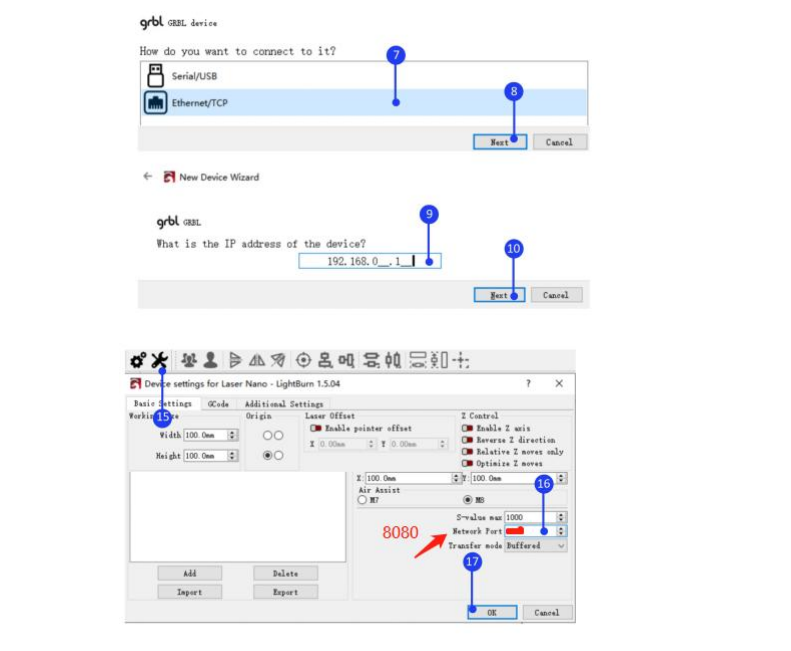
¶ 4.1.9 How to connect to Wi-Fi using LightBurn
Method to connect to Wi-Fi using LightBurn. RAY5 connects to Wi-Fi via the touchscreen to obtain the IP address (the engraving machine and computer should be connected to the same Wi-Fi). Click on Device Settings to change the network port to 8080, then go to Devices - select the device - 32 Edit - Ethernet/TCP - and enter the IP address.
¶ 4.2 Remote diagnosis
¶ 4.2.1 How to create a new work order?
¶ 4.2.2 How to upload the log files of the engraving machine to the existing work order?
¶ 4.2.3 Export logs
¶ 5. Maintenance Guide
In this section, you can find the recommended maintenance guidelines for the RAY5 10W series printers, which are designed to ensure smooth operation and a longer service life of the products.
¶ 5.1 Regular Maintenance Recommendation for RAY5 10W
¶ 6. Parts Replacement Guide
In this section, you can find a step-by-step guide which shows the process of disassembling and installing various parts of the RAY5 10W series engraving machine.
¶ 7. download
¶ 7.1 Product Manual
RAY5 5W 10W Beginner Tutorial
RAY5 10W - Material Profiles
¶ 7.2 Quick Start Guide
RAY5 Quick Start Guide
Ray5 Quick Install Limit Switch Instructions
RAY5 10W Laser Focusing Guide
¶ 7.3 Firmware
RAY5-FW-Firmware
RAY5 Firmware Upgrading Guide
¶ 7.4 Software
RAY5- lightburn
RAY5 -laserGRBL
RAY5- WIFI APP for googleplay
RAY5- WIFI APP for appstore
¶ 7.5 Accessories File
RAY5- touch screen black screen
Laser Engraver Camera Installation
RAY5 XY extension pole installation instructions
RAY5 Y-axis extension axis instruction manual
RAY5 Air Pump Instruction Manual
LONGER RAY5 Rotary Roller Quick Start Guide V2
RAY5 Laser Engraver Enclosure Installation Guide
Quick Install Limit Switch Instructions
RAY5 new 20W laser module upgrade kit installation video
Engraving machine camera manual
Laser module lifting frame instruction manual
Instructions for use of roller stand
RAY5 10W Air Assist Kit Unboxing
RAY5 10W Laser Module Unboxing