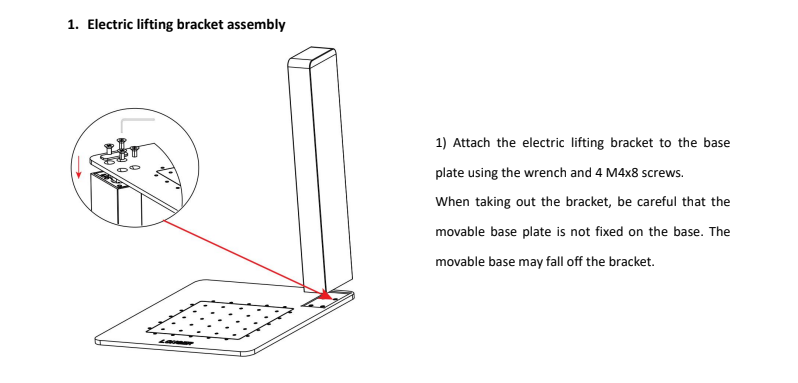
¶ 1. Quick Start
¶ 1.1 Introduction to the Nano 6w
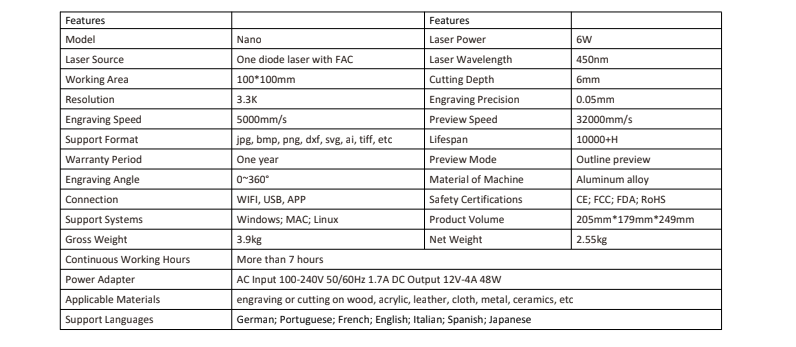
¶ 1.1.1 Product Specification
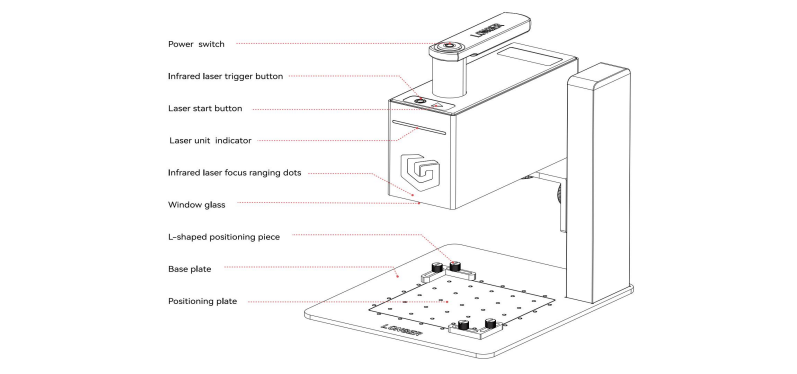
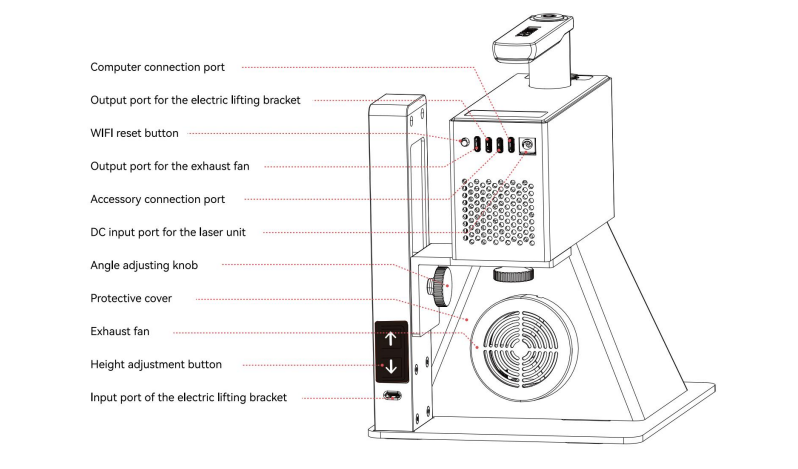
¶ 1.1.2 Introduction to Nano 6w
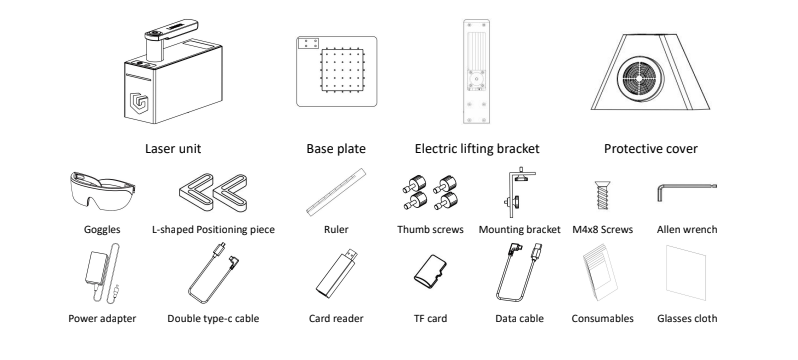
¶ 1.1.3 Supplementary instructions for accessories in the box
¶ 1.1.4 Quick Start Guide


¶ 1.1.5 Nano 6w Series FAQ
Question 1 To connect the app via wifi, do you need to connect the nano and phone to your home wifi or can they just connect directly? Just like using the app off-site
Nano has two modes for connecting to WIFI, AP mode is to connect directly to the APP (but the phone has no network) or STA mode (that is, the phone and the engraving machine are connected to the same WIFI at the same time, and the phone has network)
Question 2 How to update the firmware
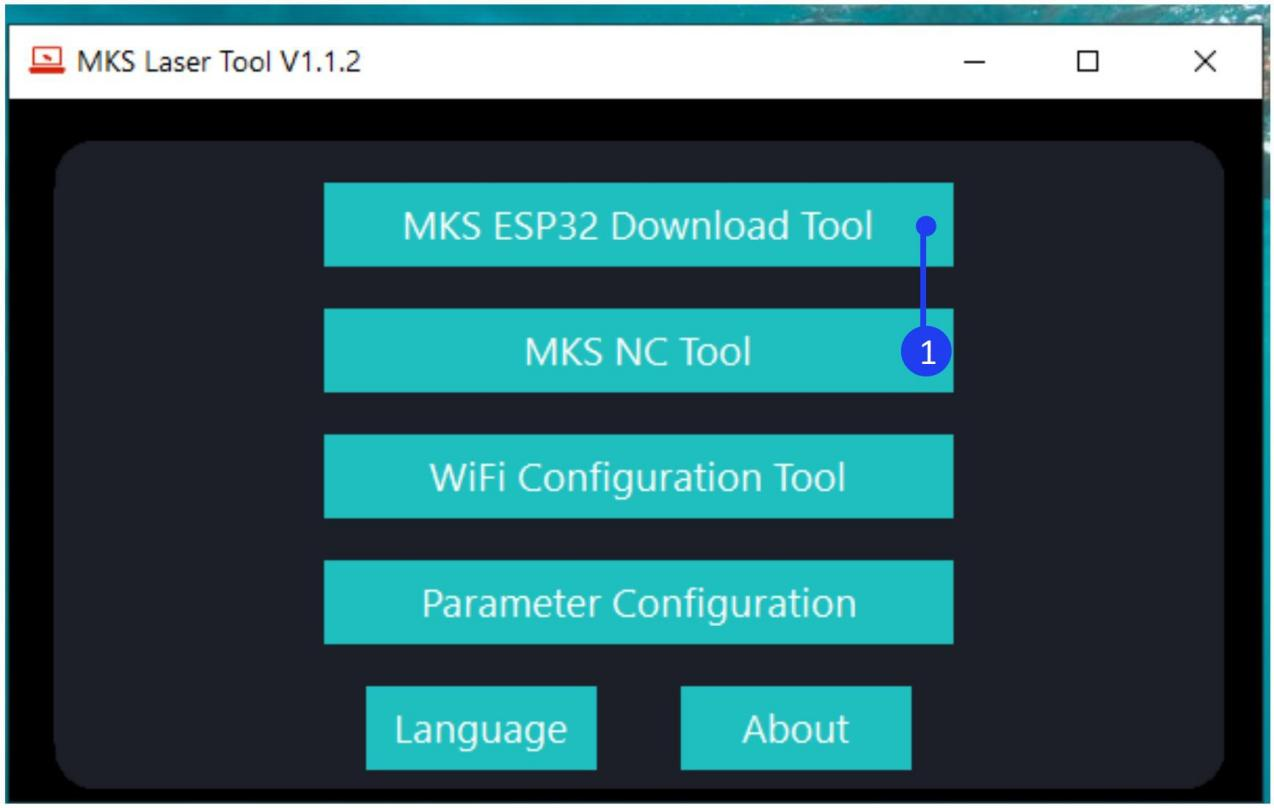
1)Update by MKSLaserTool software
Please install the MKSLaserTool software in the SD card software folder. Connect the laser engraver to computer with Type C cable, turn on the engraver.
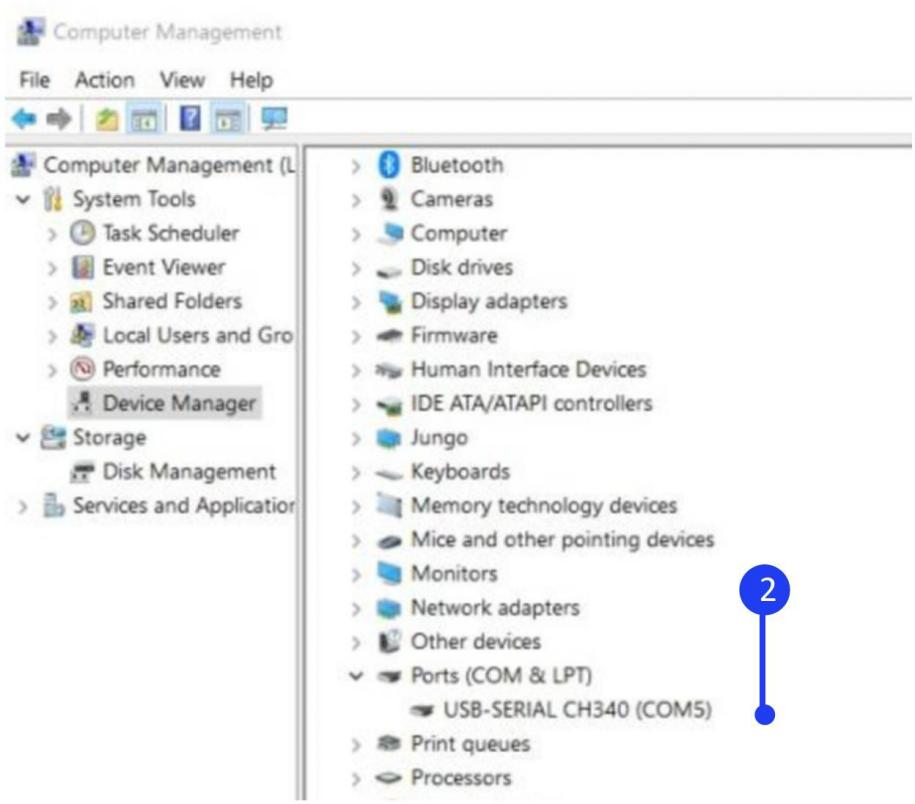
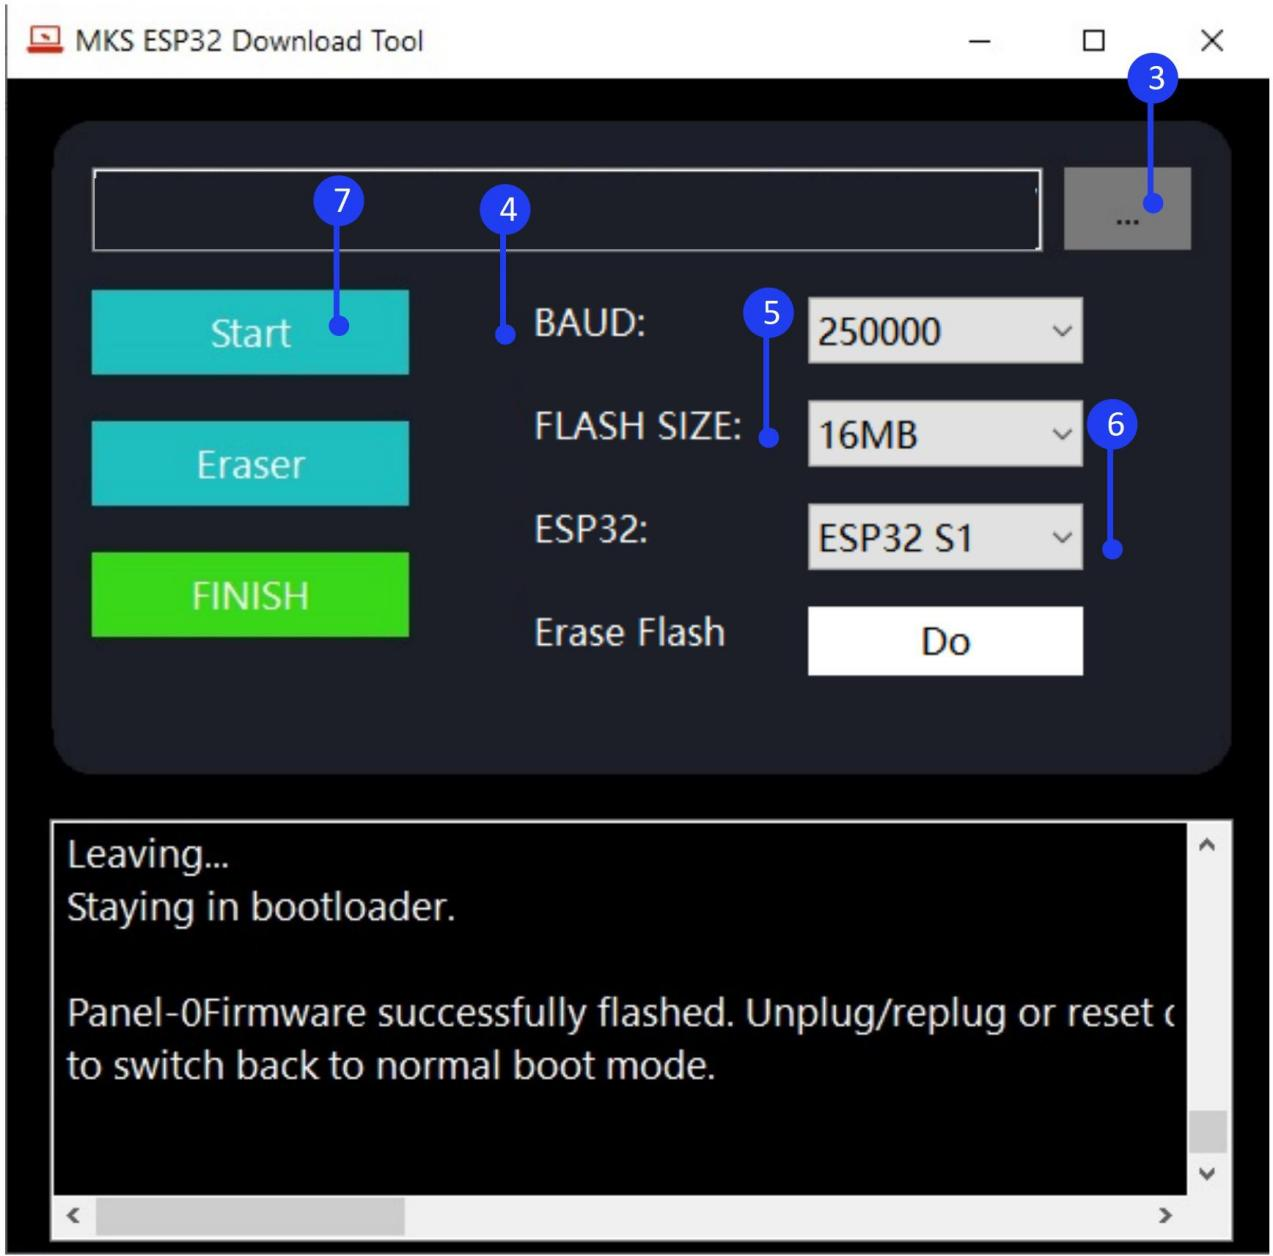
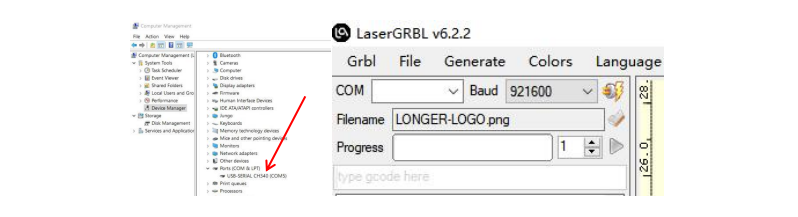
For Windows, right-click the computer and select Manage, click Device Manager, click to expand Ports, find the port corresponding to the CH340 driver. Run the MKSLaserTool and click MKS ESP32 Download Tool, select the right port which is corresponding to CH340 driver and the update firmware. Set baud to 25000, Flash size to 16MB, and select ESP32 S1, click Start, it will prompt firmware successfully flashed after the update is completed.
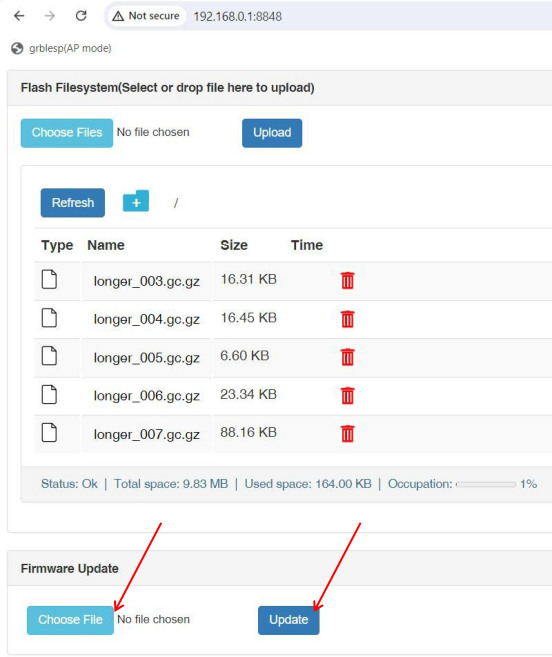
2)Update by Web
Search the WIFI network starting with LongerLaser_Nano and input password 12345678 to connect the WIFI of Nano, open the browser and enter 192.168.0.1:8848, click choose file to select firmware, and update the firmware.
Question 3 How to adjust the graphics position in LaserGRBL
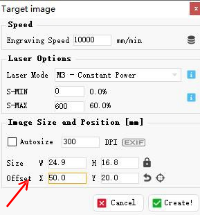
Click File > Open File to add the design to be engraved, adjust the offset of X and Y in the target image window to change the position of the graphics to make sure which is in the range of 100*100mm.
Question 4 How to transfer photos from PC to LaserBurn APP
1)Transfer photos from PC to phone
For iPhone: Connect iPhone using a USB-C cable, In the iTunes app on the PC , click the Devices button near the top left of the iTunes window
Click Photos. Select Sync Photos, then choose an album or folder from the pop-up menu.
For android: With a USB cable, connect your device to your computer. On your device, tap the "Charging this device via USB" notification. Under "Use USB for," select File Transfer. A file transfer window will open on your computer. Use it to drag files.
Add photos to LaserBurn APP

Run LaserBurn, click Creation > ALBUM to add photo from phone.
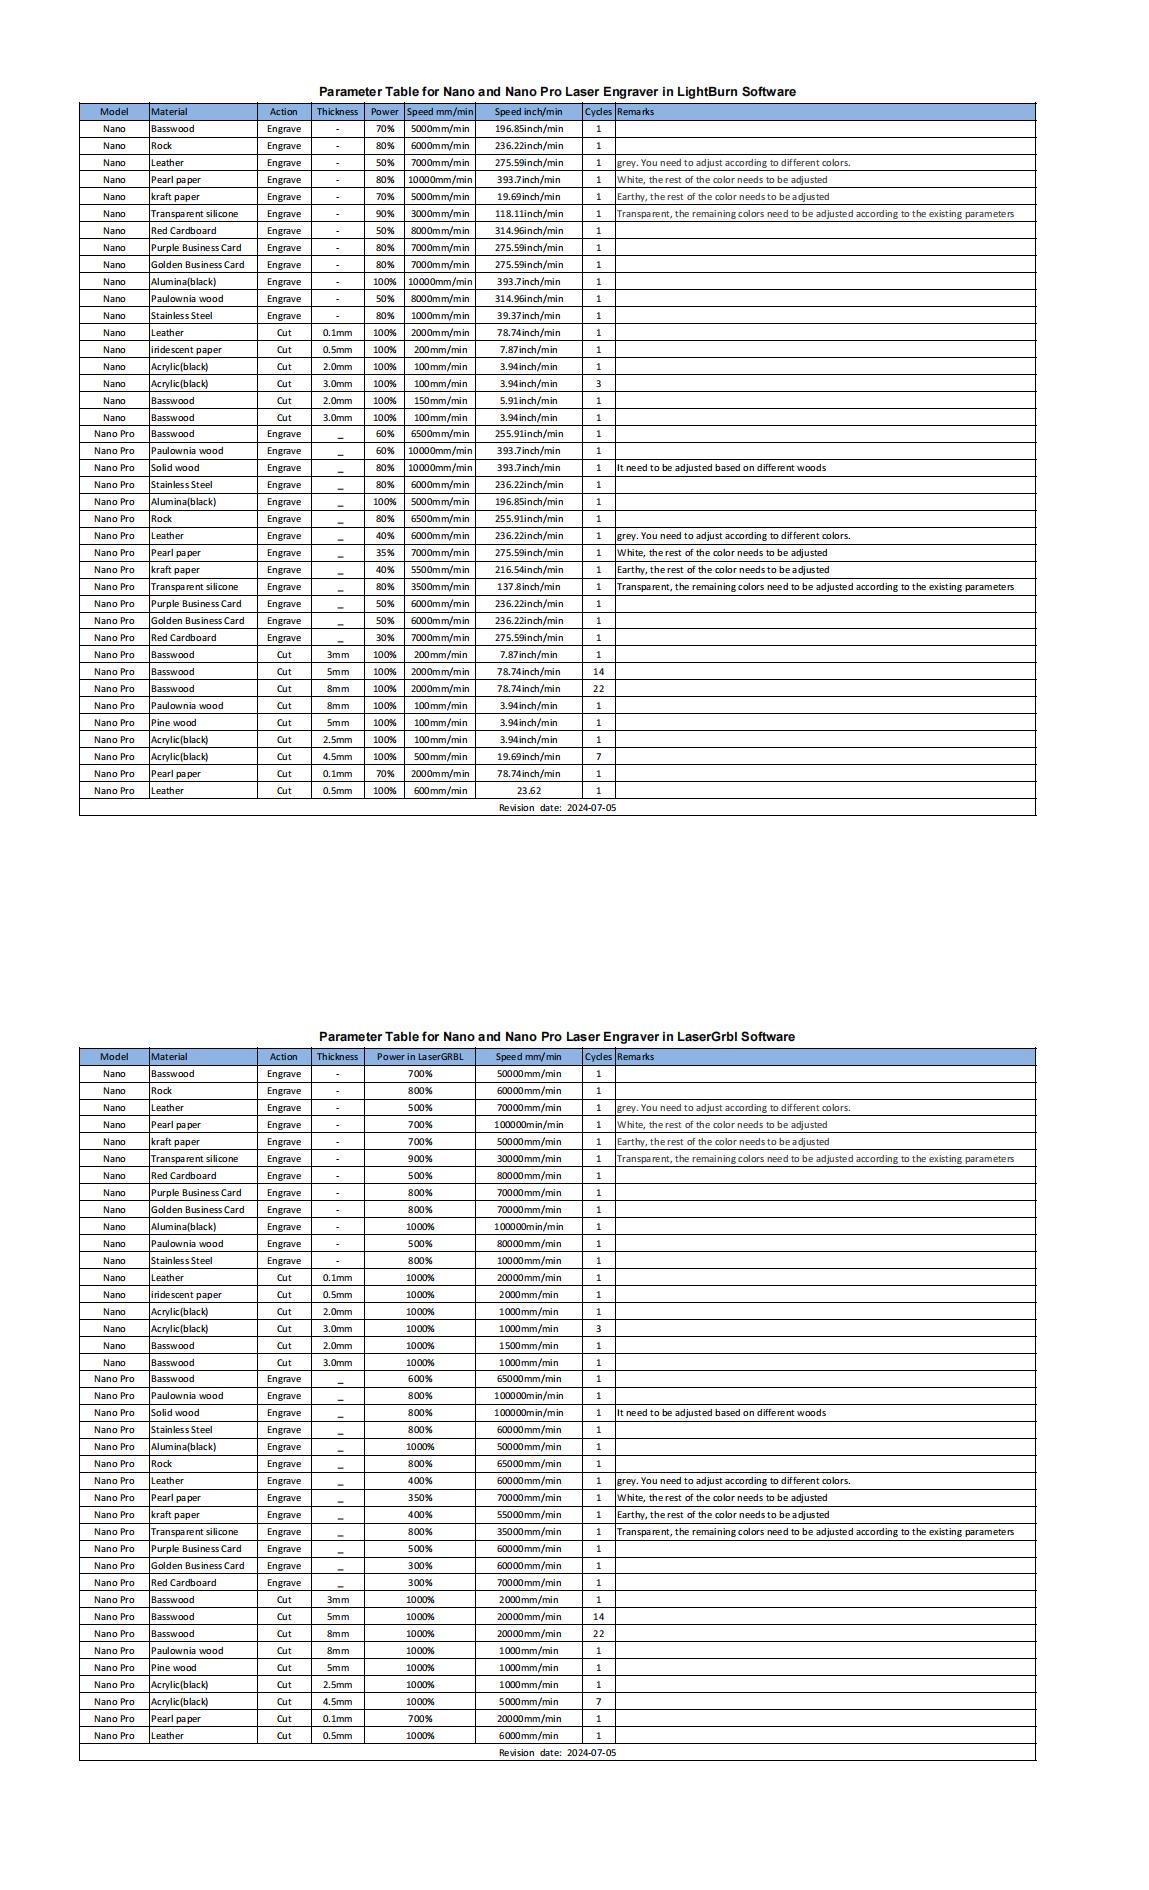
¶ 1.1.6 Parameter Table for Nano and Nano Pro Laser Engraver
¶ 1.2 Laser Engraver Setup
¶ 1.2.1 Machine Operation


¶ 1.2.2 Operation of the laserGRBL software
LaserGRBL is an easy-to-use and fully free software for laser engraver only running on Windows. Please save or back up data in time during use to avoid data loss, but LONGER is not responsible
for any data loss caused by third-party software.
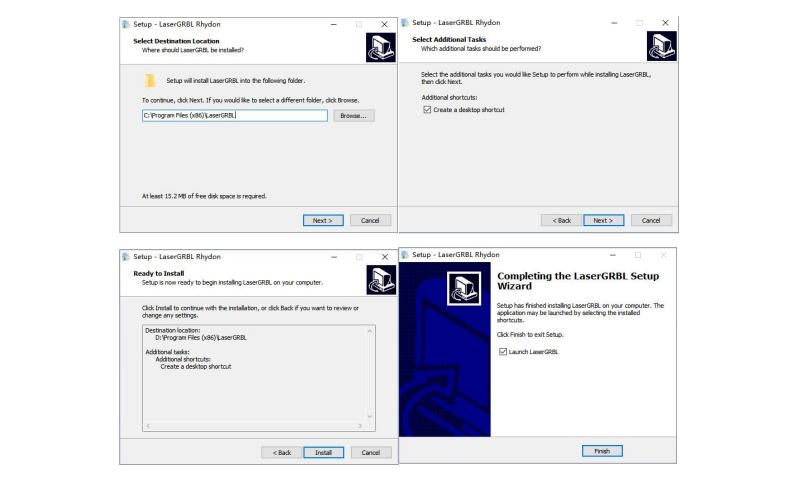
. Software Download and Installation
Double-click the LightBurn installation file in the software folder in the SD card or download it from the following link to install LaserGRBL,: https://lasergrbl.com/download/, click Next > Next >
Install > Finish.
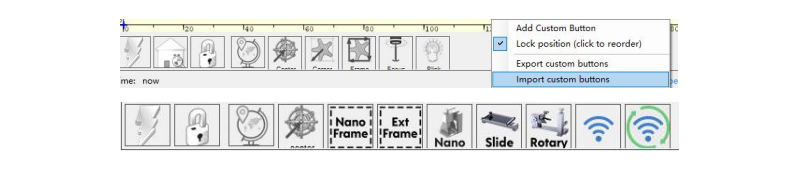
. Import configuration file
In order to meet the use of NANO in LaserGRBL, it must to import custom buttons. Right-click in the blank area at the bottom and select Import custom buttons, open nano.zbn file to import, click YES to confirm, then there are three new Nano, Slide, Rotary icons.
. Connect Nano to LaserGRBL
It needs connect the engraver to LaserGRBL software first. For Windows, it needs to right-click the computer and select Manage, click Device Manager, click to expand Ports (COM & LPT), find the port corresponding to the CH340 driver, and then select this port from the COM port list, set 961200 baud rate, click  to connect.
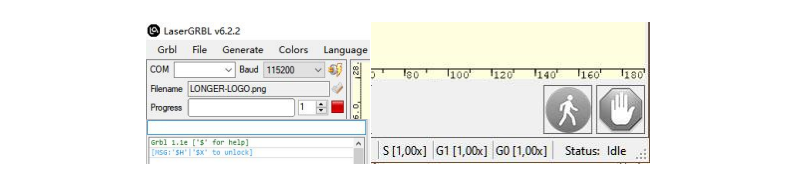
from the COM port list, set 961200 baud rate, click to connect. When connected to proper port grbl reply with “welcome message” showing Grbl firmware version. On the bottom-right of the LaserGRBL interface it shows“Status: Idle”
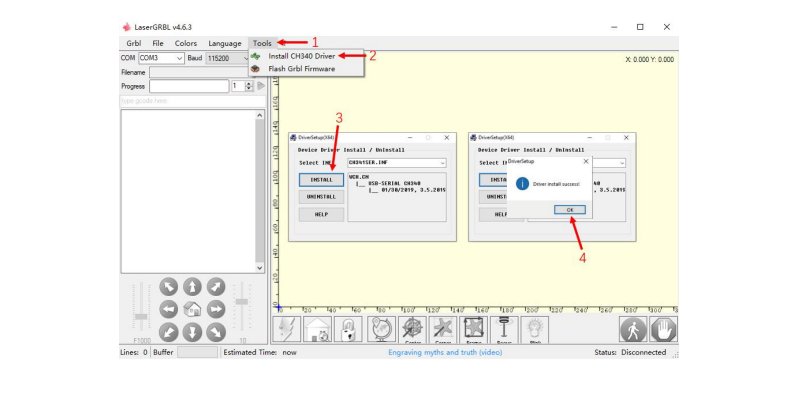
If no ports are listed in the drop-down, it means that no engravers were found, which could mean that it is not plugged in correctly, isn't powered, or the PC is missing a driver. Please click Tools menu to Install CH340 Driver from LaserGRBL software.
. The main window of LaserGRBL
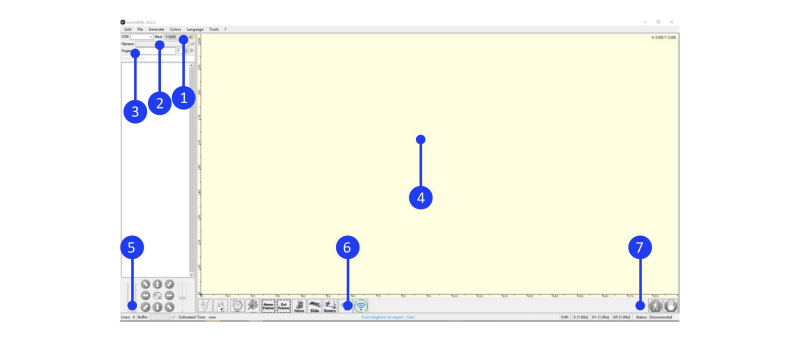
- Connection control: here you can select serial port and proper baud rate for connection.
- File control: this shows loaded filename and engraving process progress. The green “Play” button will start program execution.
- Manual commands: it can type any G-Code line here and press “enter”. Commands will be enqueued to command queue.
- Engraving preview: this area show final work preview. During engraving a small blue cross will show current laser position at runtime.
- Jogging control: allow manual positioning of the laser. The left vertical slider control movement speed, right slider control step size.
- Grbl reset/homing/unlock: this buttons submit soft-reset, homing and unlock command to grbl board. On the right of unlock button you can add some user defined buttons.
- Pause and resume: this buttons can suspend and resume program progress.
. Connect Nano to LaserGRBL by WIFI
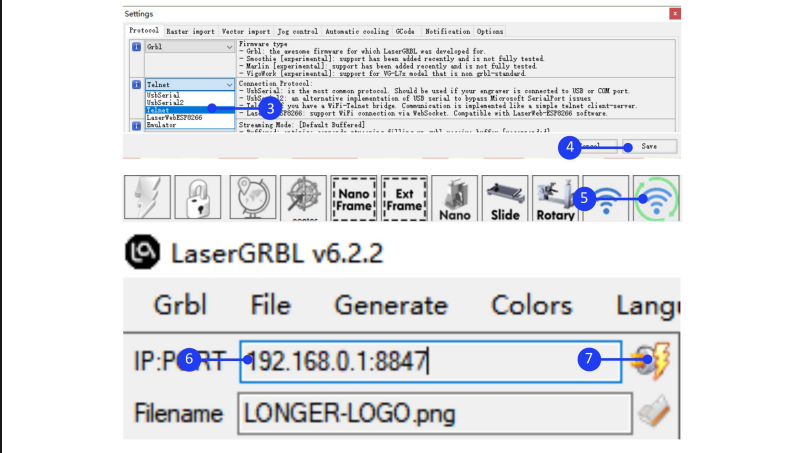
There are two modes: STA or AP to connect Nano to the LaserGRBL via wifi. The difference is that in AP mode, the computer has no network, while in STA mode, computer can maintain network. 1) Connect Nano to LaserGRBL by WIFI in AP mode Run the LaserGRBL, click Grbl > Settings, select Telnet in the
Connection Protocol and Save, click ‘WiFi reset’ in the bottom of the window to set WiFi to AP mode, connect the computer to the WiFi that starts with LongerLaser_Nano, input password 12345678,
input 192.168.0.1:8847 in IP:PORT, click to connect.

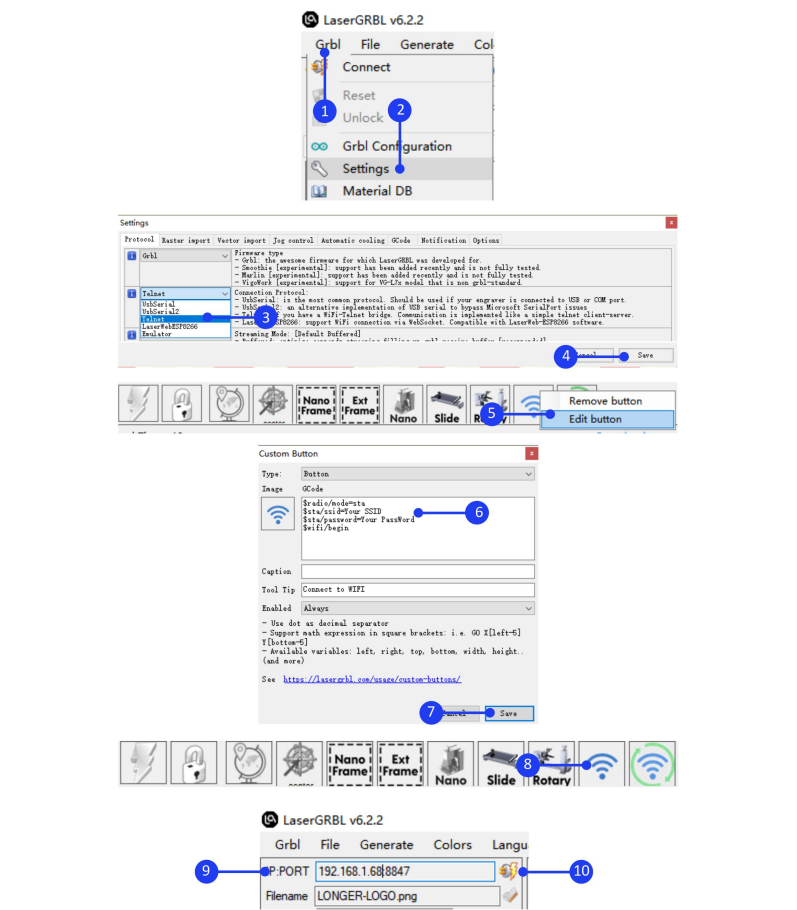
Connect Nano to LaserGRBL by WIFI in STA mode
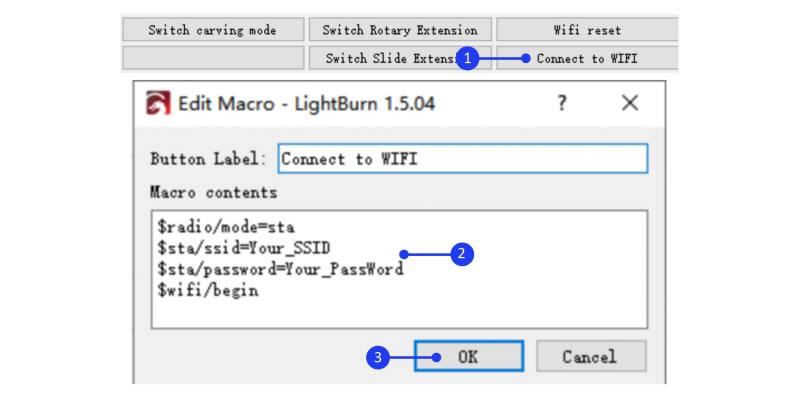
Run the LaserGRBL, click Grbl > Settings, select Telnet in the Connection Protocol and Save, right click ‘Connect to WiFi’ in the bottom of the window to change Your_SSID and Your_PassWord to your WIFI account and password in $sta/ssid and $sta/password command, click Save, left click ‘Connect to WIFI’ to change it to STA mode. After the connection is successful, the console prompts the the IP address. Please note that the computer network and WIFI must be in the same LAN (local area network). Input IP and port such as 192.168.1.68:8847 in IP:PORT, click to connect
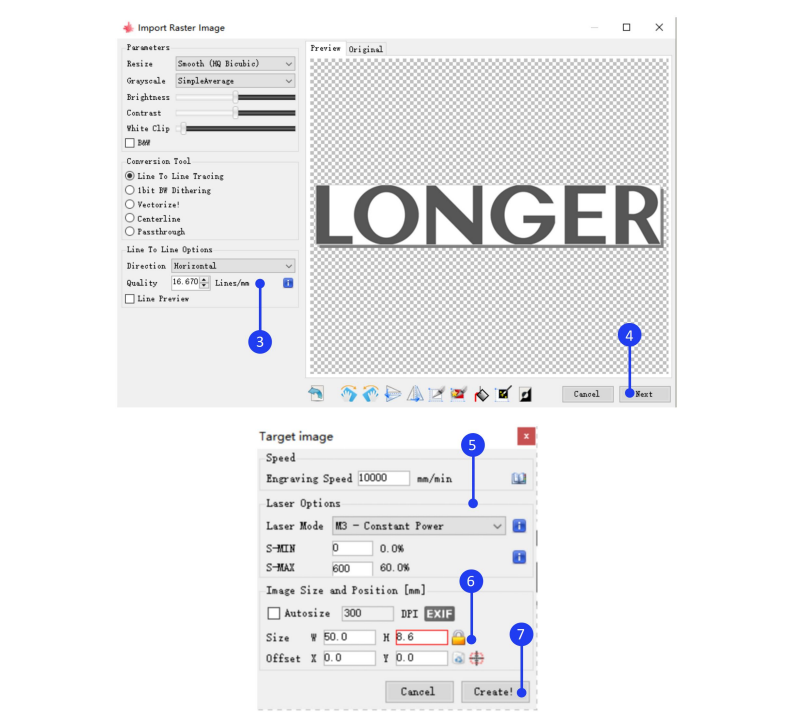
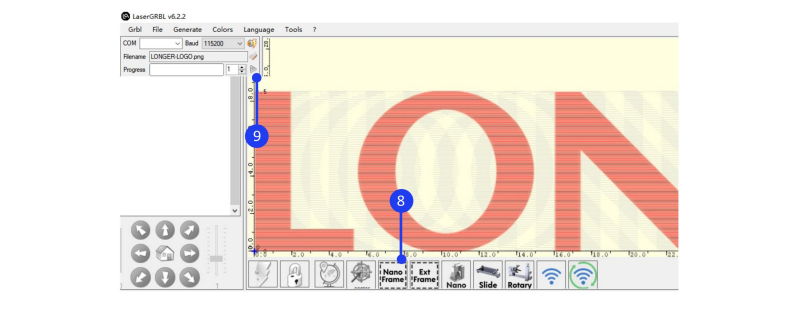
. How to make a project in the LaserGRBL

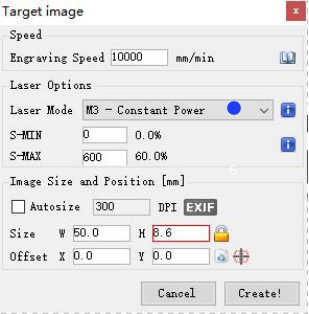
Click File > Open File to add the design to be engraved, set the Quality to 16.67Lines/mm (quality has only two values options, 11.11Lines/mm or 16.67Lines/mm. For those who require high precision, it can choose 11.11Lines/mm. For those who require high efficiency, it can choose 16.67Lines/mm), click Next, refer to the parameter table to set the appropriate engraving power S-MAX and speed. Please note that the laser mode should be selected as M3-Constant Power, and the value of S-MAX is 10 times the target laser power, such as when the laser power is 100%, S-MAX needs to be set to 1000%, if the laser power is 60%, it needs to be set to 600%. Then set the size of the image to scale the design. If the design position is outside the working range, it should set the XY axis offset to adjust the graphics position. After successfully importing the graphics and setting the parameters, it needs to set the focus of Nano, click Nano button, then click Frame button to determine the material placement, and finally click Start button to start engraving. For detailed LaserGRBL software operation, please refer to https://lasergrbl.com/usage/.
¶ 1.2.3 Operation of the lightburn software
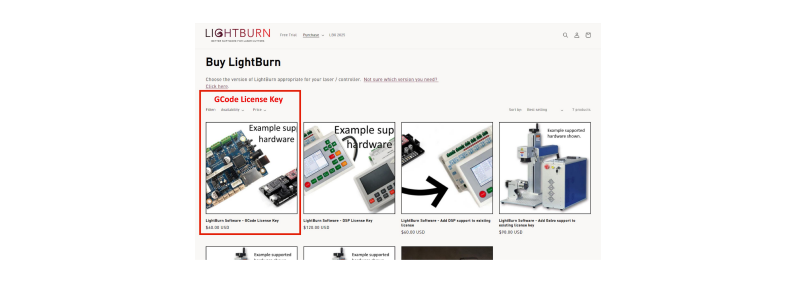
LightBurn is professional layout, editing, control and paid software for engraver, running on Windows, MacOS, and Linux. It provides a 30 days trial period. Please save or back up data in time during use to avoid data loss, but LONGER is not responsible for any data loss caused by third-party software. If the computer has previously installed the software or after 30-day free trial period, according to LightBurn's trial rules, it needs to purchase a license key to continue using it. To purchase a license and obtain a key code, please go tothe LightBurn online store and select "GCode License Key".
. Software Download and Installation
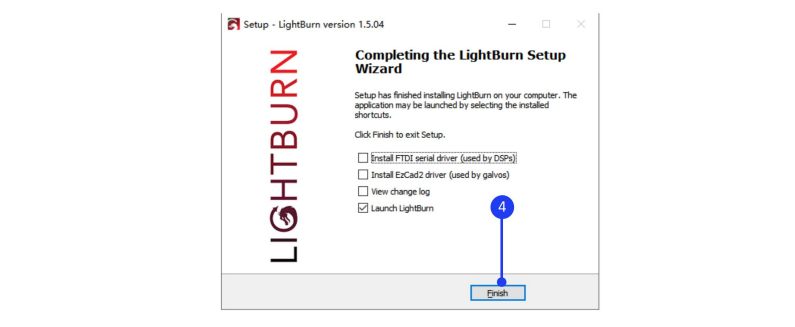
Double-click the LightBurn installation file in the software folder on the SD card or download it from the following link: https://LightBurnsoftware.com/pages/download-trial to install the trial version of LightBurn
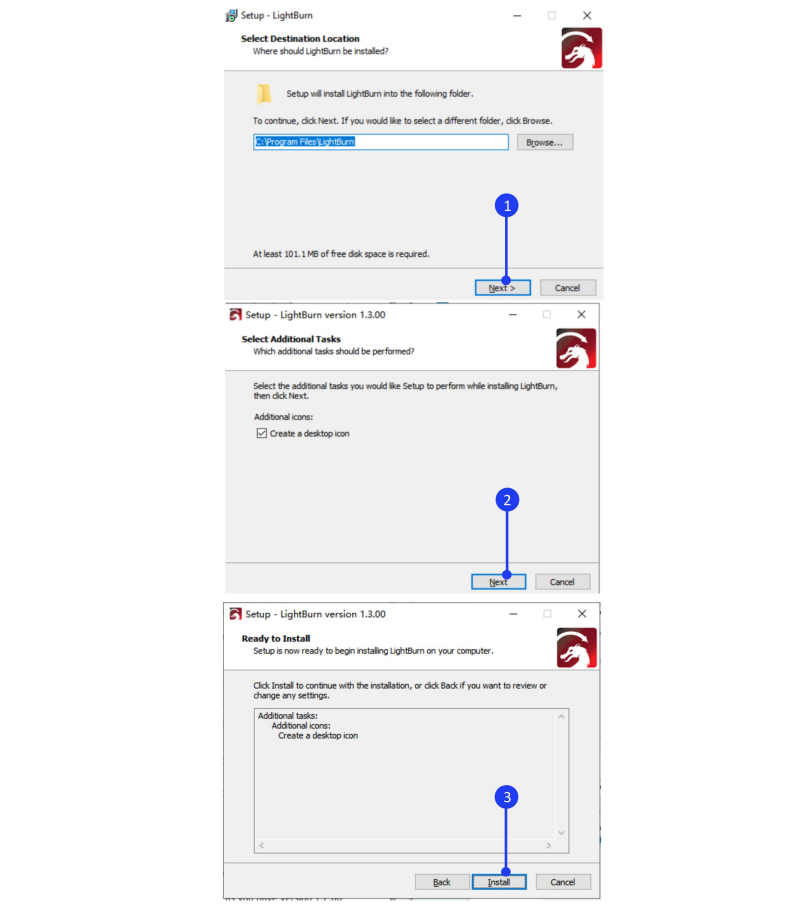
To install LightBurn on Mac, double-clicking the .DMG file after downloading it and drag LightBurn into Applications folder. When launching LightBurn for the frst time, open a Finder window, browse to the 'Applications' folder, hold the Control key and click the LightBurn icon, choose 'Open' from the menu. When MacOS asks if it should open the program, click yes, and it will be listed as an exception in your launcher. From then on you can just launch the application normally.

. Import configuration file
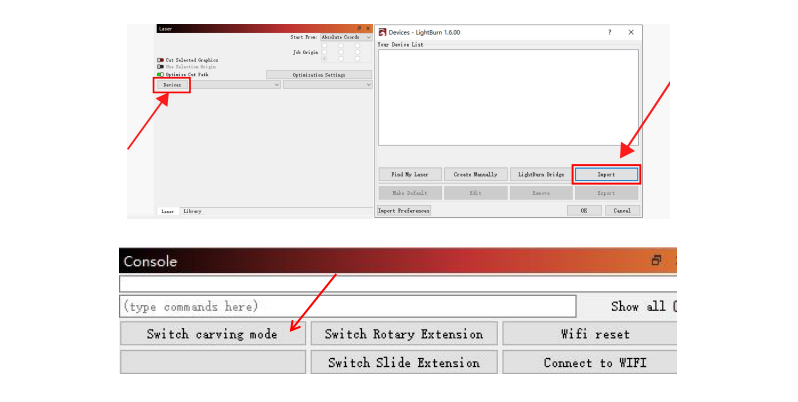
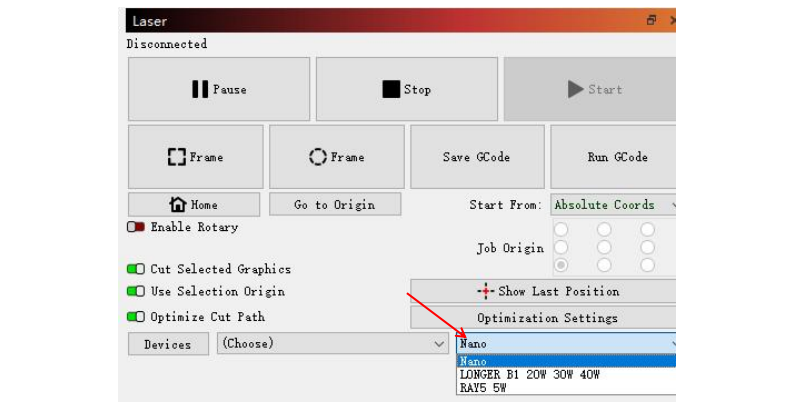
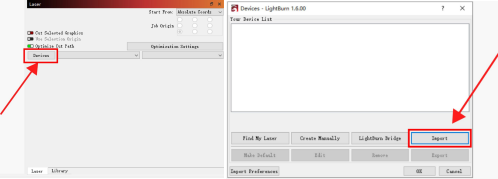
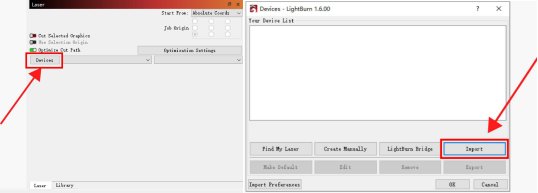
Before using LightBurn with Nano for the first time, it needs to import the LaserNano.lbdev configuration file, which is in the software folder of the SD card. For the first time launching LightBurn, it will prompt a 'New Device Wizard' or click "Devices" in the laser control module to import the engraver. Click ‘Import’, select the Nano.lbdev file, and click OK to add the Nano configuration to LightBurn. The macro commands will be successfully added in the Console window and Nano device would appear in the list of devices to the right of the 'Devices' button in the Laser window when the configuration file is imported successfully.
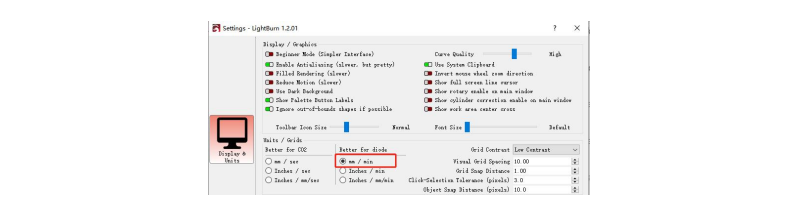
After adding the device, it is recommended to set the speed unit to mm/min. That is select 'Edit' on the task bar, select 'Settings', select mm/min as the unit, and click the 'OK' button.
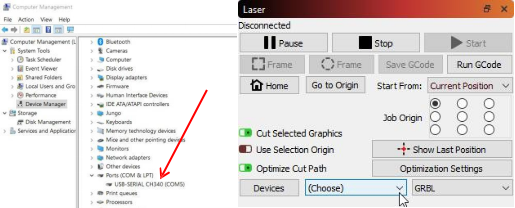
. Connect the Nano to LightBurn
It needs connect the engraver to LightBurn software before use. For Windows system, it needs to right-click the computer and select Manage, click Device Manager, click to expand Ports (COM & LPT), find the port corresponding to the CH340 driver, and then select this port in the LightBurn, that is to manually choose the right port that the engraver is connected to, by clicking where you see '(Choose)' in the Laser Window.

For MacOS, please go to About this Mac > Overview > System Report, select USB under Hardware, there will be USB Serial if the driver is installed automatically, and select cu.wchusbserial14230 port in the LightBurn by clicking where you see '(Choose)' in the Laser Window.
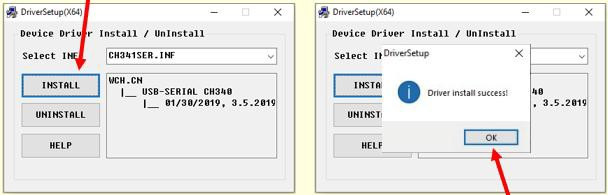
If no ports are listed in the drop-down, it means that no engravers were found, which could mean that it is not plugged in correctly, isn't powered, or the PC is missing a driver. It needs to download CH340 driver from the link and double click it to install:
https://drive.google.com/drive/folders/1Sc-TKuez-mz--38Vp6DeL-pGmQcQdHW4.
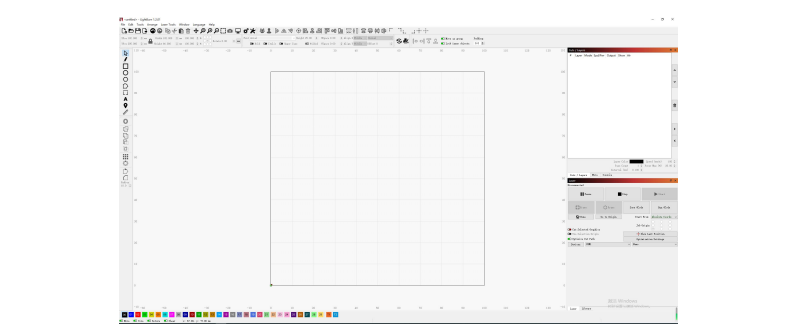
. The main window of LightBurn
This is the default layout for the main LightBurn window, which includes Menus, Main Toolbar, Creation & Modifier Tools, Color Palette, Cuts / Layers, Laser Window, Move Window etc.
Menus: The menu bar at the top of the main window provides the access to almost every feature available in LightBurn, like File, Edit, Tools etc.

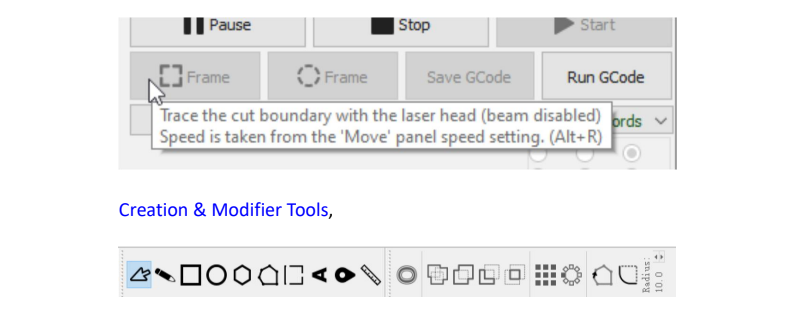
Main Toolbar: The main toolbar in LightBurn provides quick access to commonly functions for opening or importing files, saving, using the clipboard (copy & paste), moving or zooming the view. Right beside it is the Arrangement toolbar, containing some commonly used arrangement tools for arranging and aligning shapes.
Tool tips: If hover the mouse over a control, then a small bit of text pop up that describes that button or feature, like this:
Color Palette, these colors are used to assign different kinds of parameters to the shapes in the design.If a design is selected, click a color entry will apply that color to the shapes in your selection. The colors currently in use in your design will also appear as entries in the Cuts / Layers window, where you can choose the operations that each color will represent.

Cuts / Layers: The first column shows the name you've assigned to this layer, followed by the color, then the Mode (Line, Fill, both, or Image). Then the speed and power are displayed, followed by the options to enable or disable sending this layer to the laser, or displaying it in the workspace. Underneath the layer list you can see and change the basic settings for the currently selected layer. Double-clicking an entry in the layer list, it will bring up a larger Cut Settings Editor with a more complete set of options.
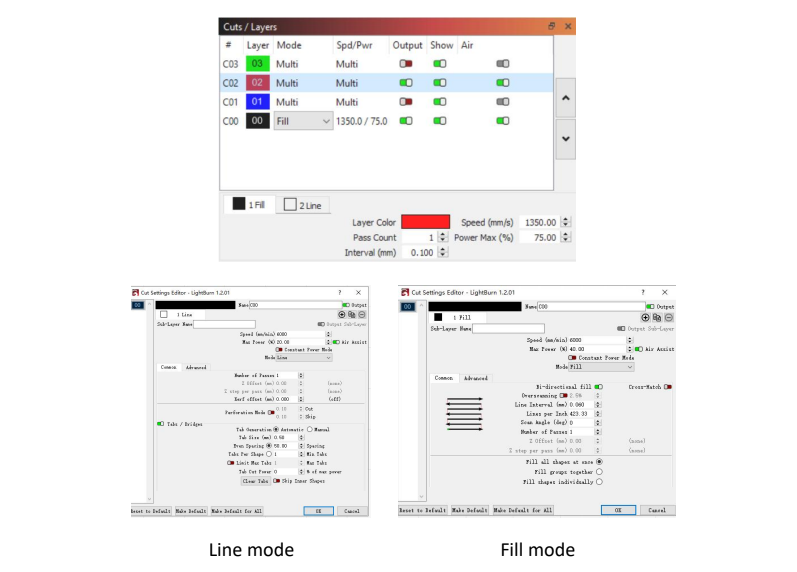
Double-clicking an entry in the layer list will bring up the full Cut Settings Window, allowing you to edit to all the settings.There are three modes that are often used, namely Line, Fill and Image.
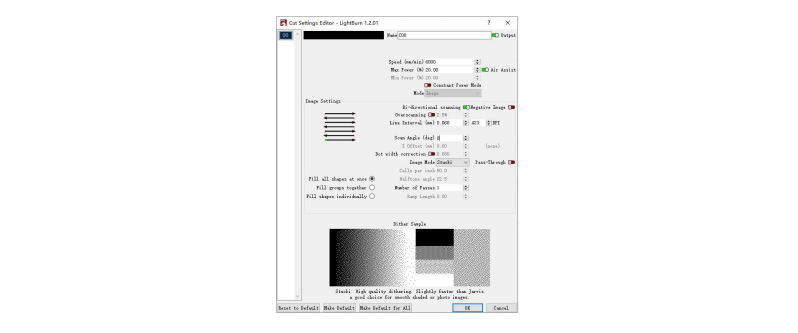
In Line mode, the laser follows the exact path of selected design, tracing the lines with the beam enabled at the setting power and speed. If laser moves quickly, or with low power, it will likely just etch the surface. If laser moves slowly and with high power, it will cut through the material. The only difference between surface marking and cutting is the power and speed. Fill mode permits the laser to scan line by line and fill in the selected shape, which will fill in closed shapes but not open shapes. Image mode is only available for images, and can control how LightBurn renders the image data on the laser. There are three iamge modes that are often chosen, which are Atkinson, Stucki, Jarvis.
Laser Window: The Laser Window is used to select the active machine, test the framing (the artwork's outer bounds), run and stop the machine, and choose the file processing, order, and artwork positioning within the workspace.
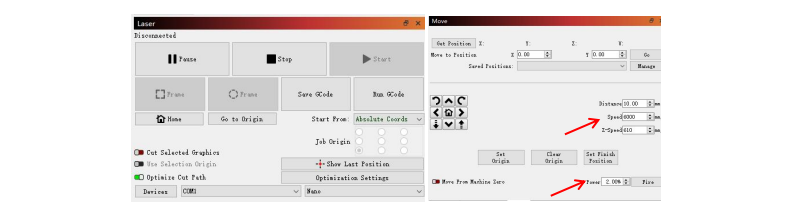
There are two Frame buttons are used to preview the position of the job on the laser. The first is a standard rectangular frame, also called a 'Bounding Box'. This is the smallest rectangle that will fully contain the shapes selected. The O-Frame button, called the 'Rubber Band Frame', traces a path around selected design that is the shape of a rubber band stretched around it. The speed and laser power during frame are adjusted in the MOVE window. Due to software limitations, the maximum speed during frame can be 10,000 mm/min.These two different frame effects can be shown in
the following figure:

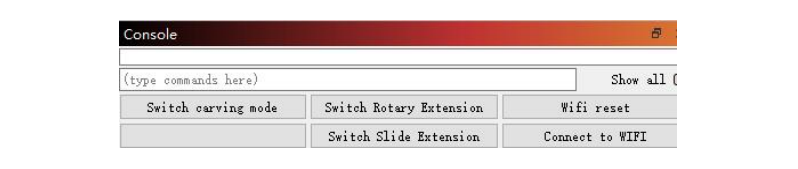
Console Window: The Console window displays messages from the controller and commands sent to it by LightBurn, and some macro commands designed of Nano engraver. It can also input direct commands to engraver through this window, such as $$ to display GRBL settings, $X is to unlock machine if it has been locked due to an alarm or error. The Console window will also display alarm or error messages sent to LightBurn by the laser's controller, indicating that there was a problem with the machine's operation.
. How to make a project
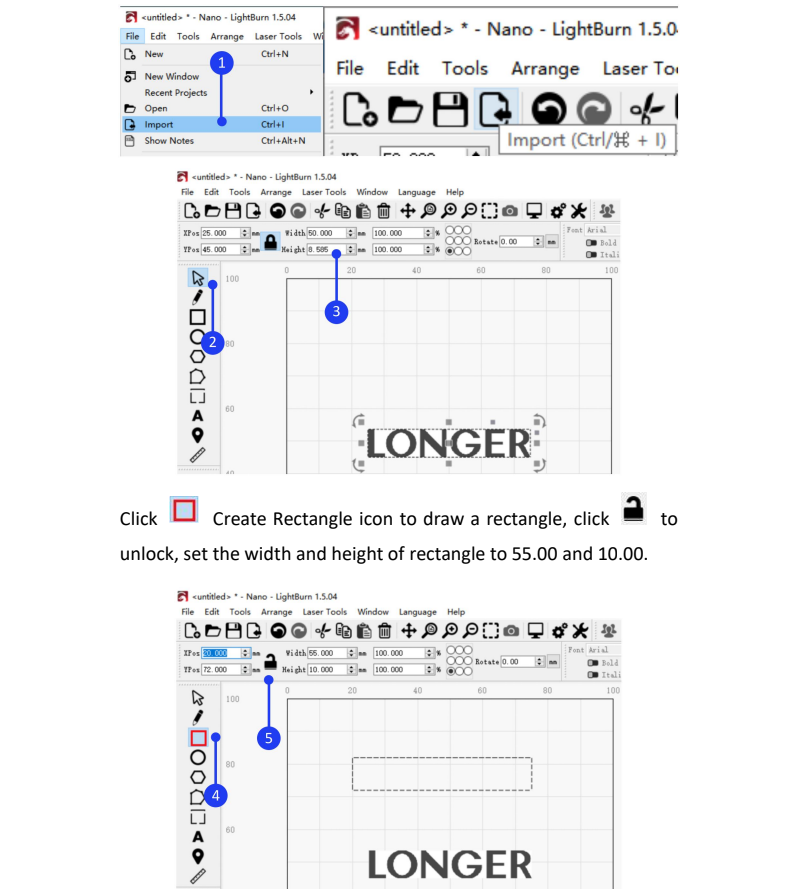
Generally speaking, creating a engraving task includes importing graphics, editing graphics, setting parameters, preview, framing and engraving. Taking engraving the LONGER LOGO and cutting after engraving as an example:. Click File > Import or click import icon in Toolbar to add image to LightBurn, click select icon to choose the image, change the width of image to 50.00mm, the height of image will change in proportion to the width.
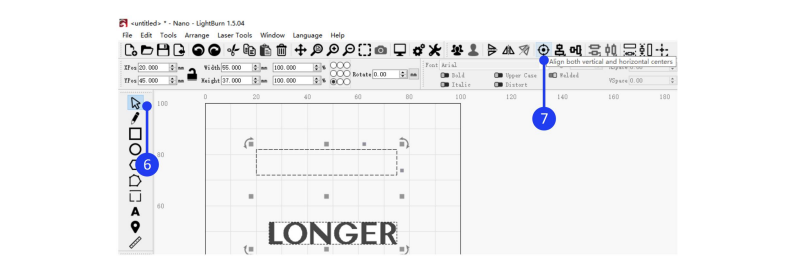
Click Select button, hold down the Shift key on the keyboard, select the rectangle and image, click the Align Center button on the toolbar to center align the image and rectangle.
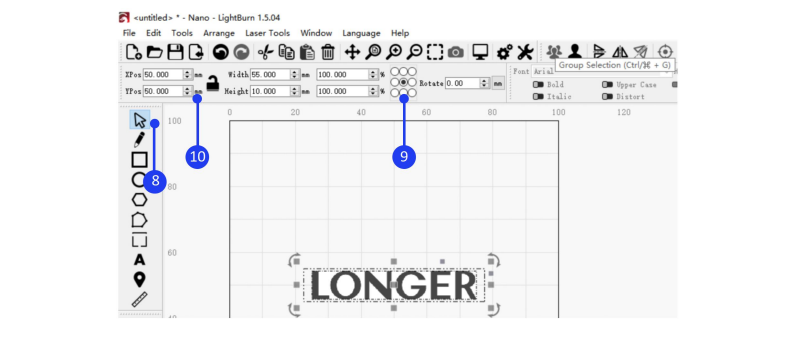
Set the coordinate point at the center of the image and enter the XY position coordinates as 50, 50 respectively, so the design is moved to the center of working size.
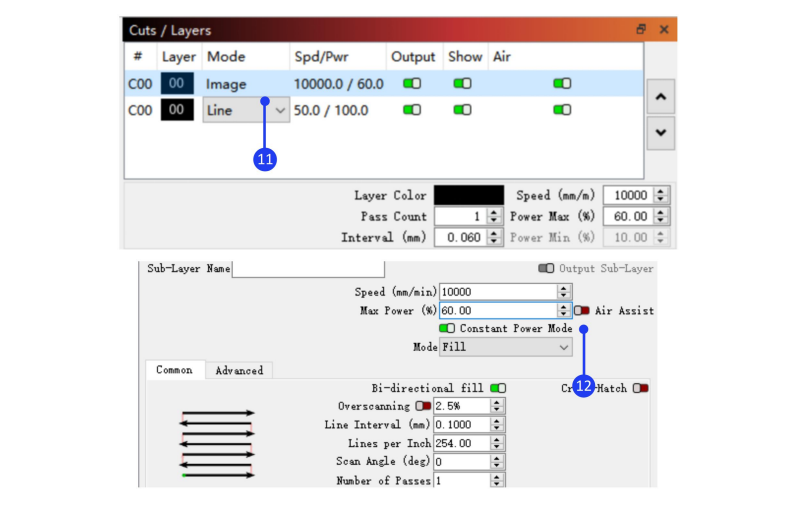
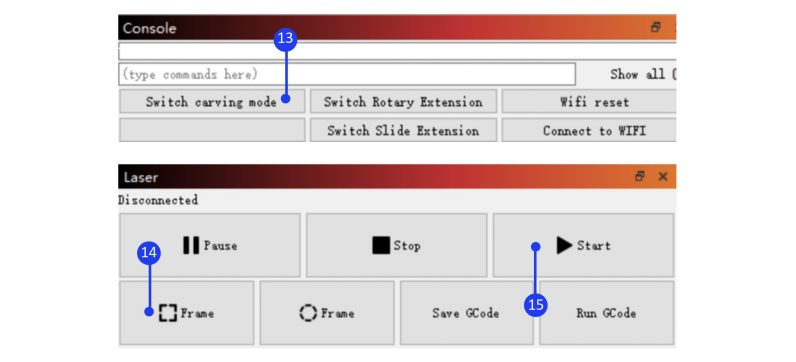
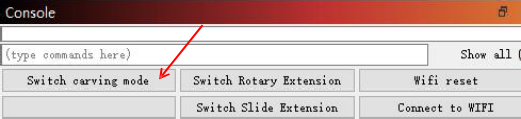
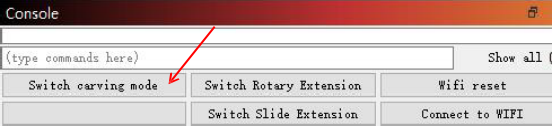
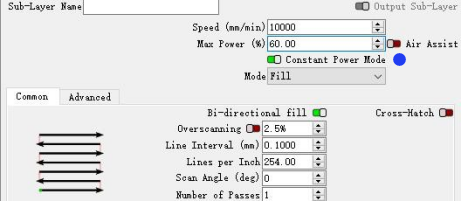
Click on different layers in Cuts and Layers Window to set the corresponding parameters, enable Constant Power Mode (Please note that for image or fill engraving, the Y interval is 0.06mm (Y interval has only two values options, 0.06mm or 0.09mm. For those who require high precision, it can choose 0.06mm. For those who require high efficiency, it can choose 0.09mm), and adjust the specific parameters according to the actual materials and parameter table). Click Switch carving mode in the console window, adjust the focus of Nano and click the Frame button ,
. Connect Nano to LightBurn by WIFI
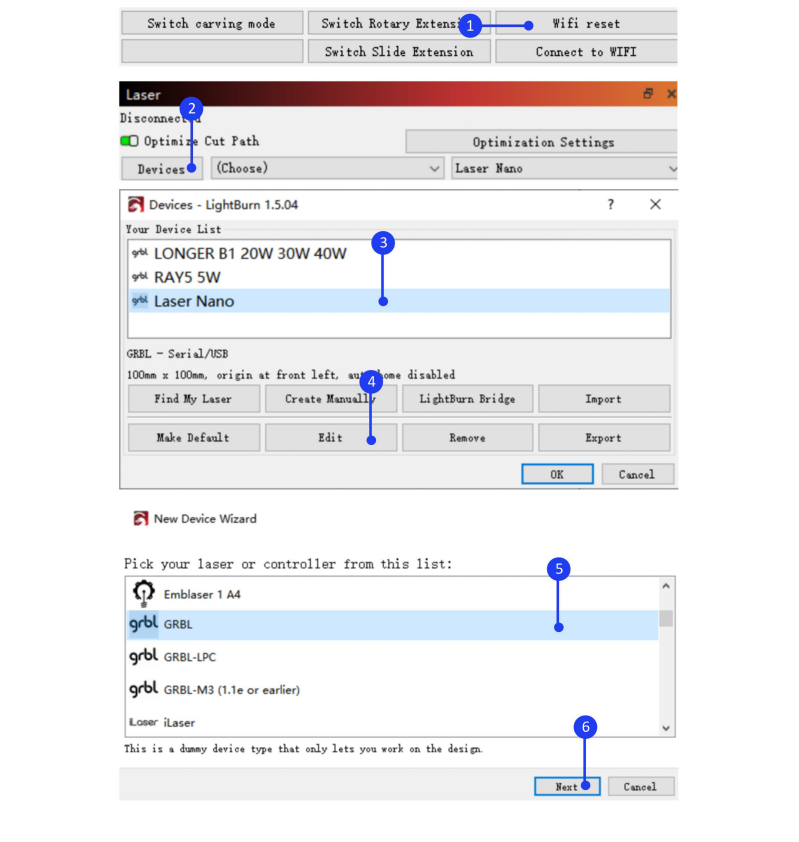
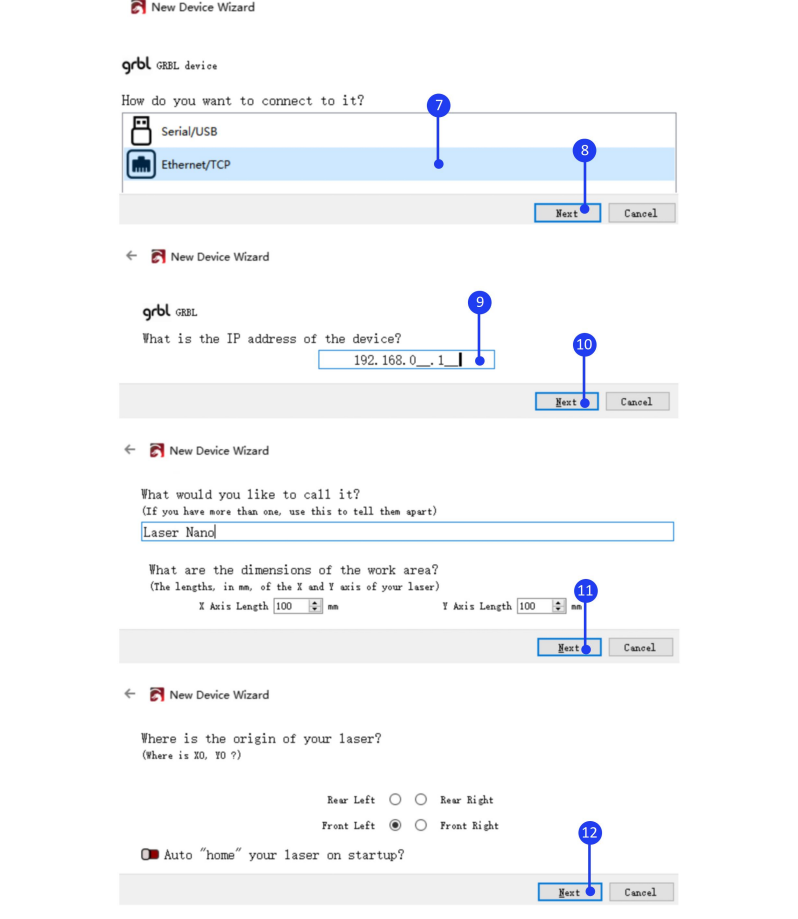
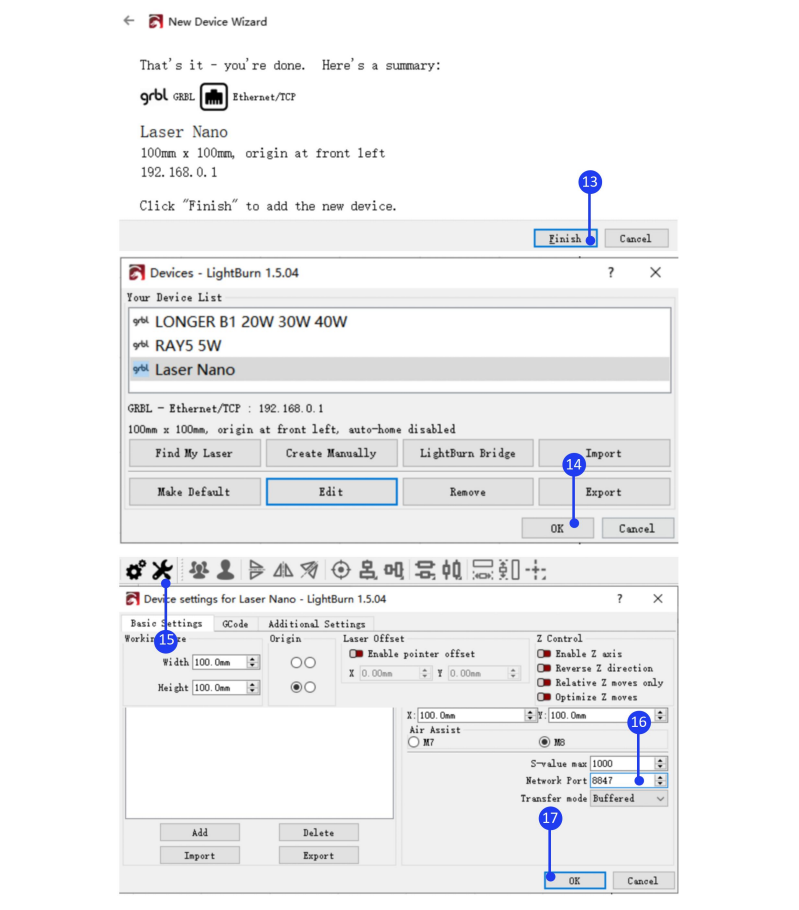
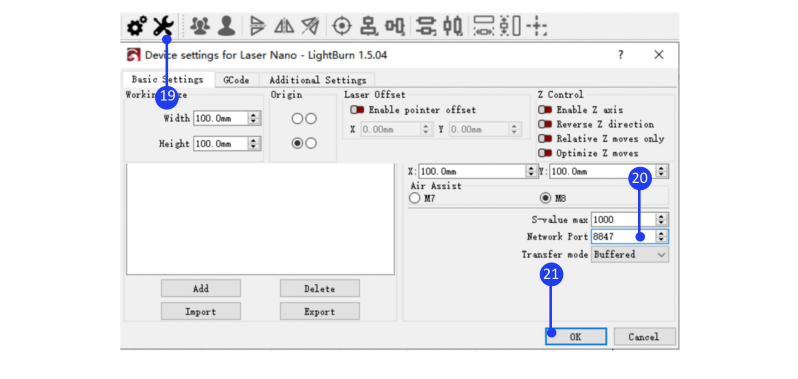
There are two modes: STA or AP to connect Nano to the LightBurn via wifi. The difference is that in AP mode, the computer has no network, while in STA mode, computer can maintain network. 1) Connect Nano to LightBurn by WIFI in AP mode Run the LightBurn, connect PC to Nano, click ‘WiFi reset’ in console window to set WiFi to AP mode, connect the computer to the WiFi that starts with LongerLaser_Nano, input password 12345678, click Devices in Laser window, select Laser Nano > Edit > GRBL > Next > Ethernet/TCP > Next > input 192.168.0.1 > Next > Next > Next > Finish > OK, click Device Settings > input 8847 in Network Port > OK.
Connect Nano to LightBurn by WIFI in STA mode
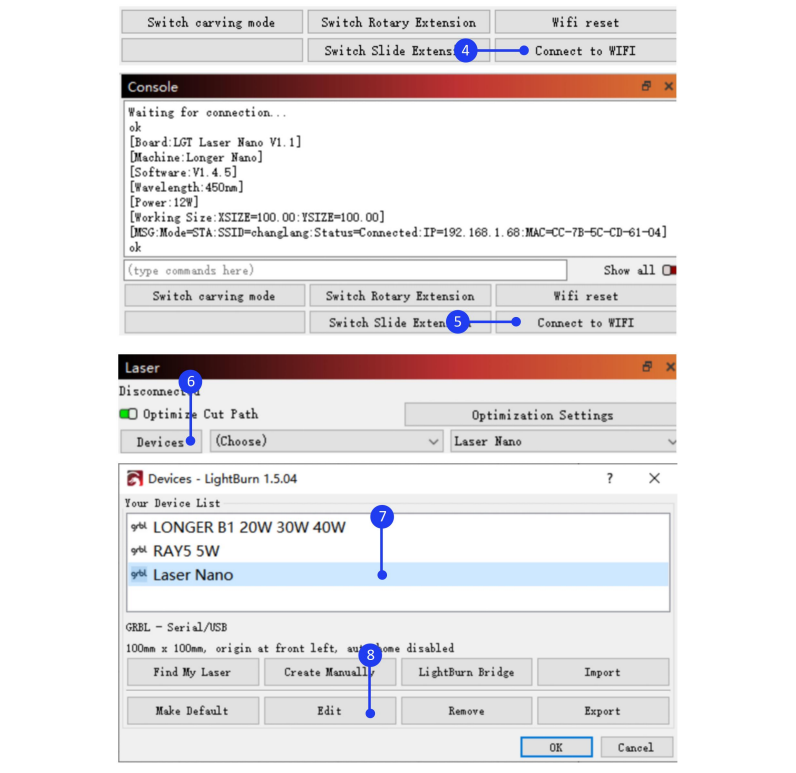
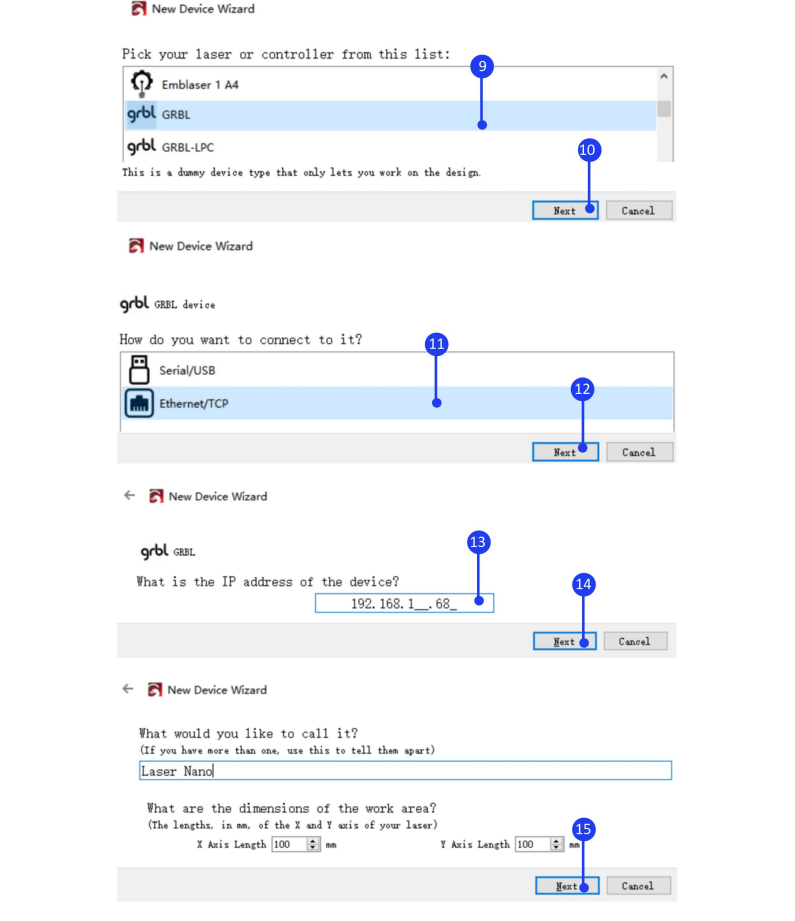
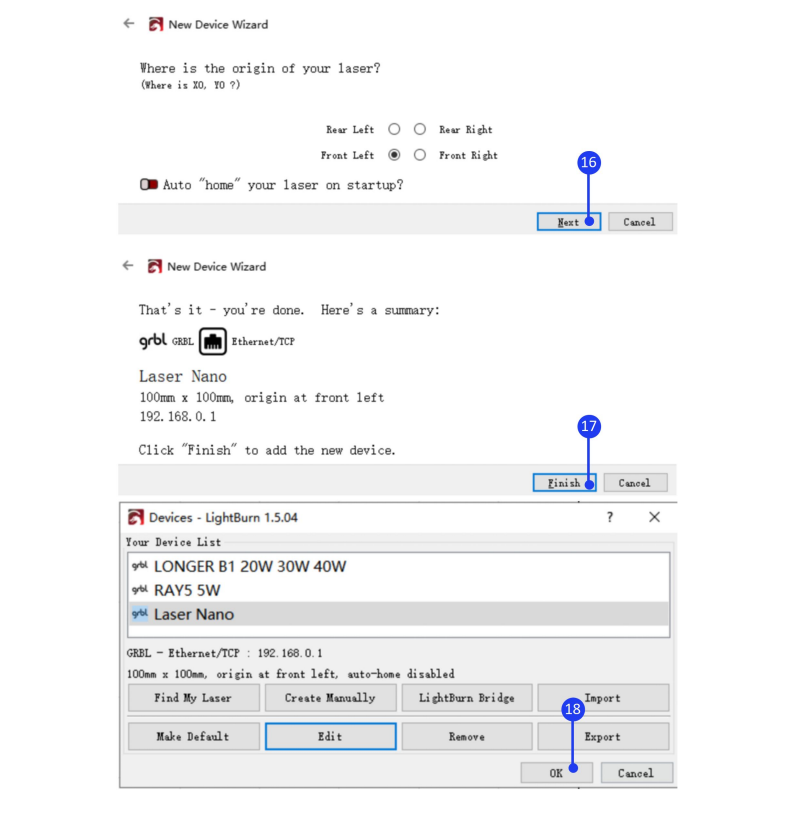
Run the LightBurn, connect PC to Nano, right click ‘Connect to WIFI’ in console window to set WiFi information, change Your_SSID and Your_PassWord to your WIFI account and password in sta/password command, click OK, left click ‘Connect to WIFI’ to change it to STA mode. After the connection is successful, the console prompts the ‘status = connected’ and the IP address. Please note that the computer network and WIFI must be in the same LAN (local area network). Click Devices in Laser window, select Laser Nano > Edit > GRBL > Next > Ethernet/TCP > Next > input IP address > Next > Next > Next > Finish > OK, click Device Settings > input 8847 in Network Port > OK.
¶ 1.2.4 APP Operation
. Download and install
Please search for "LaserBurn" in Google play or visit the address below to download for Android system
https://play.google.com/store/apps/details?id=com.longer.longerlaser&hl=en_US
Please search for "LaserBurn" in the Apple store or visit the address
below to download for IOS system:
https://apps.apple.com/us/app/laserburn/id6451089363
Or download from LONGER’s offical website:
https://www.longer3d.com/pages/longer-app
Or scan the code to download the APP:

For complex grayscale engraving, it is recommended to transfer the image to the mobile phone album and import it into the APP for engraving, which will have a better effect.
. Connect to WIFI in AP mode
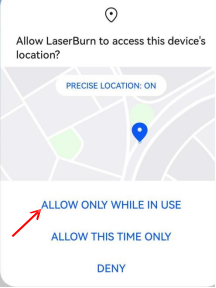
Note: There are two modes, AP and STA, to connect NANO via WIFI. The difference is that in AP mode the phone will have no network, but in STA mode the phone can maintain network. 1) Run the LaserBurn APP and enter the Home page, click not connected icon . when there is a ‘Allow LaserBurn to access this device’ prompt, you need to click ‘Allow only while in use’, otherwise you may not be able to search for WIFI of Nano.
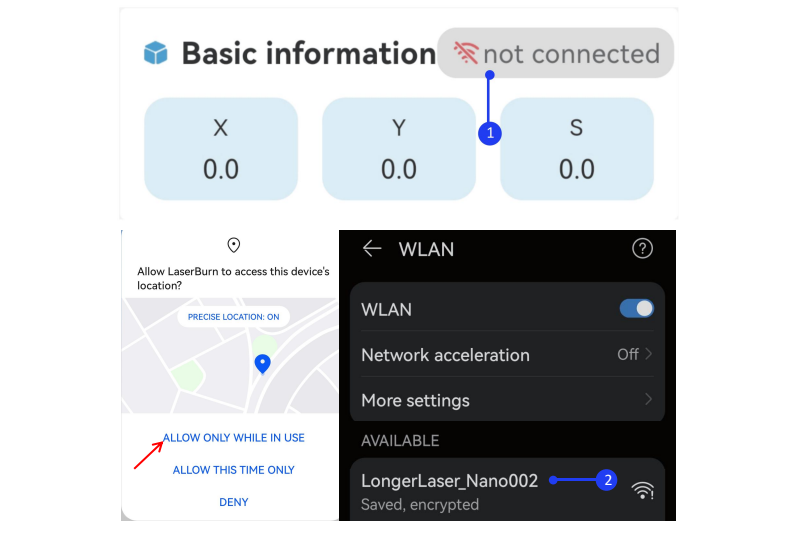
Open the WLAN settings on your phone, search for the WIFI
starting with LongerLaser_Nano and input password 12345678 to connect the wifi of Nano Pro. If WIFI of LongerLaser_Nano can not be found, please long press the WIFI reset button on the back of the
Nano Pro until you can hear three buzzers to reset the WIFI, then search the WIFI list again.
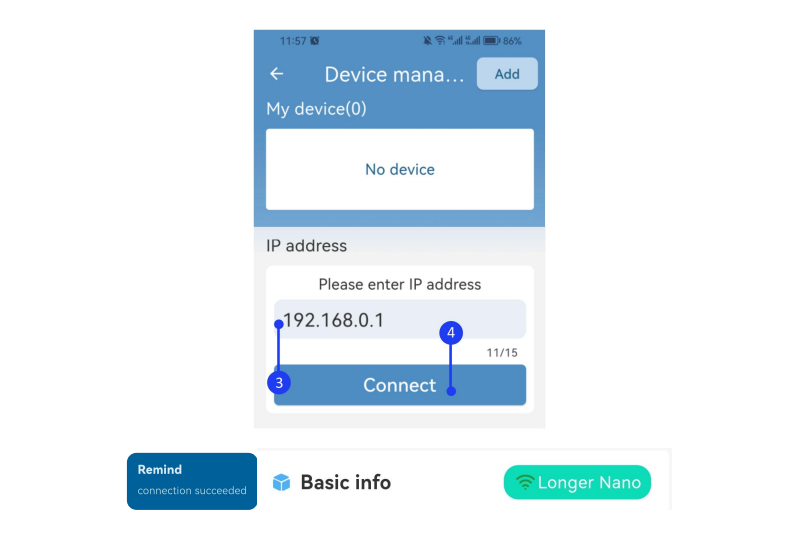
Enter the IP address 192.168.0.1 below, click Connect. There will be a remind ‘connection succeeded’ when connect successful
Connect to WIFI in STA mode
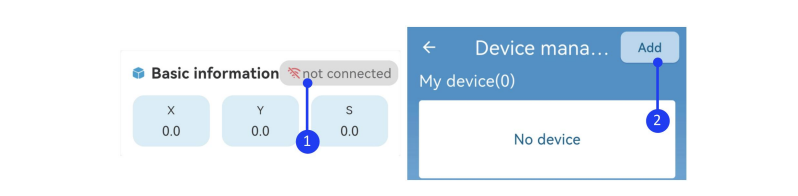
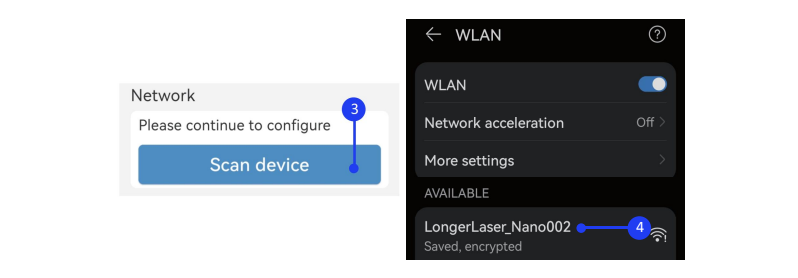
Open the WLAN settings on your phone. Run LaserBurn and enter the Home page, click not connected icon , enter the network configuration page, click Add in the upper right corner.
Click Scan device, search for the WIFI starting with LongerLaser_Nano and input password 12345678 to connect the wifi of Nano.
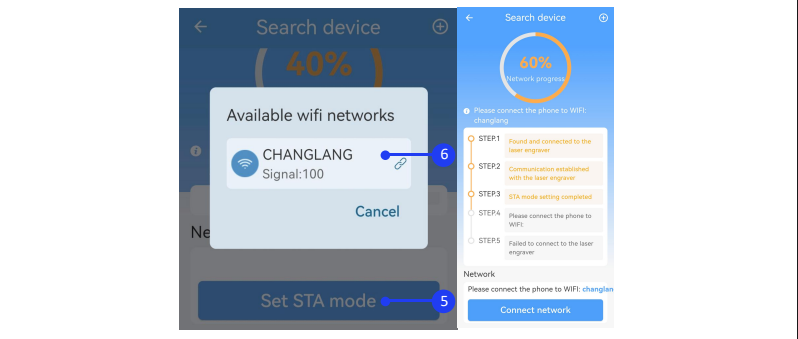
After the connection is successful, return to LaserBurn, select Set STA mode to connect WIFI of router (only supports 2.4G), and enter the password. The indicator light in front of Nano will switch to orange breathing light during connecting, then will turn green if the connection is successful, then click the app to enter the next step, the network progress will reaches 60% . And the indicator light will remain orange if the connection fails, click the app to return to the first step and start again.
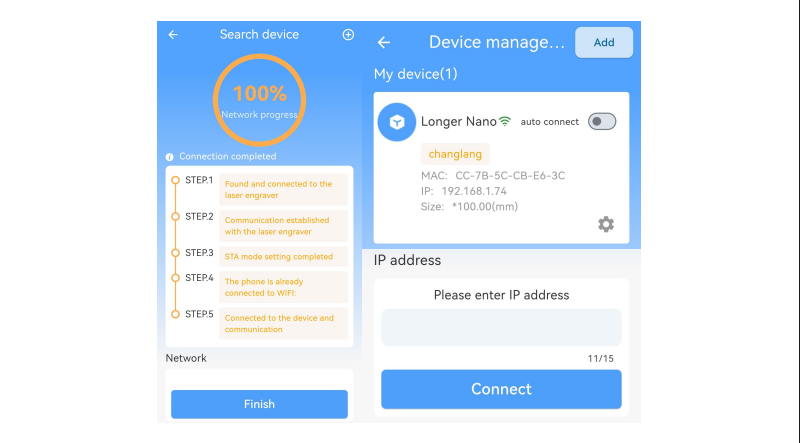
Back to LaserBurn, click Connect network at the bottom of the page, connect the phone to the same WIFI as the STA mode in the previous step, wait for network configuration. When the connection is successful and the network process reaches 100%, click FINISH at the bottom to return to the device list interface.
Note: After the device is connected, when click anywhere on the device list label, the machine will disconnect; conversely, if click when the device is disconnected, the phone will automatically connect to the device.
. Creation
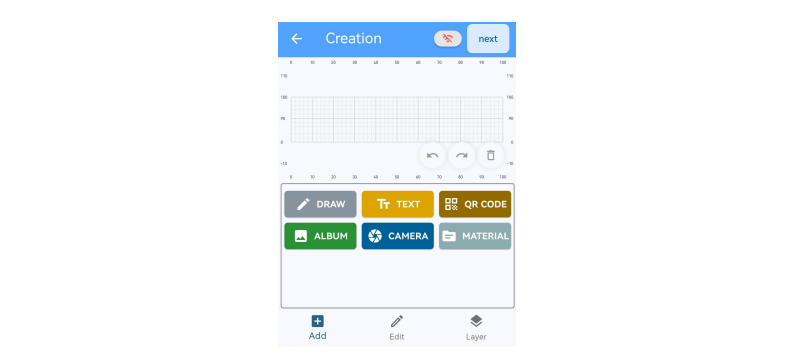
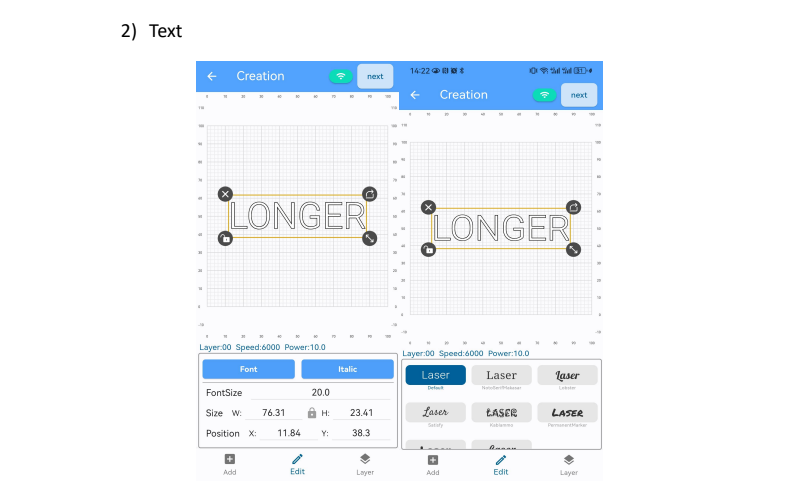
In the creation interface, graphics can be imported through drawing, text, QR code, photo album, camera, material library, etc.
Draw:
Draw simple images, such as circles, rectangles, triangles, etc.
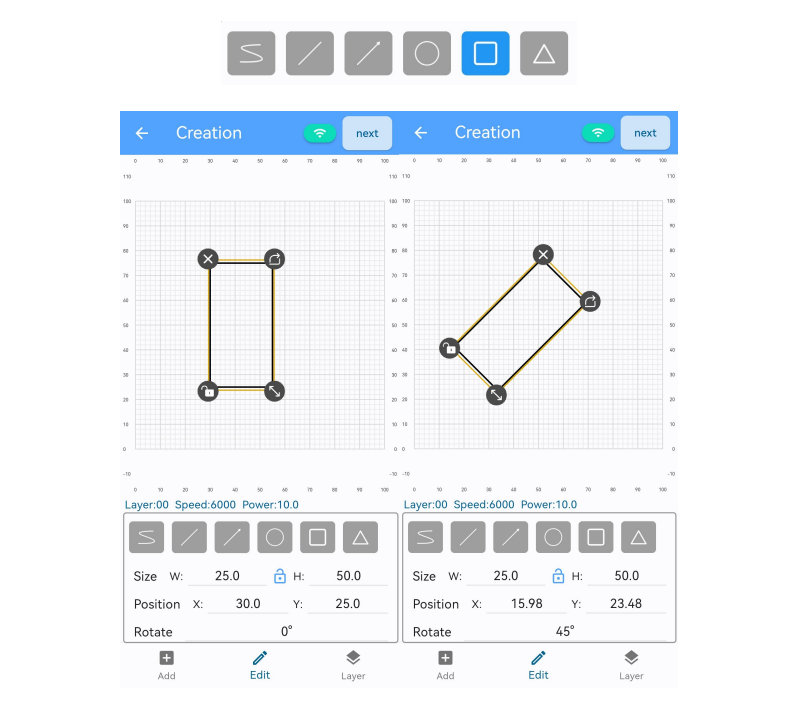
Enter the value in Size to scale the graphic proportionally or hold down the button to drag. If you need to change the length and width of the graphic separately, you can click the button to unlock the proportional lock; enter a value in Position to change the position of the graphic, or select the graphic and move it within the canvas by dragging it; enter a value in Rotate can rotate the graphic counterclockwise to the corresponding angle, or hold down the button to rotate the graphic at any angle; if you click the button , the size, position or angle of graphic can only be changed by entering a value;click the button can delete graphics.

QR code
Generate QR code based on the input content, and change the size, position or angle of the QR code. Layer
Layer mode: set line or fill
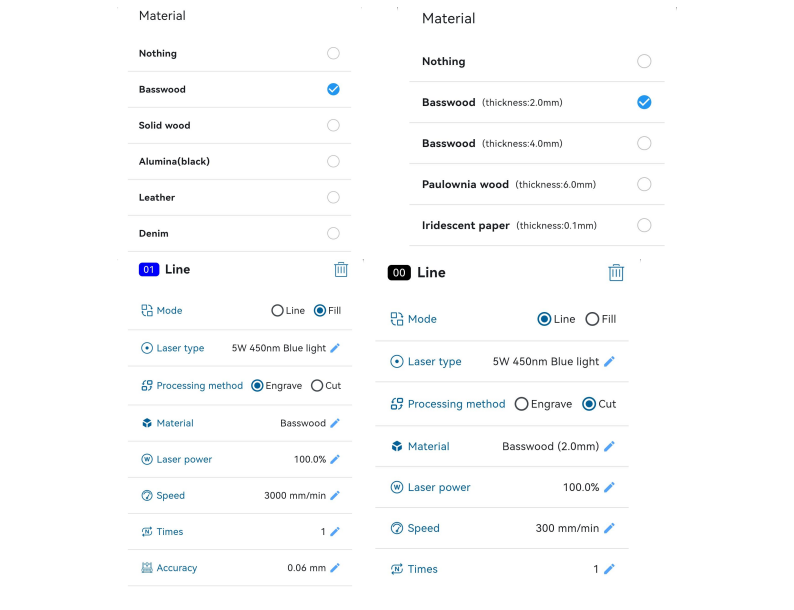
Laser type: choose 6W for Nano, 12W for Nano Pro pro Processing method: engrave or cut Material: select the corresponding material from the material library, and the APP will automatically set the appropriate parameters according to the processing method and laser power selection. If the parameters need to be modified, click the edit button to adjust.
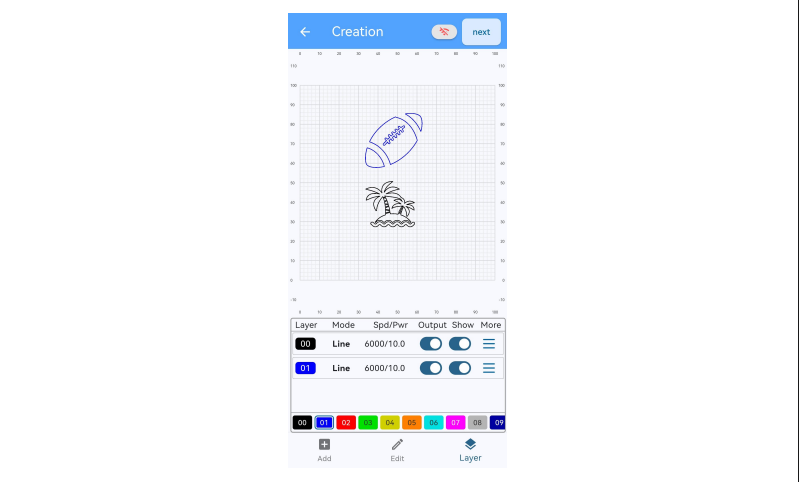
Different colored layers can set different parameters for designs to meet the needs of engraving or cutting multiple files at the same time. Such as layer mode, laser type, processing method, material, laser power, speed, times and accuracy. Up to 11 parameters can be set in the APP, first select the design to set parameters, click Layer, and select different colored layers.
Album
Import pictures from the mobile phone album.
Camera
Use the phone camera to shoot pictures and import to APP.
Undo
Undo the last operation, up to 20 steps can be supported.
Redo
Redo the last operation, up to 20 steps can be supported.
Clear
Clear all graphics in the canvas.
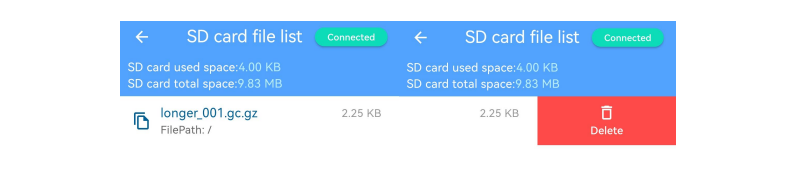
. Files
When connected to the engraving machine, you can preview the file data uploaded to the Nano. Select a file from the list and slide it to the left can delete it. When the reserved memory is almost used up, please clean up unnecessary files in time, otherwise new files can not be uploaded.
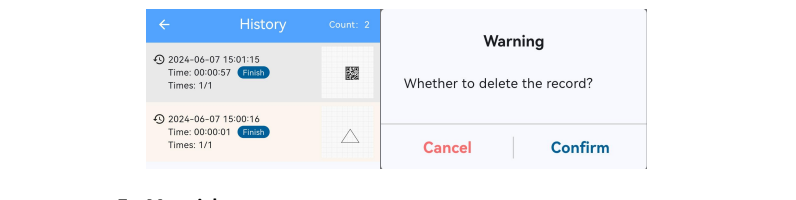
. History
History displays a graphic history list of operations on the APP. You can long press a file in the list to delete unwanted images.
. Material
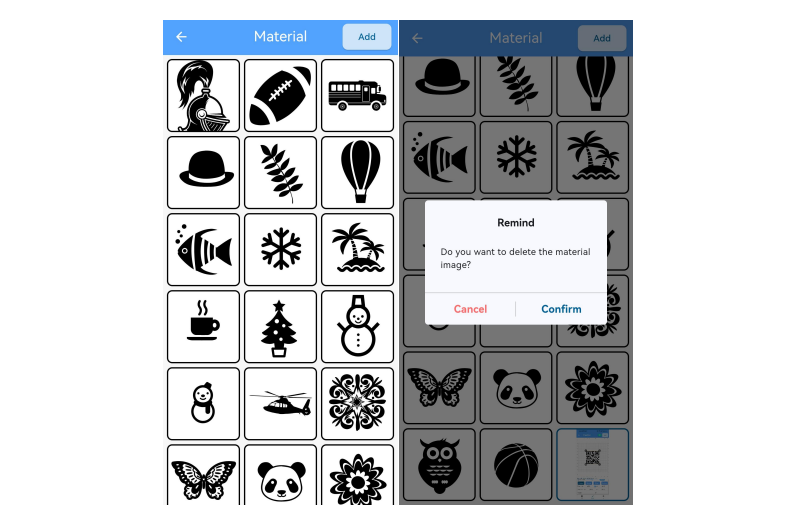
Material: Graphic library in the APP. Click the ADD button in the upper right corner can add graphics from the phone album or phone memory. Long press on the self imported image can delete it, but the built-in image cannot be deleted.
. How to make a project on LaserBurn APP
Run LaserBurn app and connect the APP to Nano, add a graphic, click Edit to set size and position, click Layer to set the parameter of the graphic, then click next in the upper right corner.

Accuracy has only two values options, 0.09mm or 0.06mm. For those who require high precision, it can edit it to 0.06mm. For those who require high efficiency, it can choose 0.09mm. 2) There will be a warning window, make sure the work area is safe, wear googles and protective cover is installed , click Confirm.

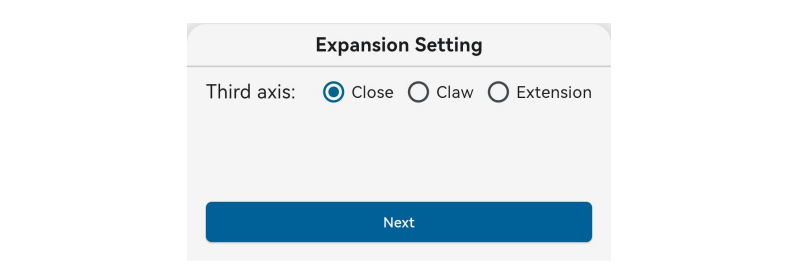
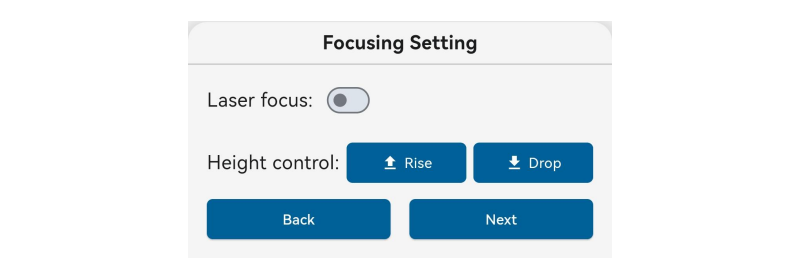
Set the third axis option, select None for the Nano, click Next.
Set the focus, enable the Laser focus, the infrared laser will be turn on, click Rise or Drop to adjust the height until two infrared dots coincide with each other, click Next.
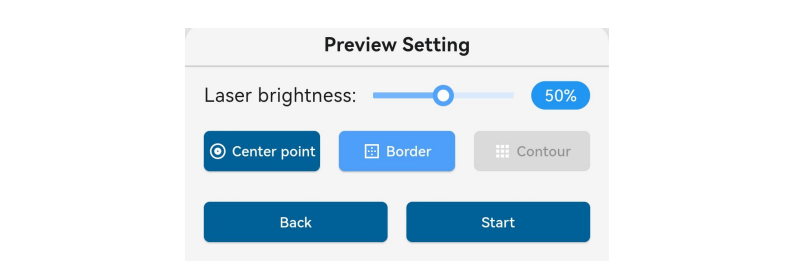
Click Border to preview the work position of the graphic to confirm the position of material is correct. If you cannot see the blue light clearly during preview, you can increase the blue light power appropriately, but be careful to avoid burning the engraving material, click Start.
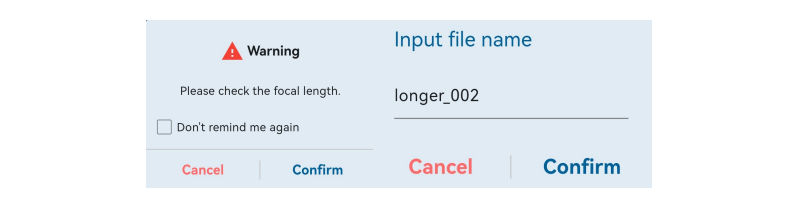
After confirming that the focus is adjusted normally and the goggles are worn, click Confirm to make sure the file name, and then the file starts to upload to the Nano. After the upload is completed, click Confirm and press the start button on the laser module to start the engraving task.

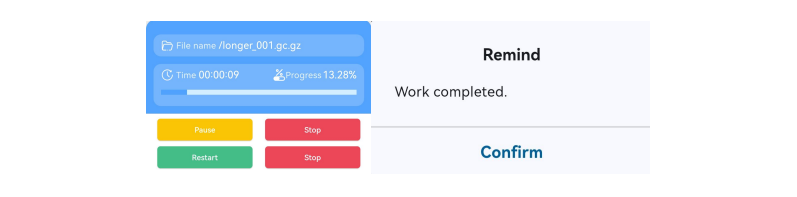
The APP will display the task progress. You can click Pause to pause the task, click Restart to resume the task, or click Stop to cancel the task. When the task is completed, there will be a ‘Work completed’ prompt. Click confirm to return to the Home page.
¶ 2. Laser Engraver Features:
In the Laser Engraver Features section, you can find detailed guides related to various features available on the nano series Laser Engraver.
¶ 2.1 Laser nano 6w Touch Screen Instructions
¶ 2.2 Download of network firmware
https://drive.google.com/file/d/1XLRSUq8JEMNHSxjsdxODCIOdskX6iIeT/view?usp=sharing
¶ 2.3 Upgrade firmware
Firmware upgrade tutorial: New Experience for Longer Nano - Engraving speed up to 5000 mm/s
https://www.youtube.com/watch?v=IPqv-k9ccP0&list=PLLz1z_0pXsW2Wi7ihi1j-uadzP2K_KW-s&index=16
¶ 3. Operation Guide
¶ 4. Troubleshooting & Solutions:
In the Troubleshooting & Solutions section, you can find guides related to the nano 6w Series where potential issues are listed with solutions on how to solve them.
¶ 4.1 Troubleshooting
¶ 4.1.1 Unable to connect to LightBurn or LaserGBRL
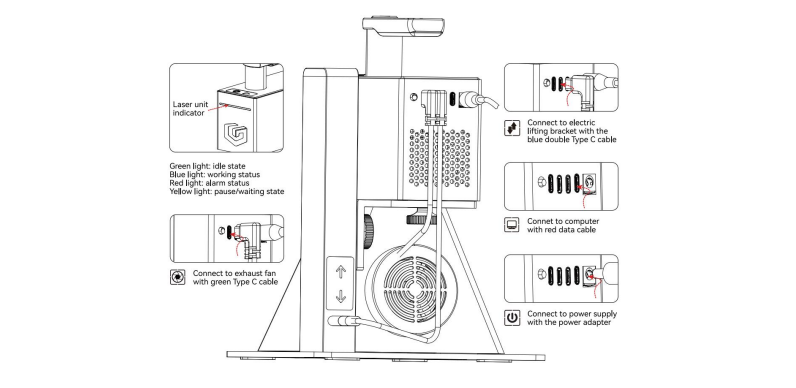
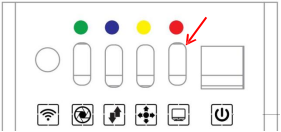
1)Using the wrong Type C cable
Please use the red terminal Type C cable to connect computer to the third port of engraver, that is
2)Can't find CH340 driver
For Windows system, it needs to right-click the computer and select Manage, click Device Manager, click to expand Ports (COM & LPT), find the port corresponding to the CH340 driver, and then select this port in LightBurn or LaserGRBL.
For MacOS, please go to About this Mac > Overview > System Report, select USB under Hardware, there will be USB Serial if the driver is installed automatically, and select cu.wchusbserial14230 port in the LightBurn or LaserGRBL.
If no ports are listed in the expand Ports (COM & LPT), it means that no engravers were found, which could mean that it is not plugged in correctly, isn't powered, or the PC is missing a driver. It needs to download CH340 driver from the link and double click it to install: https://drive.google.com/drive/folders/1Sc-TKuez-mz--38Vp6DeL-p
GmQcQdHW4.
3)CH340 driver port is occupied
Before connecting, please make sure that the CH340 port is not occupied by software such as serial communication tools, cura, etc.
4)The configuration file is not imported or damaged
For LaserGRBL, right-click in the blank area at the bottom and select Import custom buttons, open Nano.zbn file to import, click YES to confirm, then there are new Nano, Slide, Rotary icons.


For LightBurn, click "Devices" in the laser control module to import the engraver. Click ‘Import’, select the Nano.lbdev file, and click OK to add the Nano Pro configuration to LightBurn. The macro commands will be successfully added in the Console window and Nano Pro device would appear in the list of devices to the right of the 'Devices' button in the Laser window when the configuration file is imported successfully.
¶ 4.1.2 LaserBurn APP cannot connect to WIFI
1)Update the app to the latest version
Please search for "LaserBurn" in Google play or Apple store to download and update to the latest version.
2)APP is not allowed to discover device’s location
When run the app for the first time, select ALLOW ONLY WHILE IN USE when prompted ‘Allow LaserBurn to access this device’s location?’, or the LongerLaser_Nano WIFI can not be found. If have already selected DENY, it needs to change the app's location discovery permission in Settings.
3)Reset the WIFI
If WIFI of LongerLaser_Nano can not be found, please long press the WIFI reset button on the back of the Nano until you can hear three buzzers to reset the WIFI, then search the WIFI list again.
4)Not connected to the same router or not 2.4G WIFI
In STA mode, it needs to connect the engraver and mobile phone to the same router WIFI. Make sure it is 2.4G WIFI. 5G WIFI is not supported yet.
5)WIFI signal is too weak
Switch to a router with better signal strength.
¶ 4.1.3 Blue light is flashing but not in focus
When start engraving, blue light is emitted through the field lens or window lens, but the blue light is not focused and it cannot see the blue light engraving.
1)The configuration file is not imported or damaged
For LaserGRBL, right-click in the blank area at the bottom and select Import custom buttons, open Nano.zbn file to import, click YES to confirm, then there are three new Nano, Slide, Rotary icons.


For LightBurn, click "Devices" in the laser control module to import the engraver. Click ‘Import’, select the Nano.lbdev file, and click OK to add the Nano Pro configuration to LightBurn. The macro commands will be successfully added in the Console window and Nano Pro device would appear in the list of devices to the right of the 'Devices' button in the Laser window when the configuration file is imported successfully.
2)Not switch to engraving mode
Before engraving, it must switch to carving modes, that is click in Console window for LightBurn, or click Nano icon at the bottom for LaserGRBL.
3)Need to close clustering in LightBurn
¶ 4.1.4 There are error or alarm during engraving
Nano has built-in temperature and position sensors. If the temperature inside the laser tube exceeds a certain level or the machine tilts during engraving, the software will prompt an error or alarm, as shown in the figure. At this time, the machine will stop engraving and the indicator light will light up red.


¶ 4.1.5 The engraving picture appears vibration or not smooth
1)Engrave with LaserBurn APP or Web
When the image is a complex image with a lot of details, the amount of data transmitted by the computer is too large through the USB connection, it will lead to poor engraving effect. Please transfer the image to phone and engrave through the LaserBurn.
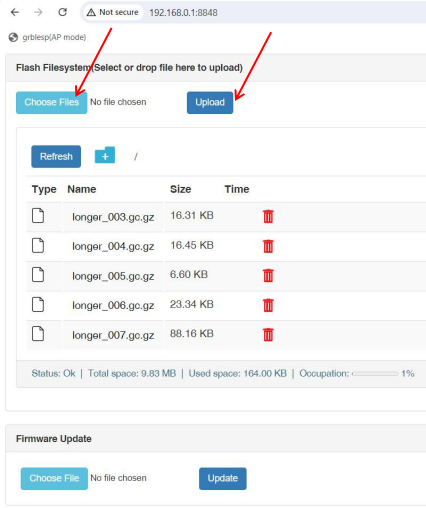
Search the WIFI network starting with LongerLaser_Nano and input password 12345678 to connect the WIFI of Nano, open the browser and enter 192.168.0.1:8848, click choose file to select nc files, and upload the file, select the file from the list click start to engrave.
2)Check if the engraving size is exceeds 100mm
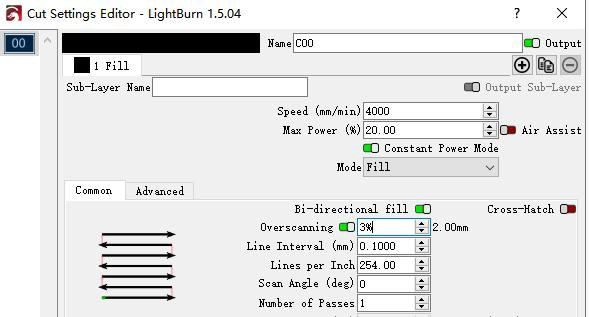
Check if the engraving size is larger than 100mm. Especially when the overscaning function is turned on in the cut settings editor, the path of the galvanometer rotation during the actual engraving process will be slightly larger than the actual image size. If the actual image size plus the additional size added by the overscaning function is greater than 100mm, such as the size will increase by 2mm as shown in the figure, which will lead to poor engraving quality. It can reduce the overscaning ratio or reduce the image size so that the image size plus the additional size added by the overscaning function is less than or equal to 100mm.
3)Check the bitmap mode
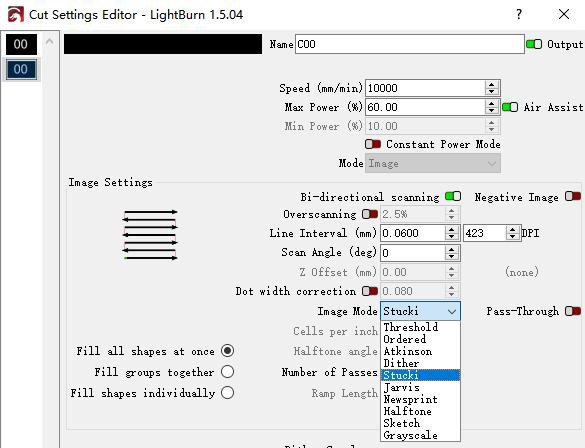
When engraving pictures, please choose among these three image modes, such as Atkinson, Stucki, Jarvis, other image modes will affect the engraving quality.
¶ 4.1.6 The engraved patterns are unclear
The failures of laser engraving mark is unclear may be due to incorrect focus, mismatch of parameters and materials, etc. Please refer to the following steps to check.
1)First make sure the focus is correct.
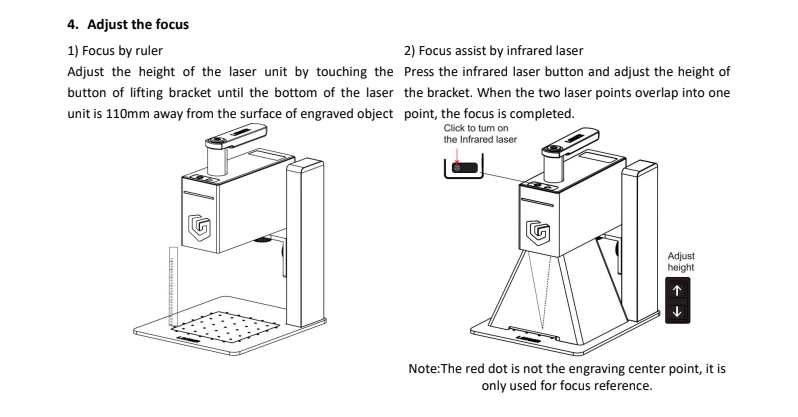
For Nano engraver: adjust the height of the laser unit by touching the button of the lifting bracket until the bottom of the laser unit is 110mm away from the surface of the engraved object. Or press the infrared laser button and adjust the height of the laser unit. When the two laser points overlap into one point, the focus is completed and you can start engraving.
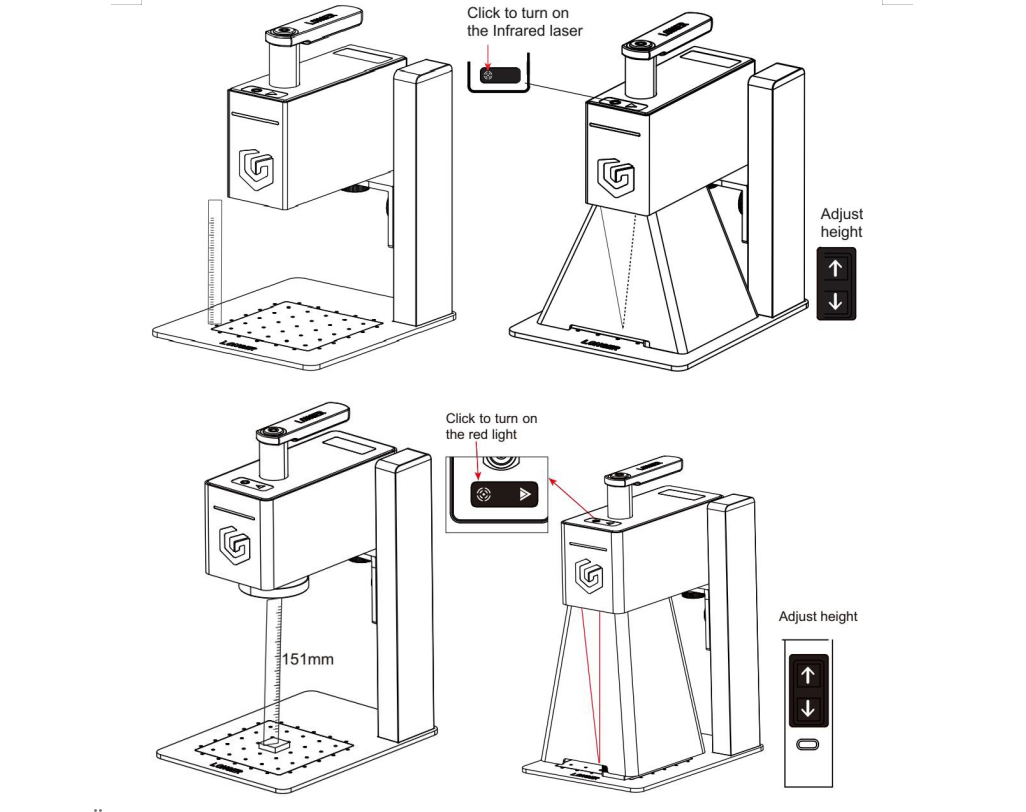
For Nano Pro engraver: adjust the height of the laser unit by touching the button of the lifting bracket until the bottom of the laser unit is 151mm away from the surface of the engraved object. Or press the infrared laser button and adjust the height of the laser unit. When the two laser points overlap into one point, the focus is completed and you can start engraving.
2)Check if the S value in Lightburn 检查Lightburn中的S值
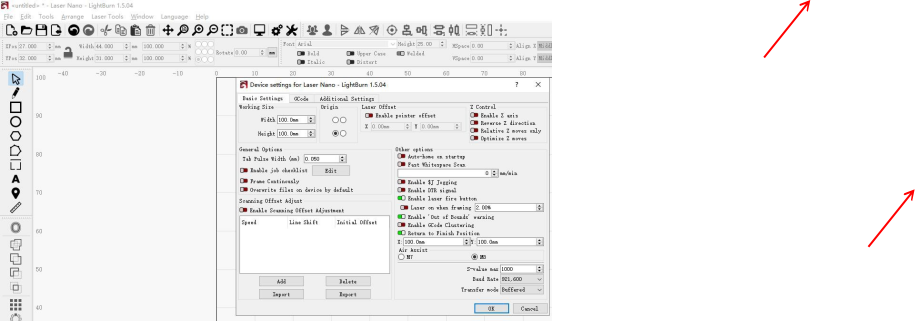
That is click Lightburn-Edit-Device Setting and check whether the S-value MAX is 1000.
3)Check the parameters
Check whether the engraving parameters are correct, especially the speed unit, please refer to the parameter table in the SD card. And for the LaserGRBL software, the value of S-MAX is 10 times the target laser power, such as when the laser power is 100%, S-MAX needs to be set to 1000%
4)Turn on the constant power
When editing parameters, make sure the laser mode is set to constant power mode, as shown in the figure.
5)Check the window mirror or filed lens
Check whether the window mirror or filed lens of the laser head unit is contaminated. If there is contamination, it is recommended to use lens cleaning paper or a dust-free cloth soaked in alcohol to wipe gently to avoid damaging the coating.
¶ 4.2 Remote diagnosis
¶ 4.2.1 How to create a new work order?
¶ 4.2.2 How to upload the log files of the engraving machine to the existing work order?
¶ 4.2.3 Export logs
¶ 5. Maintenance Guide
In this section, you can find the recommended maintenance guidelines for the X1 series printers, which are designed to ensure smooth operation and a longer service life of the products.
¶ 5.1 Regular Maintenance Recommendation for nano 6w:
¶ 6. Parts Replacement Guide:
In this section, you can find a step-by-step guide which shows the process of disassembling and installing various parts of the nano series engraving machine.