¶ Camera Features
¶ Notes before using the camera function
- Before using LaserBurn's camera function, make sure that no other machine software occupies the NanoDuo camera.
- Before using the camera function, you need to make sure that you have successfully performed a visual correction by Visual Alignment.
- Try not to connect other USB cameras to the computer to prevent interference.
¶ How to use the camera function
- Connect the NanoDuo machine and click Camera to open the camera function.
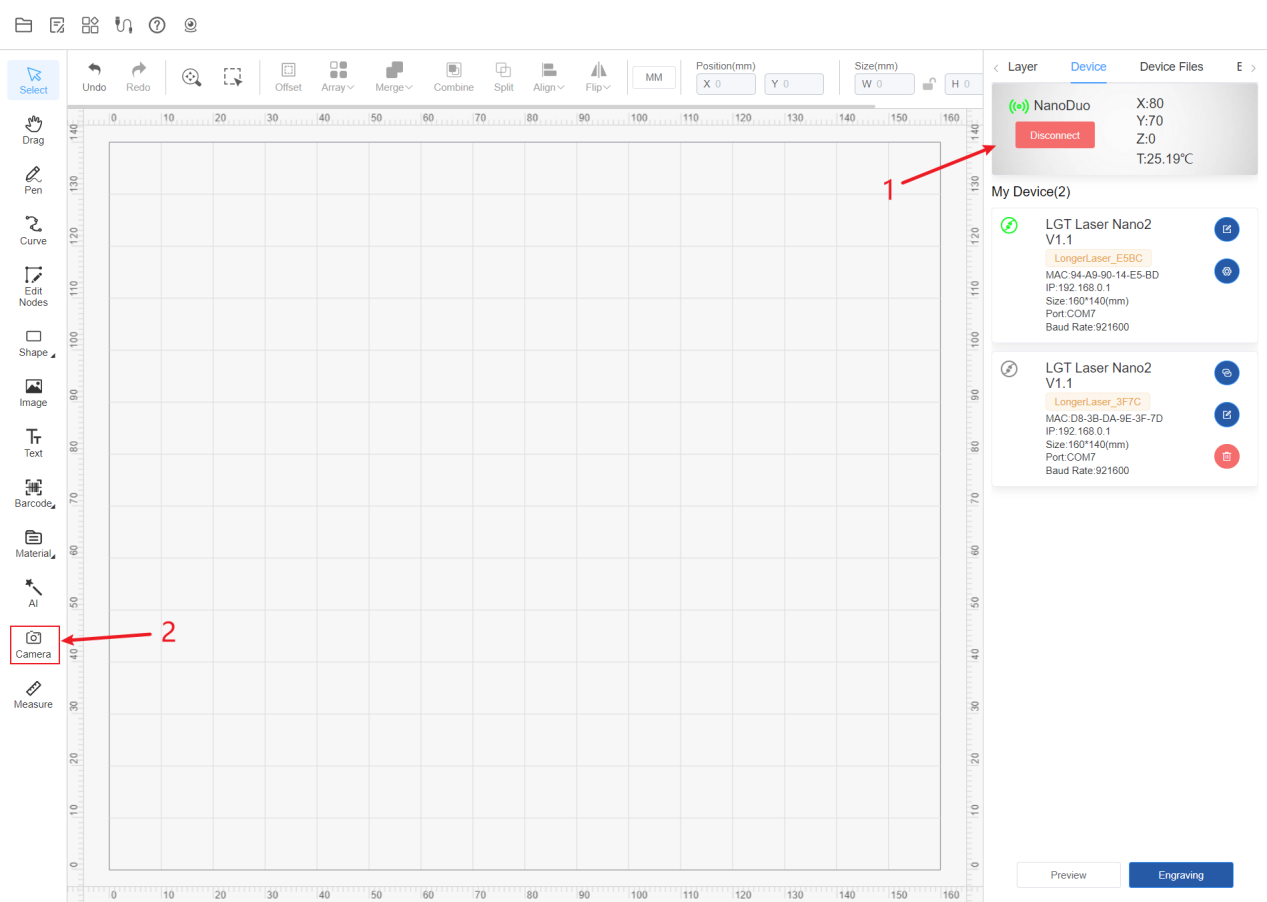
- Click the capture button to capture a picture with the camera and place it on the canvas.
(1) If the picture exceeds the canvas size or is deformed, you need to perform the Visual Alignment function again.
.png)
- Place the drawn figure at the position you need to engrave in the picture.
.png)
- Click on "Engrave". After engraving is completed, click "Capture" again to take a photo and check whether the engraved position coincides with the canvas element. If the position deviates, it means that the visual correction function has not been performed and visual correction is required to improve the accuracy.
.png)
¶ Conveyor Belt function
Multi-batch engraving function
The camera captures the processing pattern, identifies multiple materials of the same shape in a batch, and engraves them in batches. Then the next batch is identified and engraved.
¶ Notes
Before batch engraving, confirm whether the camera function can be used normally.
It is recommended to perform a visual calibration during Batch Fill
The multi-batch engraving function of the conveyor belt is based on the batch filling function. Please confirm whether the batch filling function can be used normally before using it.
The conveyor belt needs to be kept clean, free of debris, scratches and other messy items except engraving materials.
Note: Do not use thin, light-transmitting materials (such as paper and cloth) on the conveyor. The laser beam falling on the conveyor belt will damage the conveyor belt
¶ Multi-batch engraving process
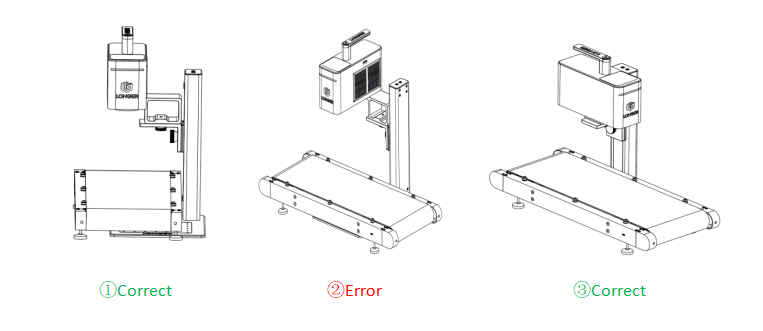
Confirm the placement of the machine and conveyor belt as follows:
- Place materials
(1) Place materials of the same size, shape, and color on the conveyor belt with a spacing of more than 5 mm.
(2) The materials should be placed within the engraving range and should not exceed the engraving range.
- Take a picture of the material
(1) Open the camera function and click capture to capture the image of the processing consumables. - Design the pattern and set the position
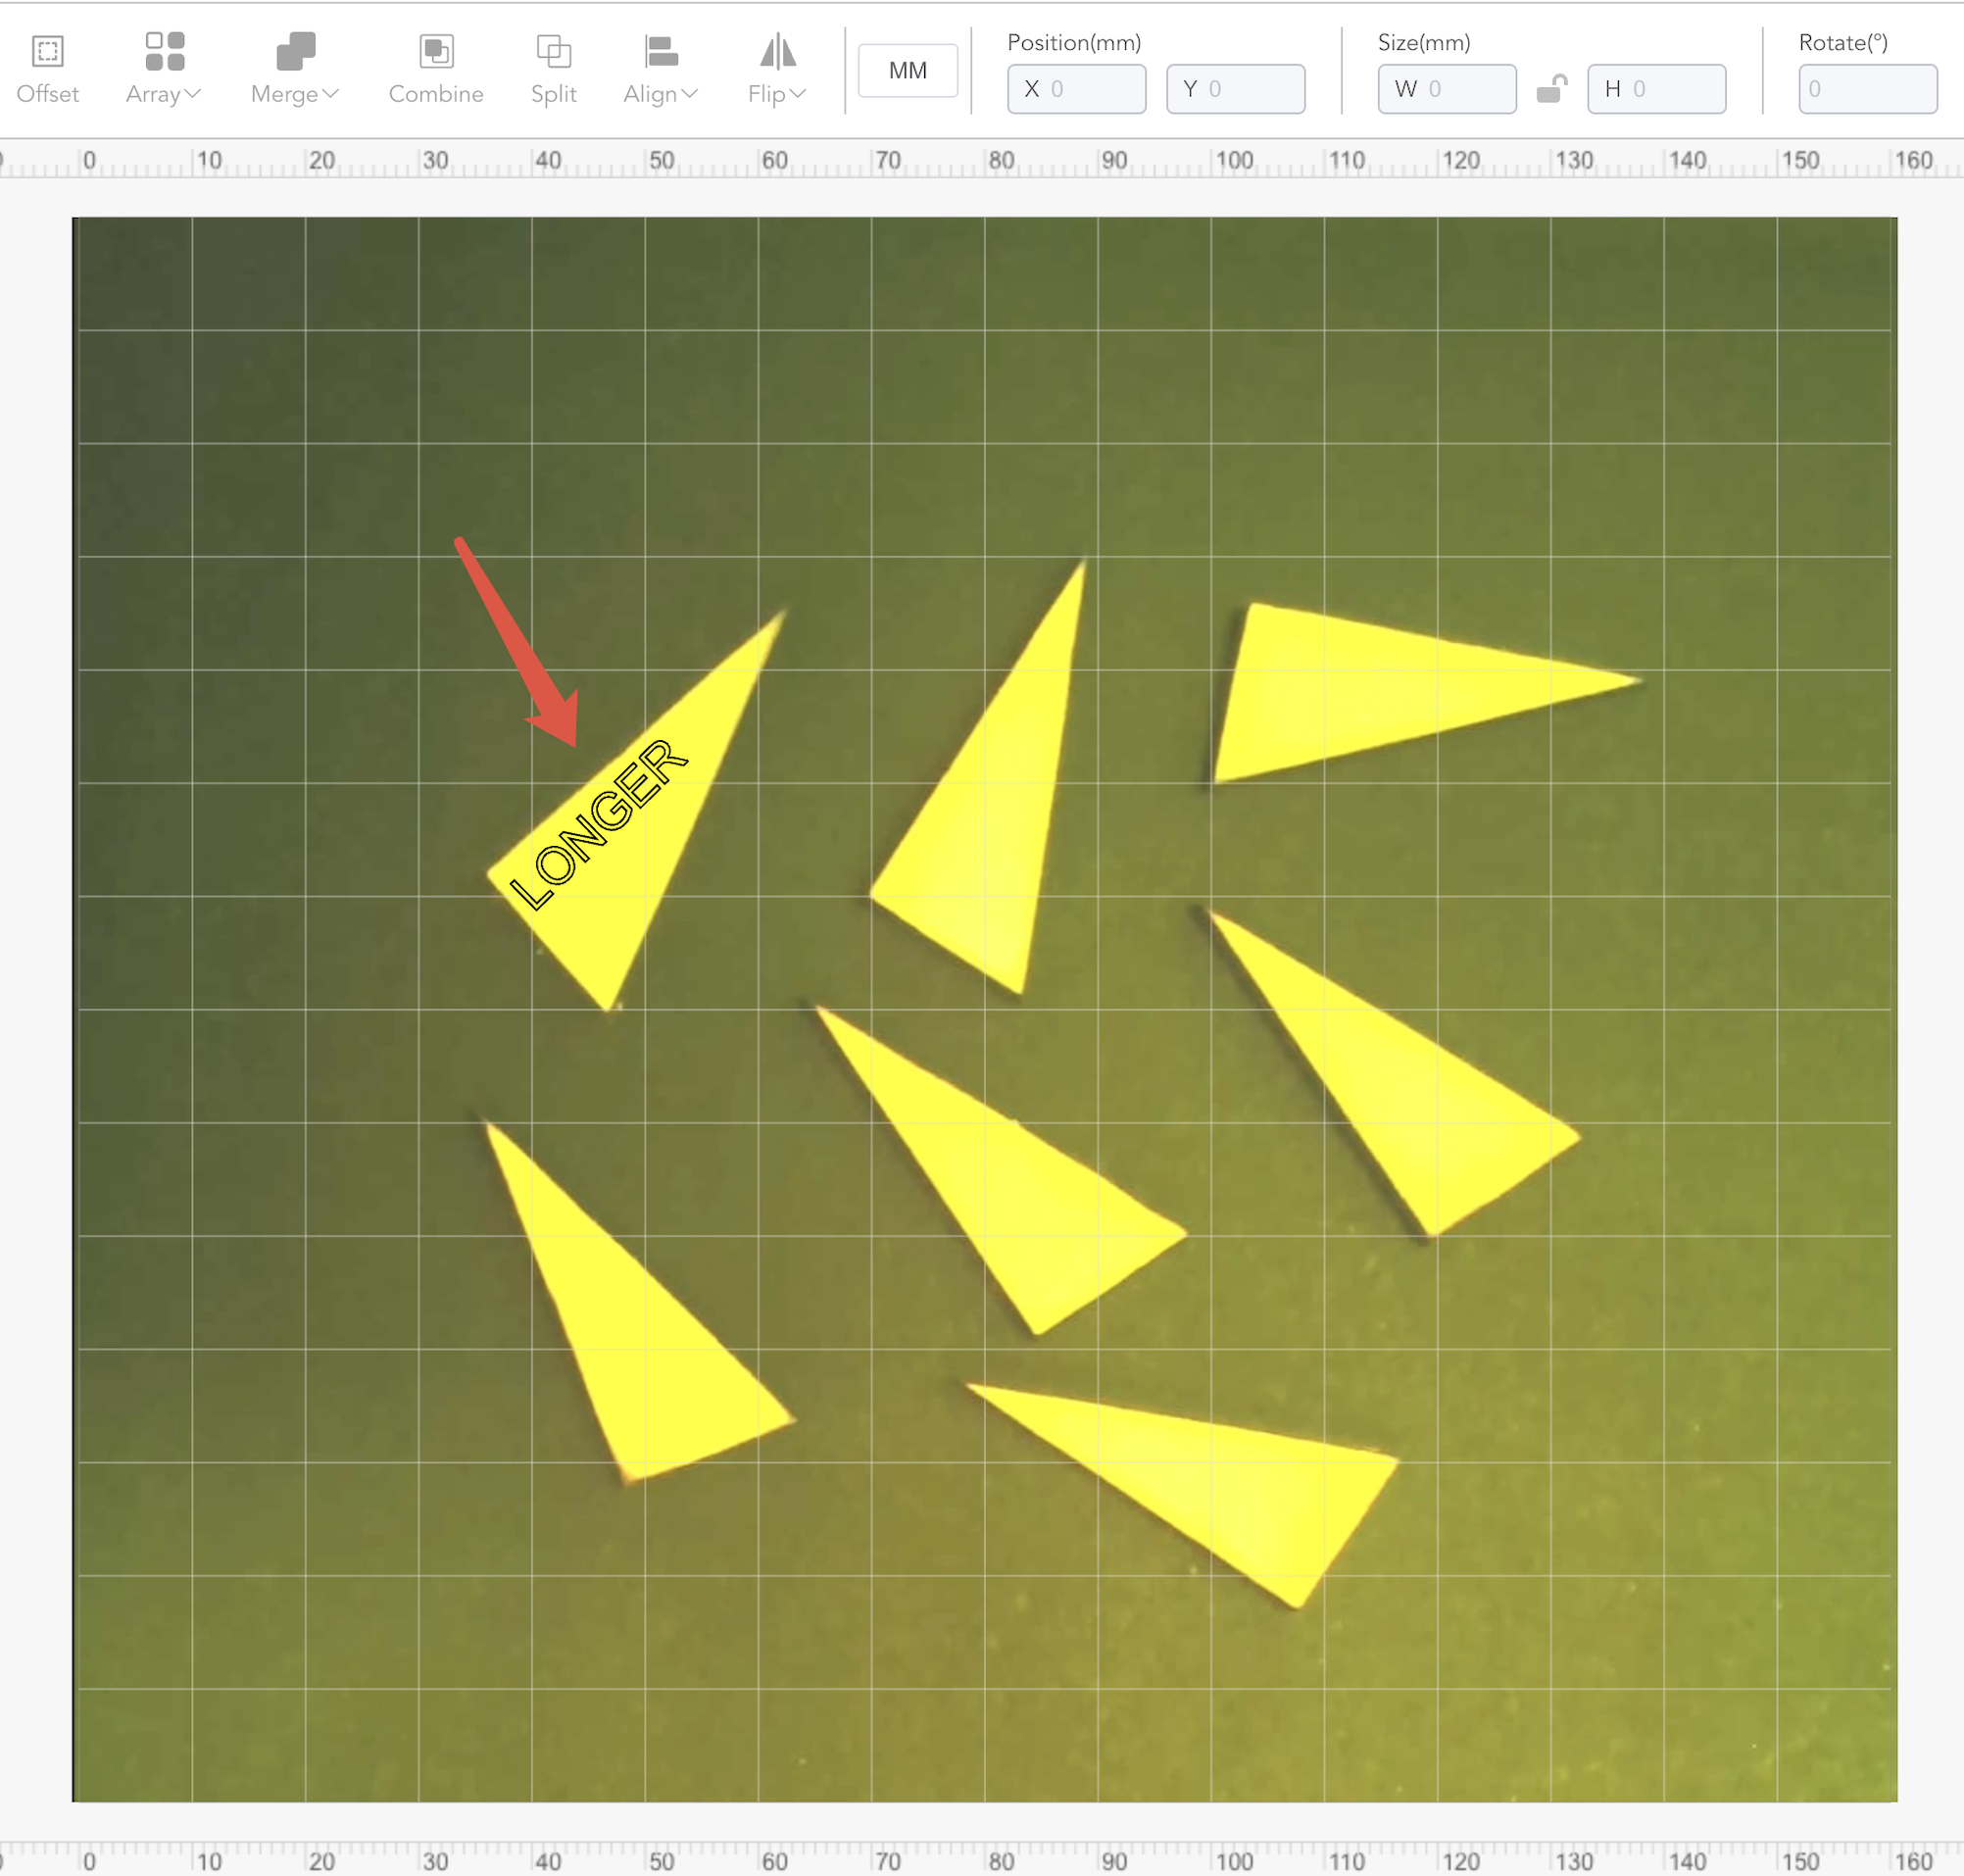
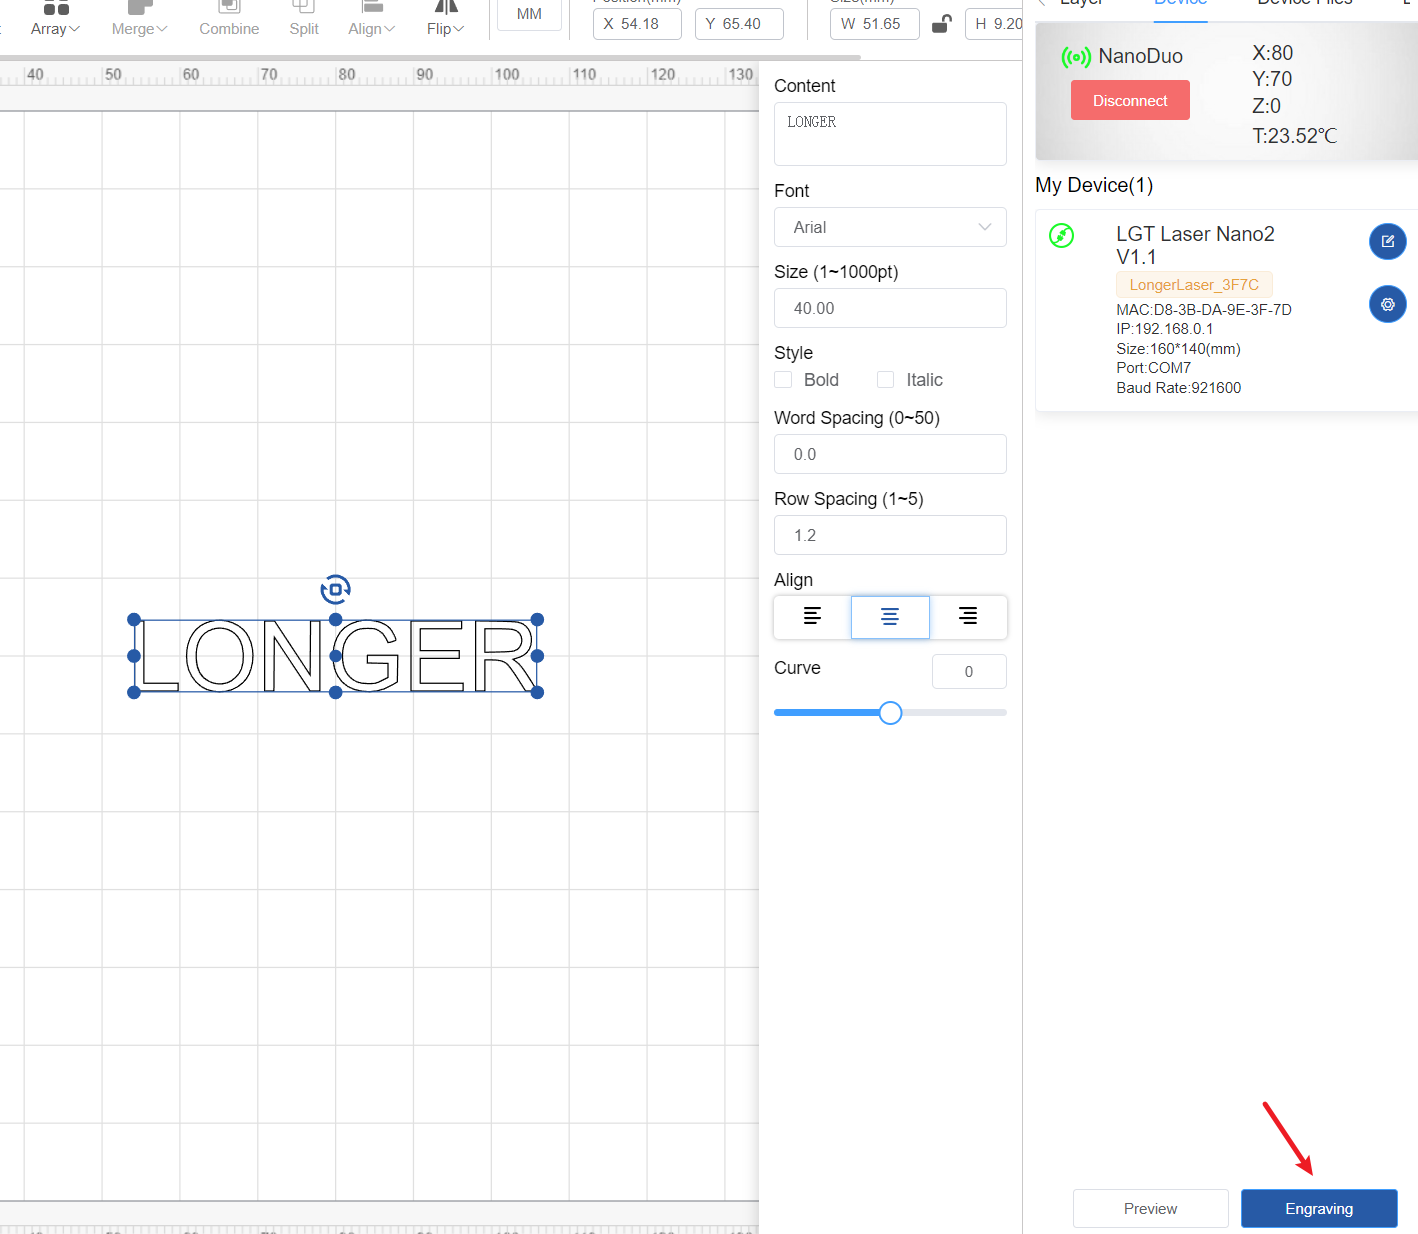
(1) Design a pattern on the canvas.
(2) Drag the pattern and place it on any material so that the pattern is completely inside the material. Try to keep a certain distance between the pattern and the material boundary to prevent engraving on the conveyor belt.
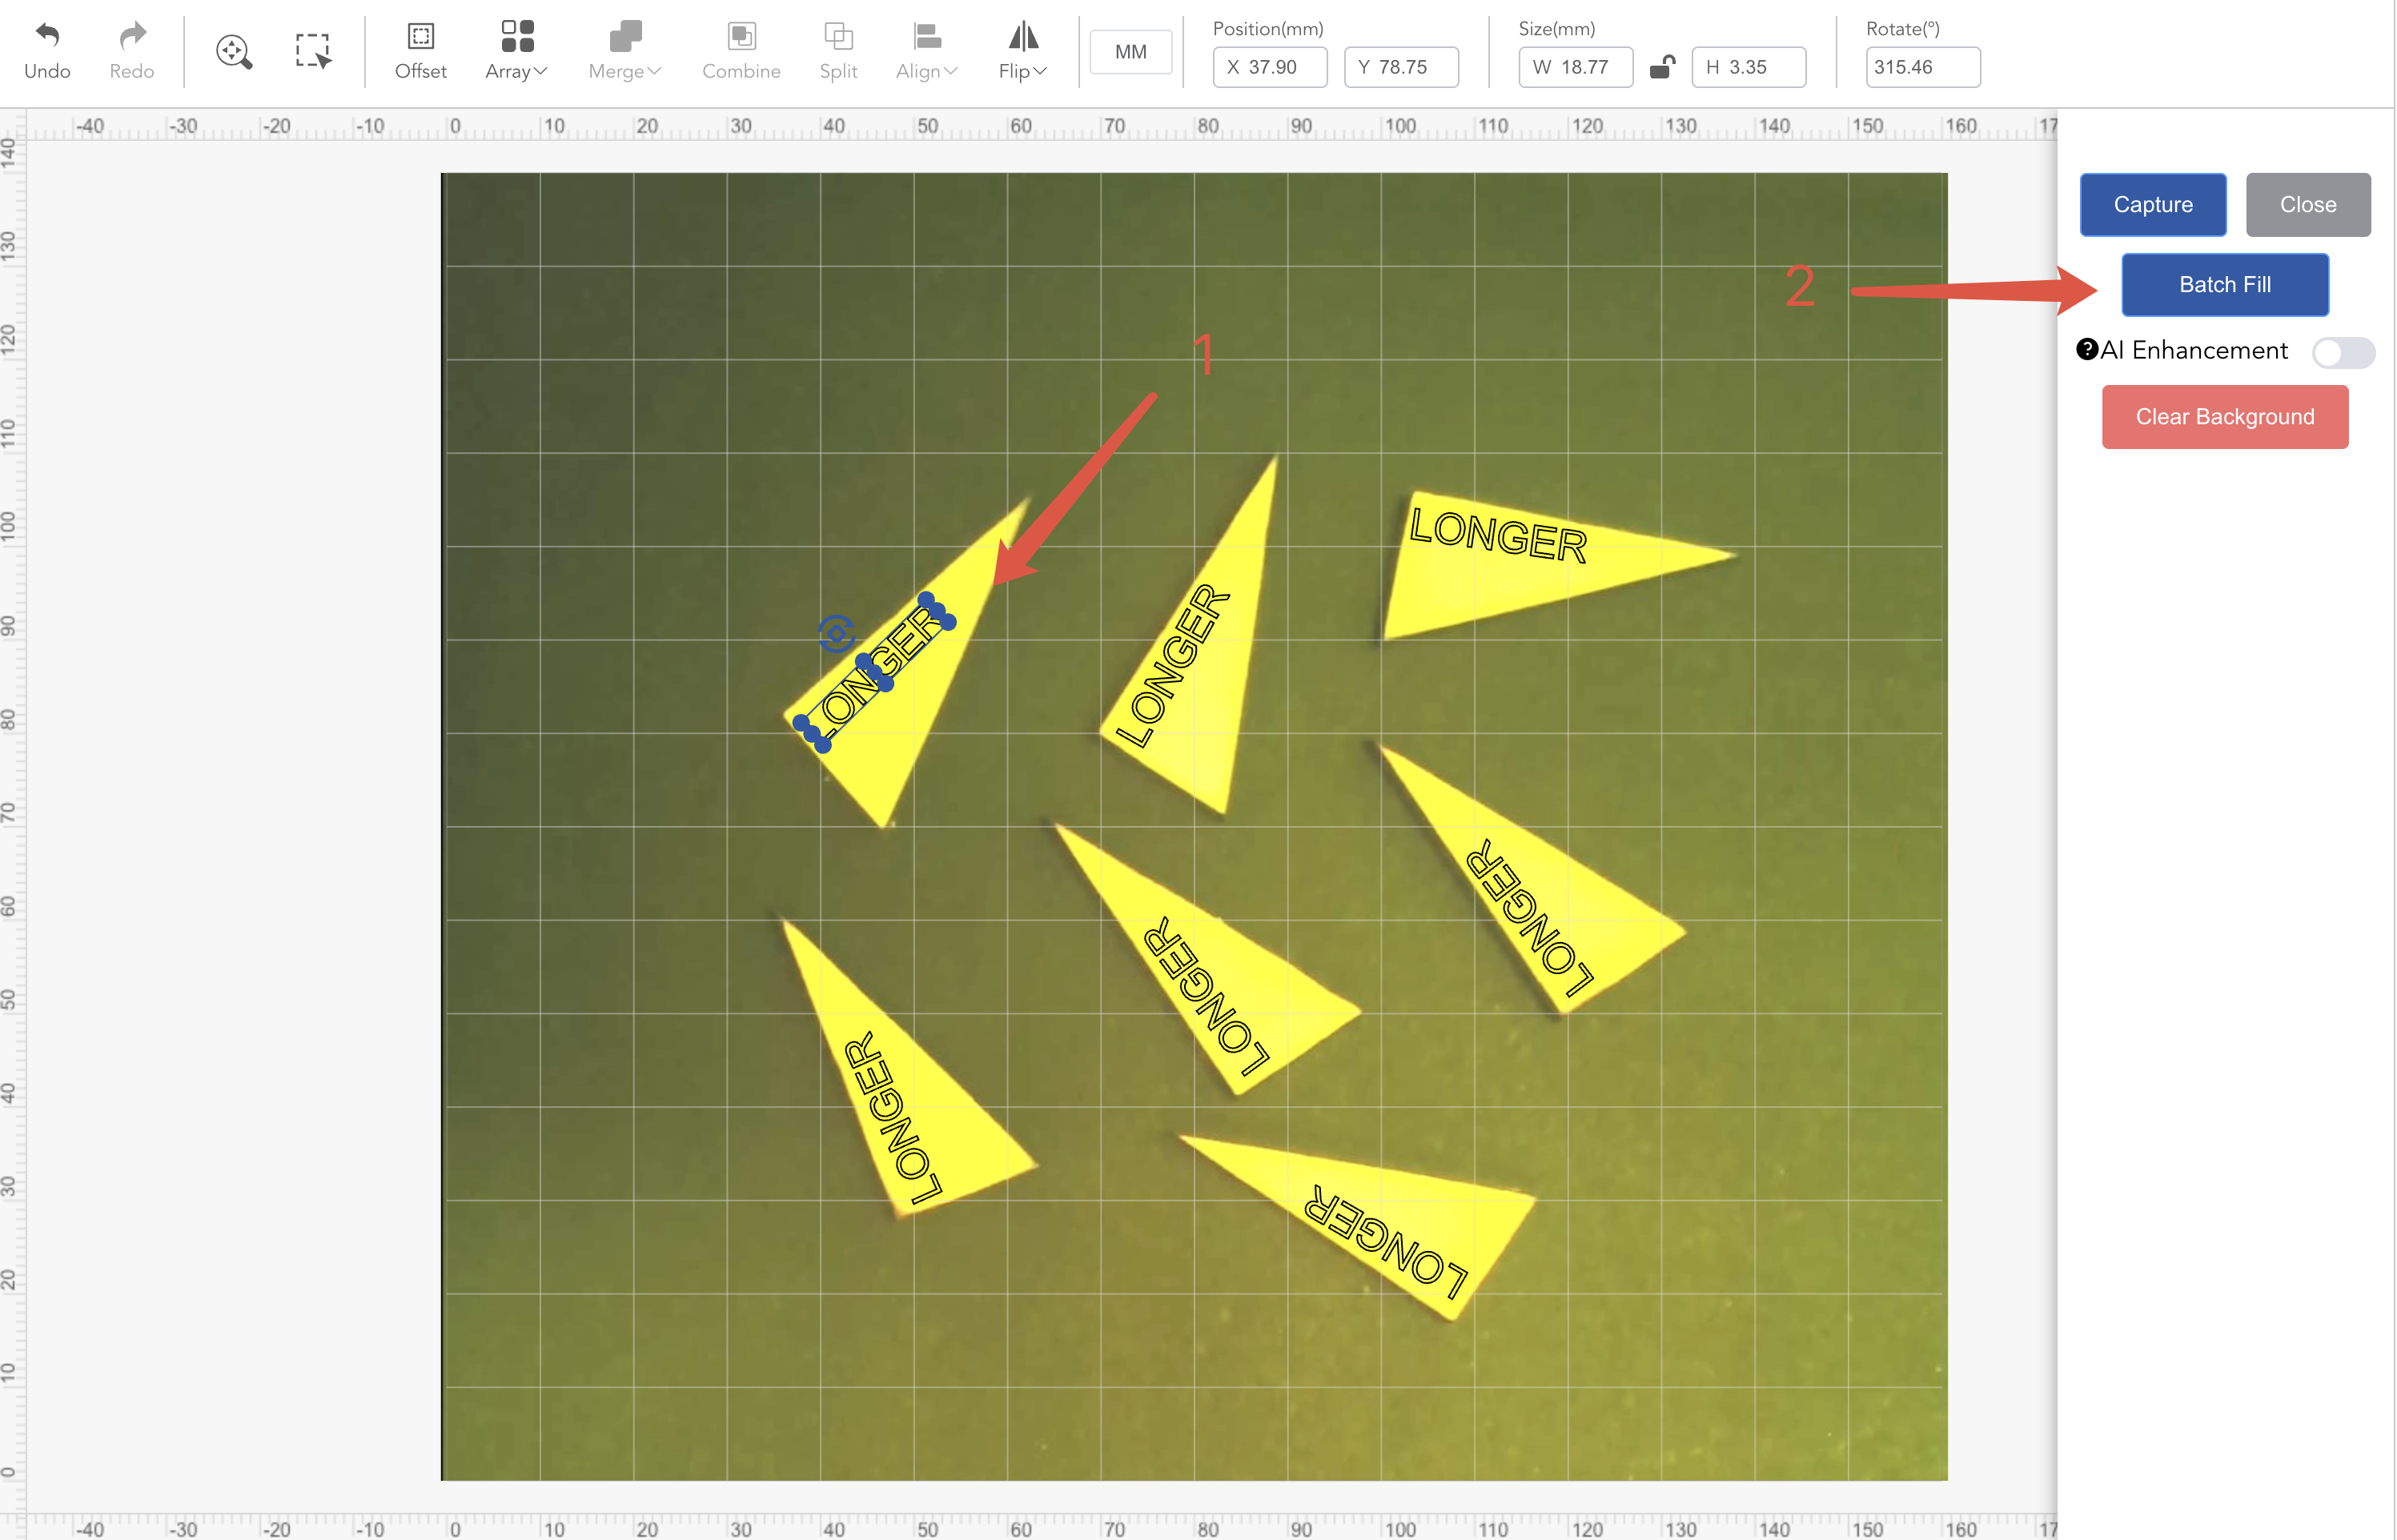
4. Batch copy and place patterns
(1) Click Batch Fill, the remaining material contours will be automatically identified and the pattern will be copied to the inside of the remaining contours at the same relative position and angle.
Note: AI Enhancement is not available in the current working mode.
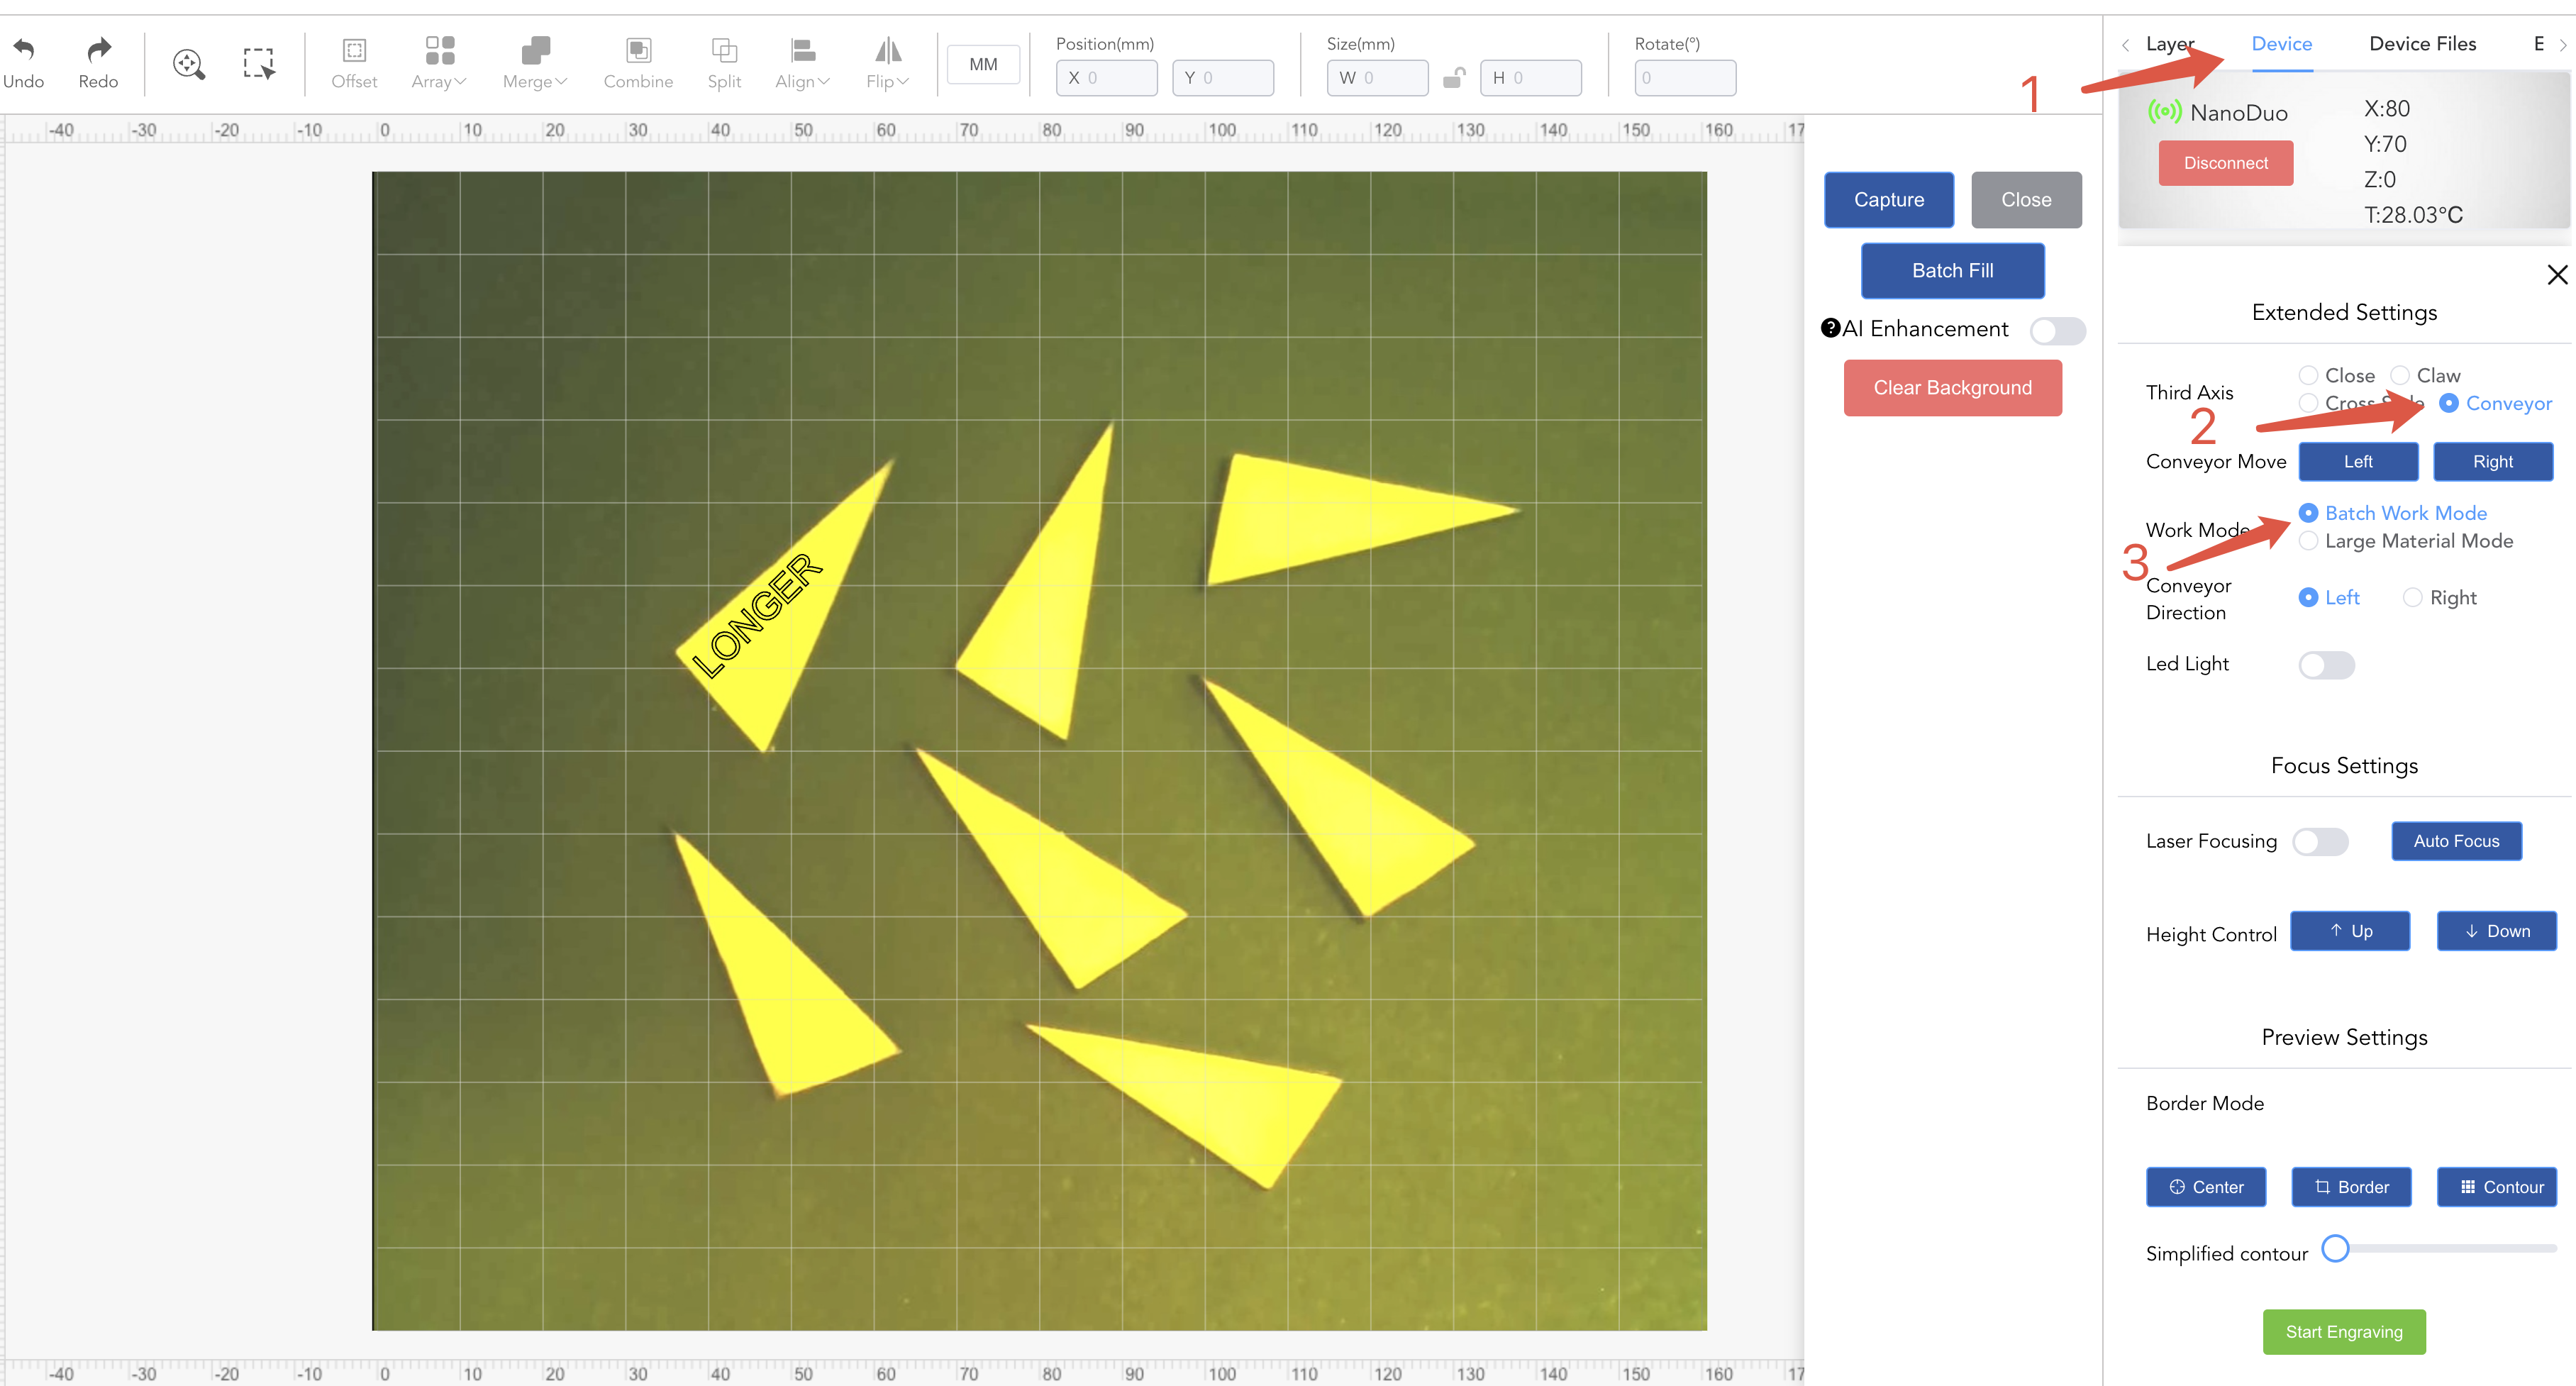
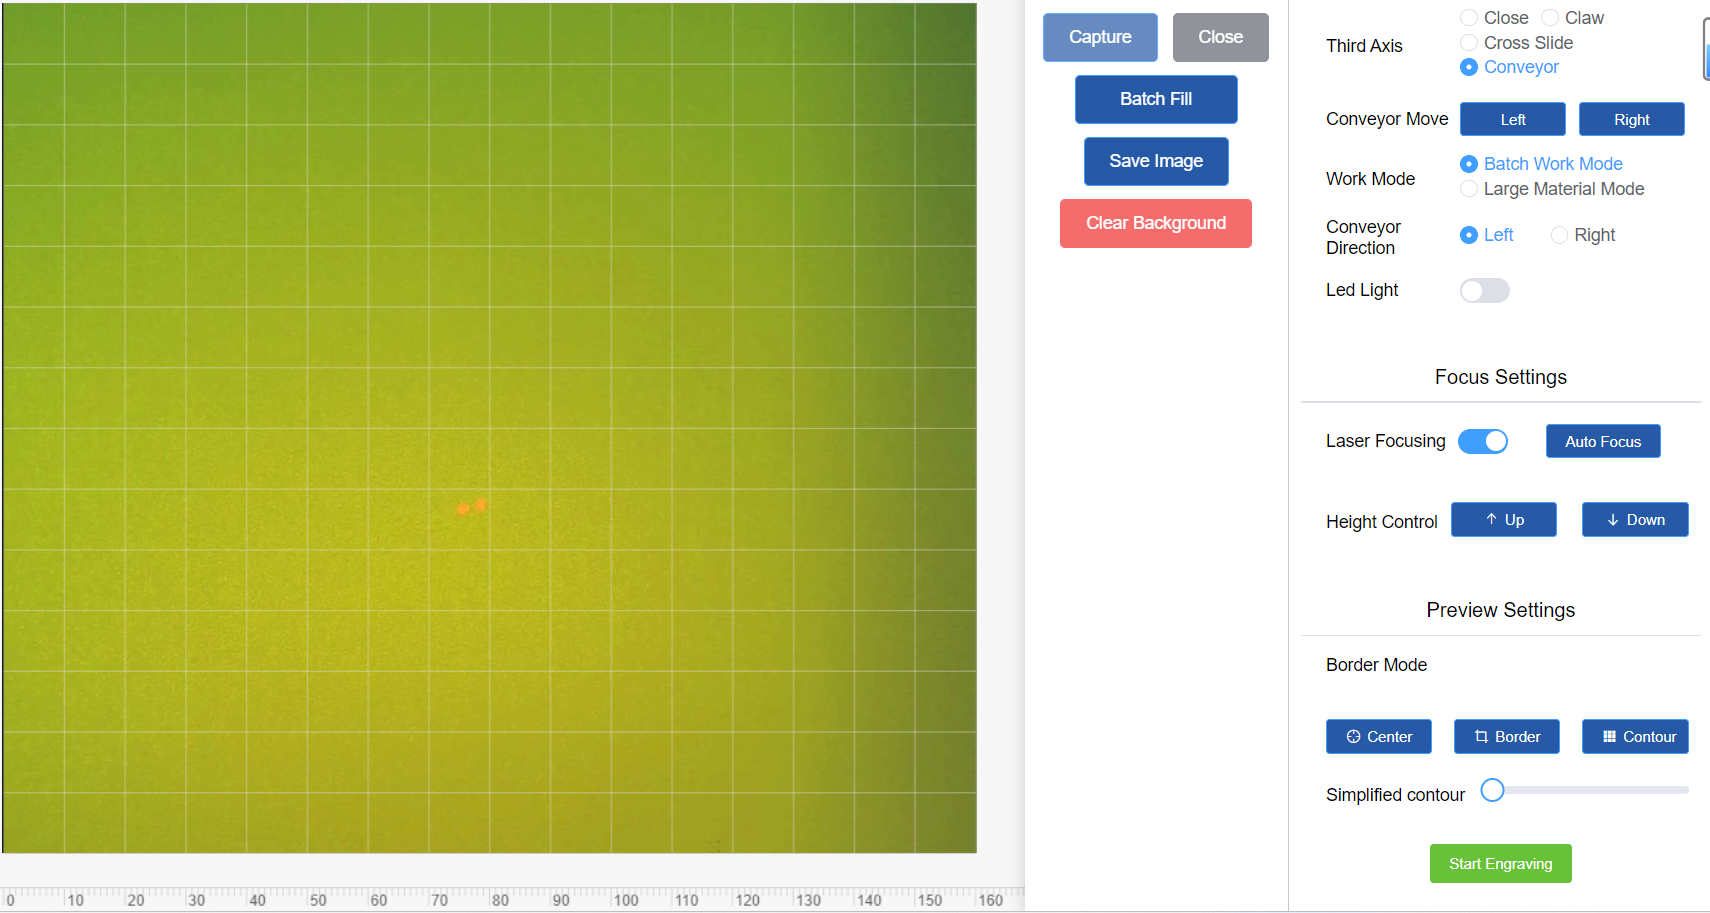
- Select the conveyor module
(1) Switch to Device tab
(2) Click Engraving on the Device page to enter the Extended Settings page and switch to the Conveyor Batch Work Mode.
(3) Depending on the placement direction, select whether the Conveyor moves in the Left or Right direction.
(4) Note that you need to click Border or Contour to preview during this step (to check whether the engraved pattern is in the expected position). If the position in Conveyor deviates, you need to re-perform visual correction.
6. Start Engraving
(1) Click Start Engraving to execute the engraving process and start engraving all patterns.
(2) After engraving the first batch, the conveyor will move in the selected direction and start engraving the next batch.
(3) When no more than one engraving consumable is detected in the screen, Batch Work will stop working.
¶ Batch Fill function
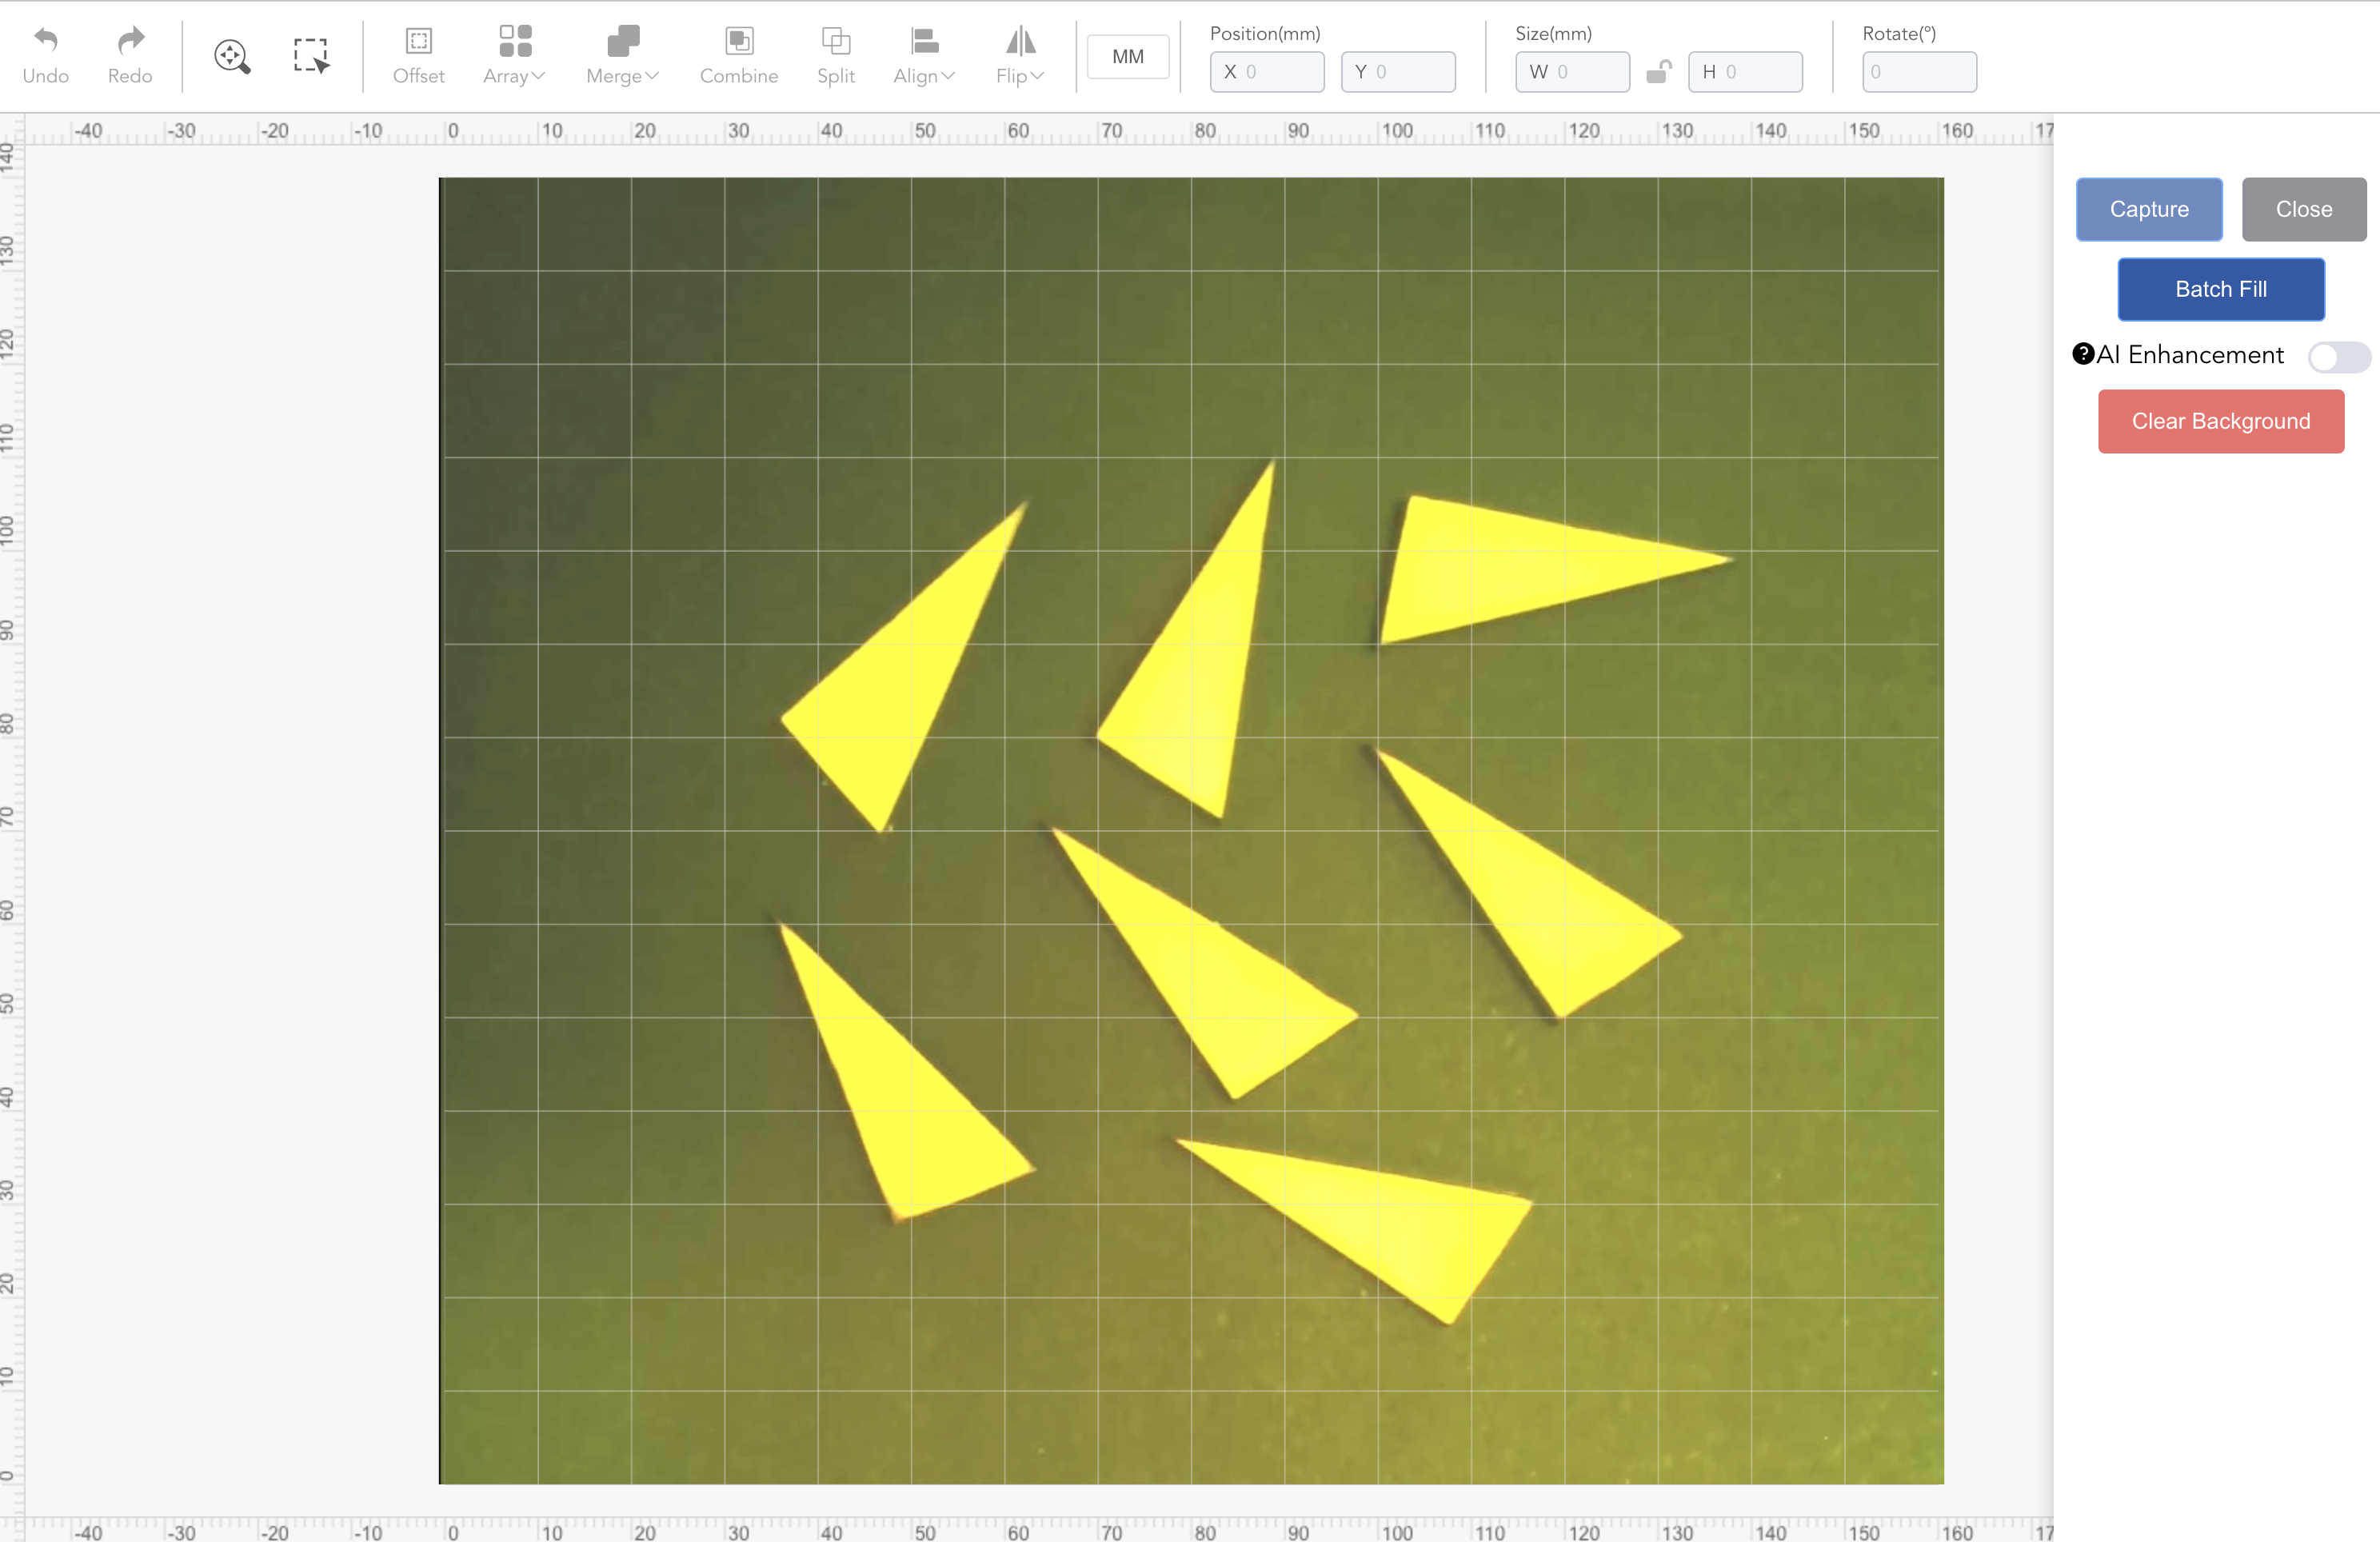
Capture the processing pattern through the camera, identify the contour position of multiple materials with similar shapes, and copy them in batches.
¶ Material restrictions
All materials must have the same shape and material, with size errors between multiple targets not exceeding 10% and area errors not exceeding 25%.
The material color must have a distinct contrast with the background pad, as shown in the schematic diagram below.
Significant reflection on the metal surface will greatly reduce recognition accuracy.
Two or more engraving targets must be placed within the engraving area, with spacing of at least 5mm.
The material thickness should be less than 5mm.
¶ Notes
Before batch filling, ensure the camera is functioning properly and that the captured image has clear outlines visible to the eye.
Before batch filling, select a single element. The batch filling function will clear unselected elements and then fill the selected element onto the object.
For batch filling, manually place the first pattern on the material surface and select it. Batch filling will use it as the reference.
Avoid including extraneous objects or clutter in the image.
¶ Batch filling process
-
Place materials
(1) Place materials of the same size, shape, and color on the base plate with a spacing of more than 5mm
(2) The materials should be placed within the engraving range and should not exceed the engraving range

-
Take a picture of the material
(1) Click capture to get the image of the processed material
-
Design the pattern and set its position
(1) Design a pattern on the canvas
(2) Drag the pattern and place it on any material so that the pattern is completely inside the material
-
Batch copy and place patterns
(1) Select the material in the canvas and click Batch Fill. The remaining material outlines will be automatically identified and the pattern will be copied to the inside of the remaining outlines at the same relative position and angle.
- Start engraving
(1) Adjust the material parameters and follow the engraving process to engrave all the patterns on the canvas at once
¶ Note
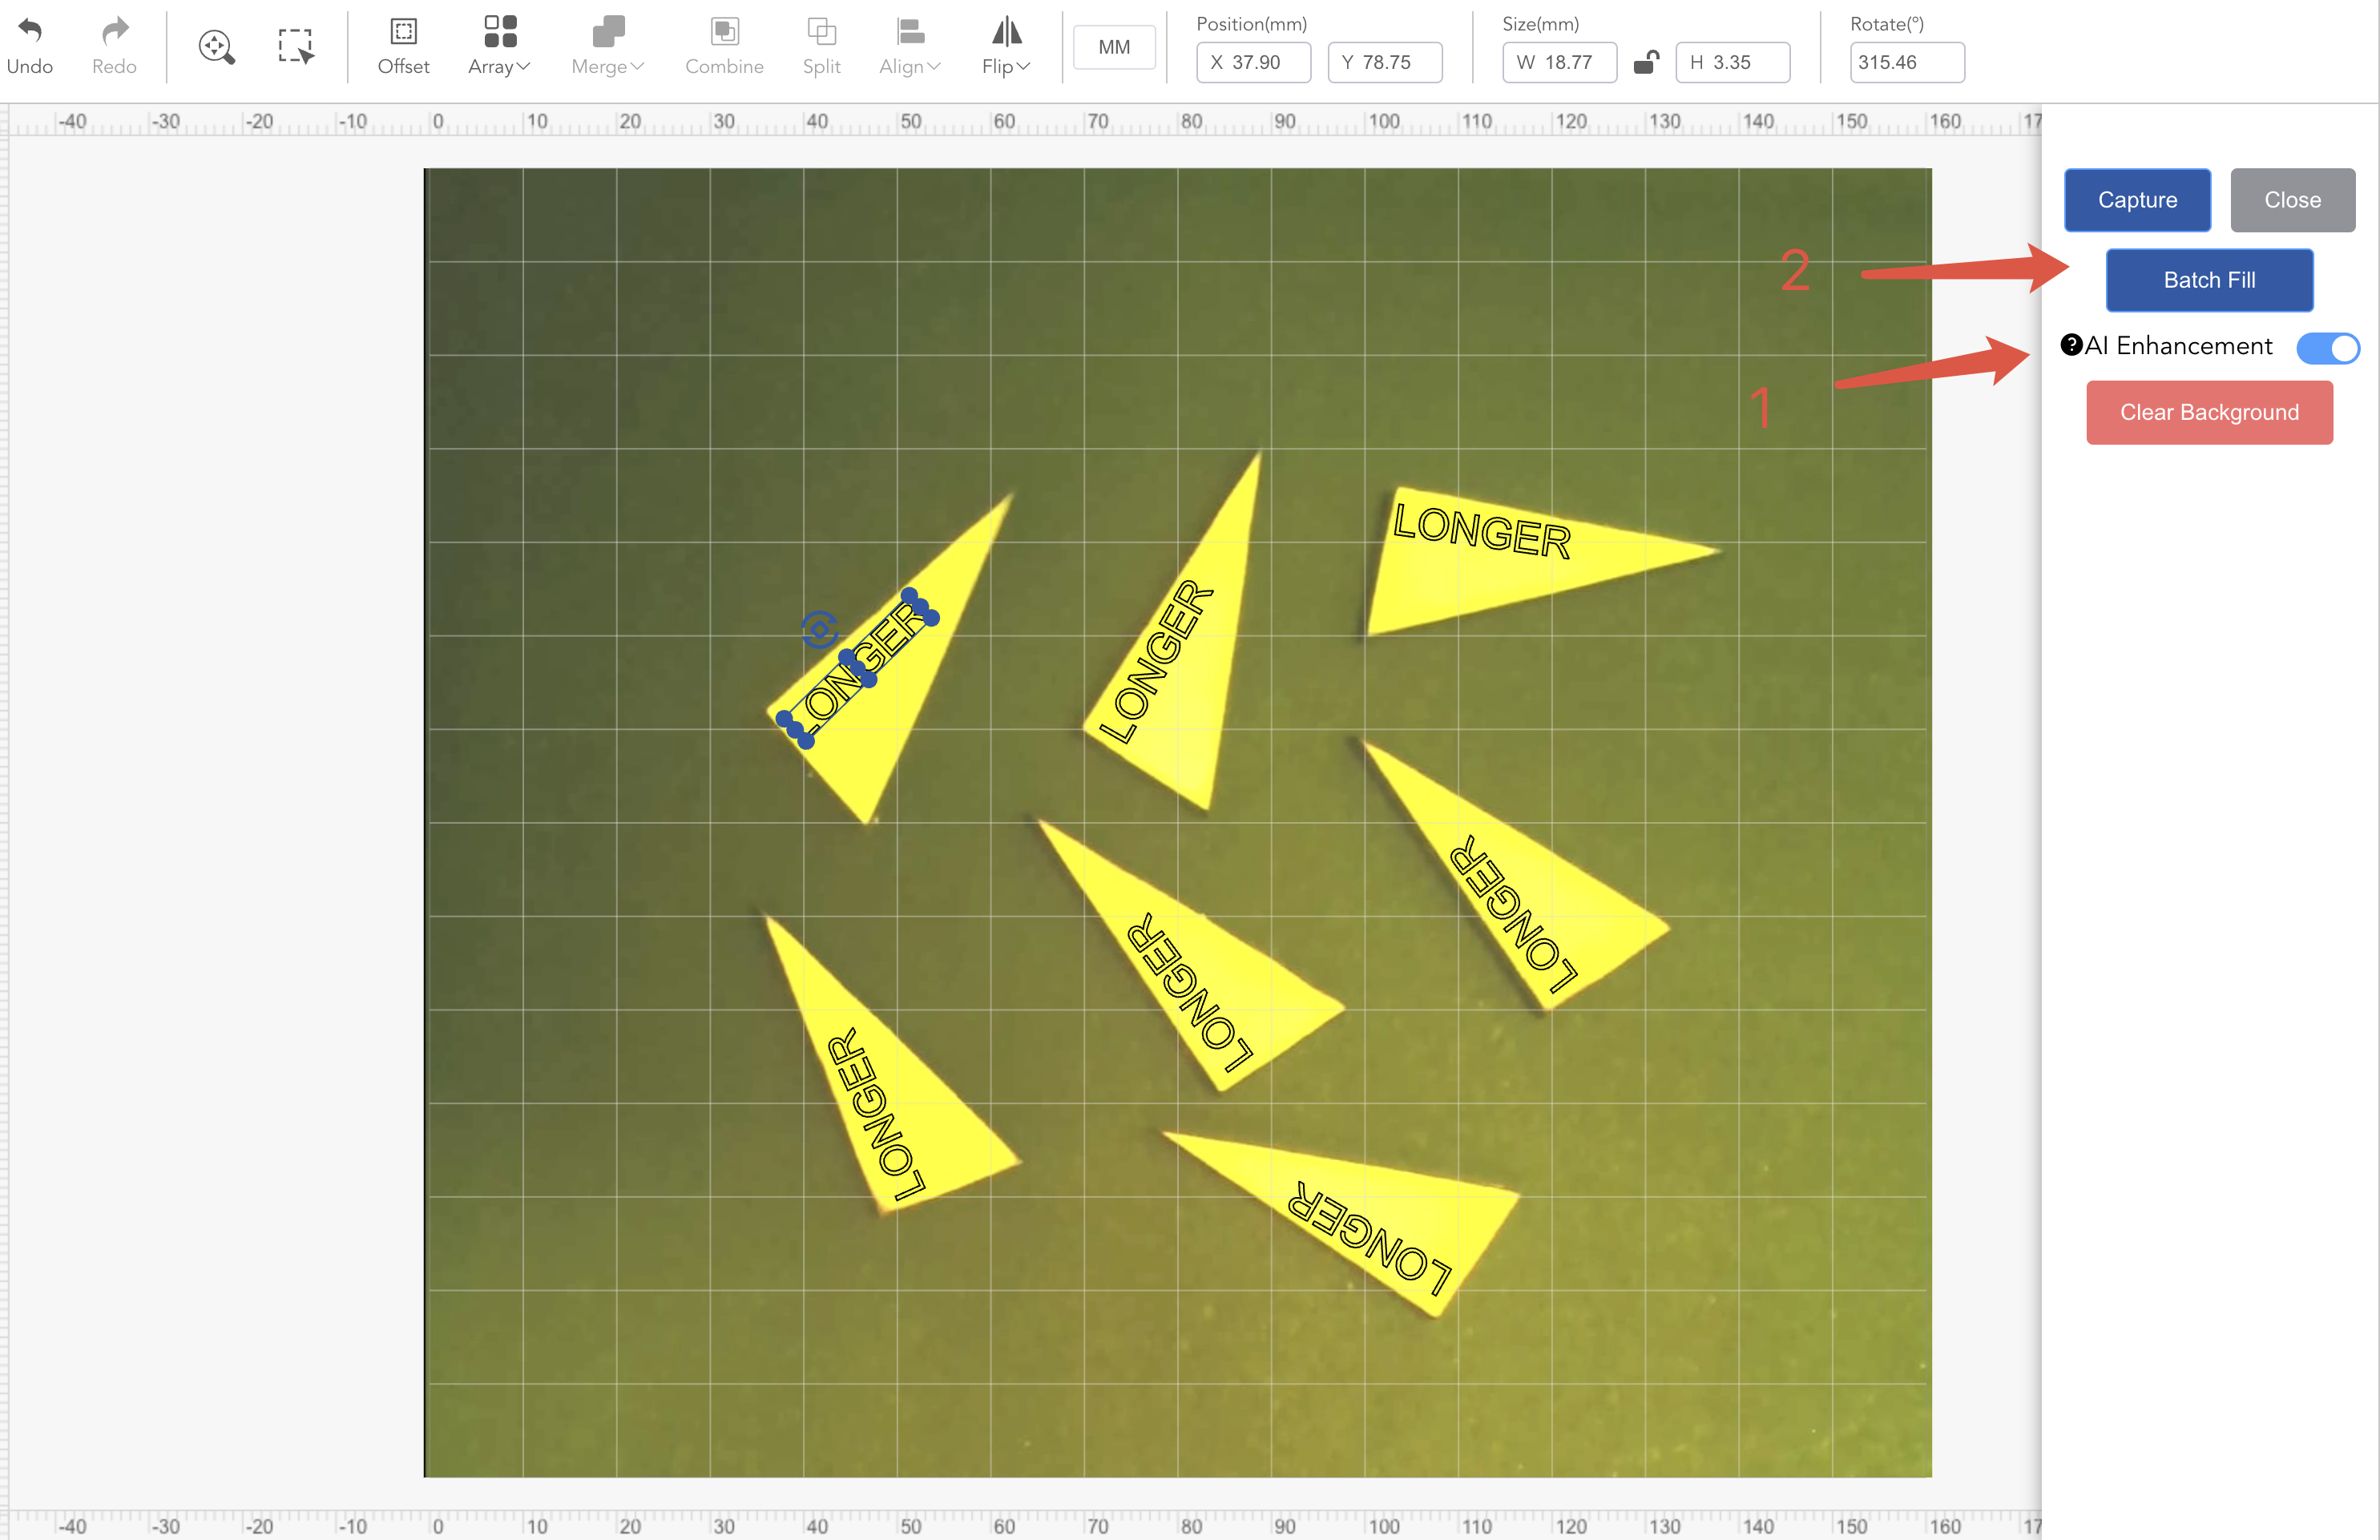
- If the Batch Fill results are not satisfactory, you can choose to use AI Enhancement. When enabled, the system will load a large model, which may take 3-8 seconds (depending on your computer's performance).
- Once the large model is successfully loaded, the Batch Fill button will become available. Clicking the button at this point will use the large model for assisted computation. The computation process also varies based on computer performance, taking approximately 5-10 seconds, while computers with lower performance may require more time.
¶ Visual Alignment
Before using several vision-related features of NanoDuo for the every time, you need to align your camera. This is done by engraving a target mark pattern and then marking the mark in the photo capture by the camera. Before starting, make sure that no other application is occupying the NanoDuo's camera.
¶ Notes
Place the engraving paper in the engraving work area (use the provided white engraving paper).
When performing the visual Alignment function, make sure that no other cameras are connected and the machine camera is not occupied.
Do not move the machine or engraving paper during the visual correction process. Make sure the correction process is completed once
Do not use the engraved pattern for correction again, and you need to re-engrave a new marking pattern
Every time you disassemble the machine, you need to re-perform visual correction
¶ Engraving the Marking Graphic
You will use your laser to engrave the target pattern on a piece of material and mark the center of the target.
- Step 1
After connecting to the NanoDuo, click on the camera icon that appears in the menu bar to enter the Vision Alignment function page.
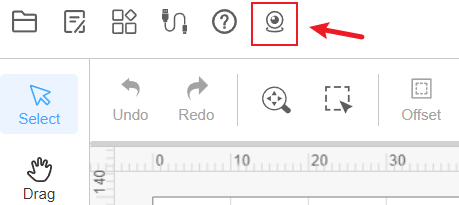
Before entering the Vision Alignment page, please zoom out and move the canvas to the side so that the entire canvas can be seen normally after the Vision Alignment page is opened.
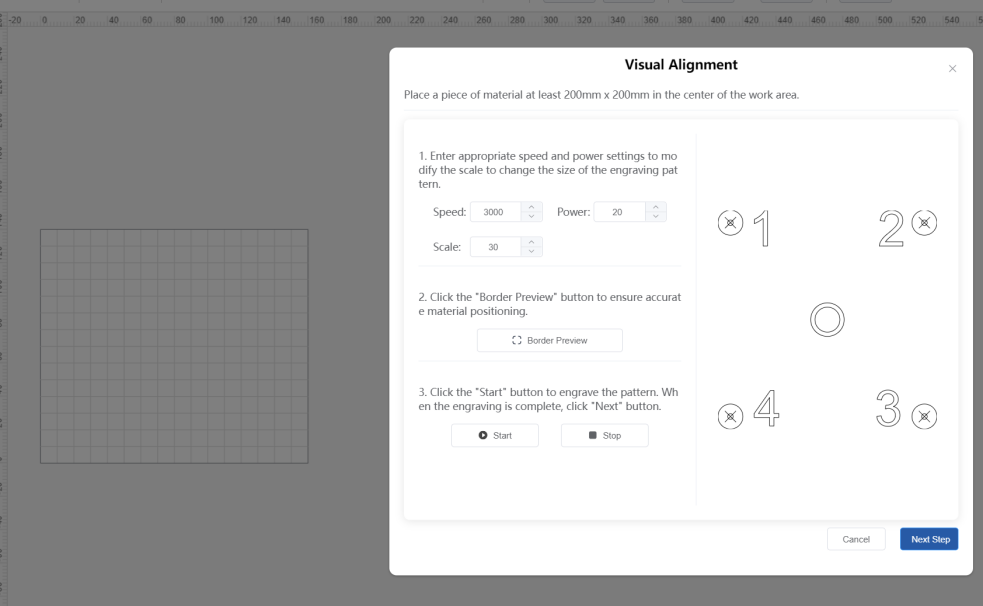
- Step 2
Enter the appropriate speed and power settings to get moderate engraving without burning through. Increase or decrease the scale value until the canvas is able to fit the marking pattern.

3. Step 3
Click the border preview button to make the marking pattern appear on the canvas and not exceed the canvas size.
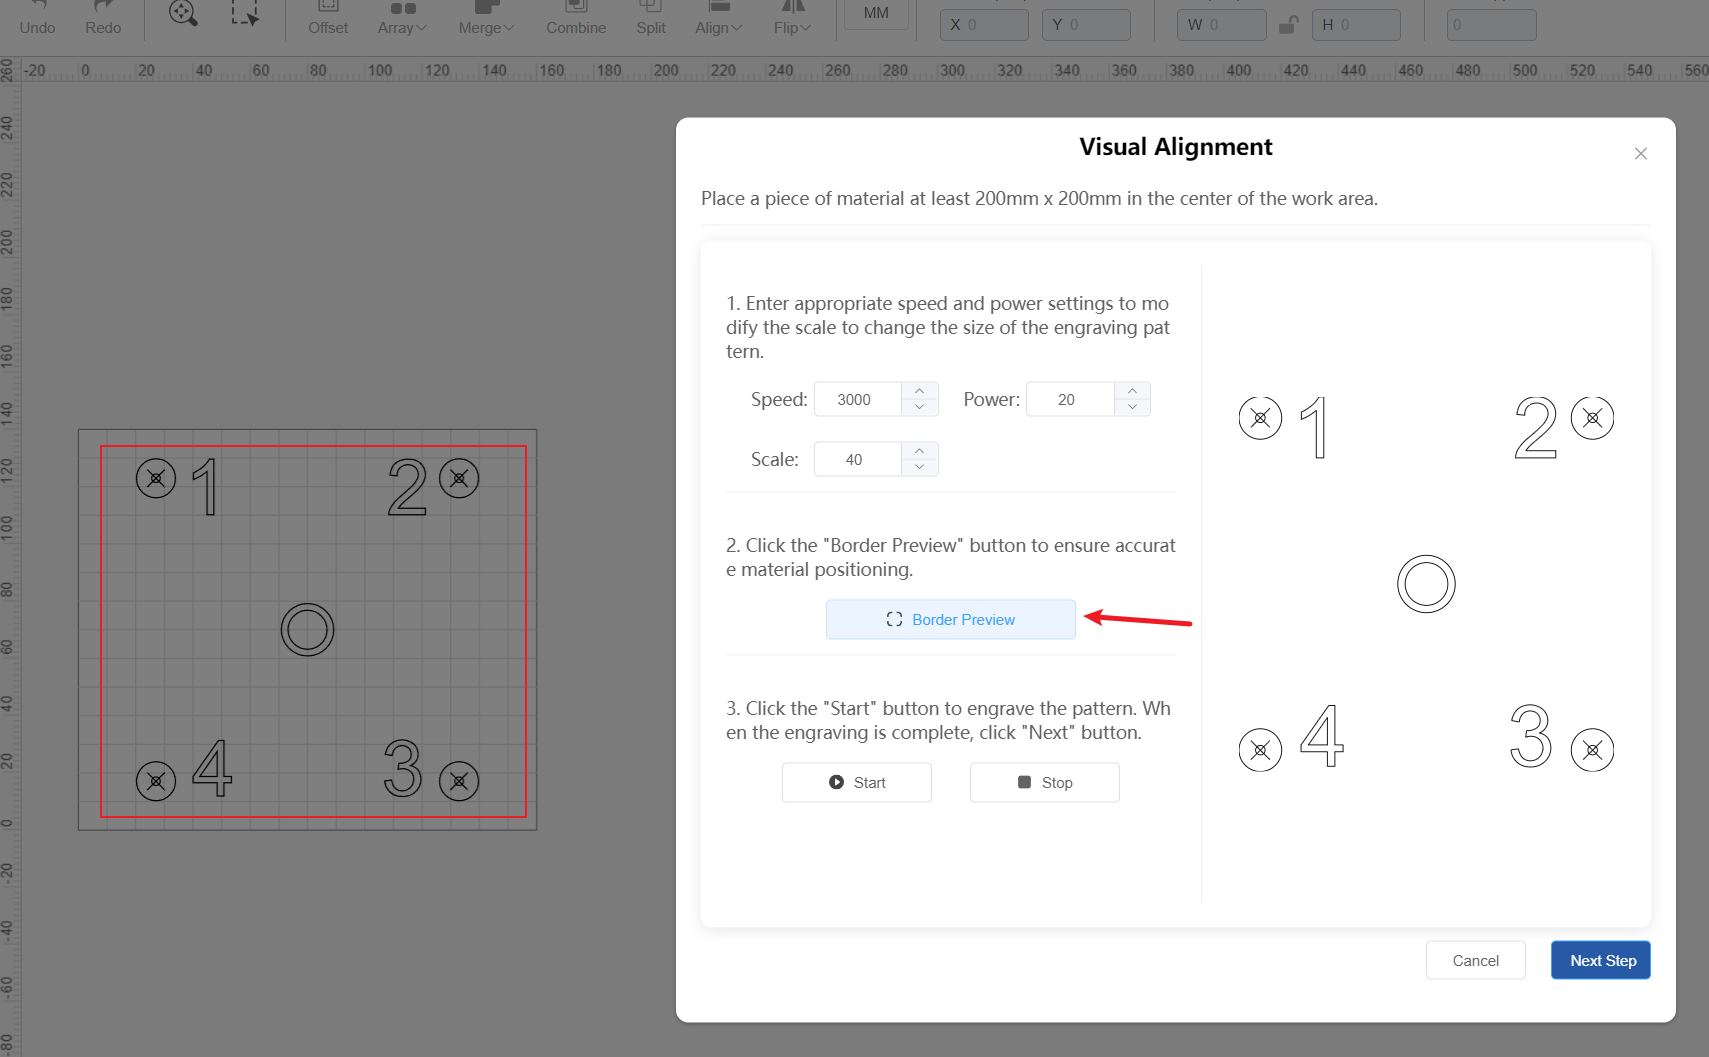
Note: Every time you modify the speed, power and zoom values, you need to click the border preview button again to update the marking pattern on the canvas again.
- Step 4
Start engraving. If it is not obvious enough, you can adjust the settings and run it again. When the pattern is clearly visible and easy to see, click Next.
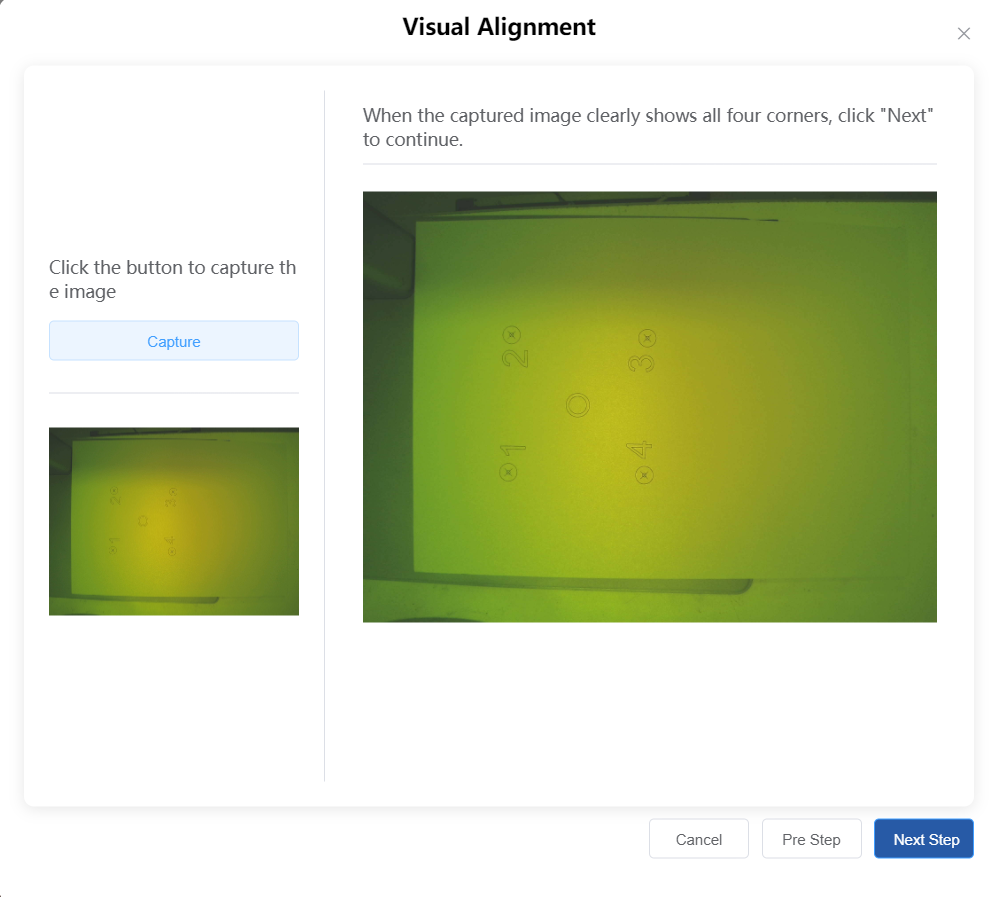
¶ Capture the target marker image
During this process, you will capture the alignment image, you may need to wait a few seconds on this screen for the camera to be successfully captured
When the machine's camera is captured, click the Capture button. You should see the camera view displayed in the lower left of the window with all four target points visible and the captured image on the right, as shown below. Click Next when the four target points are clearly visible in the captured image.
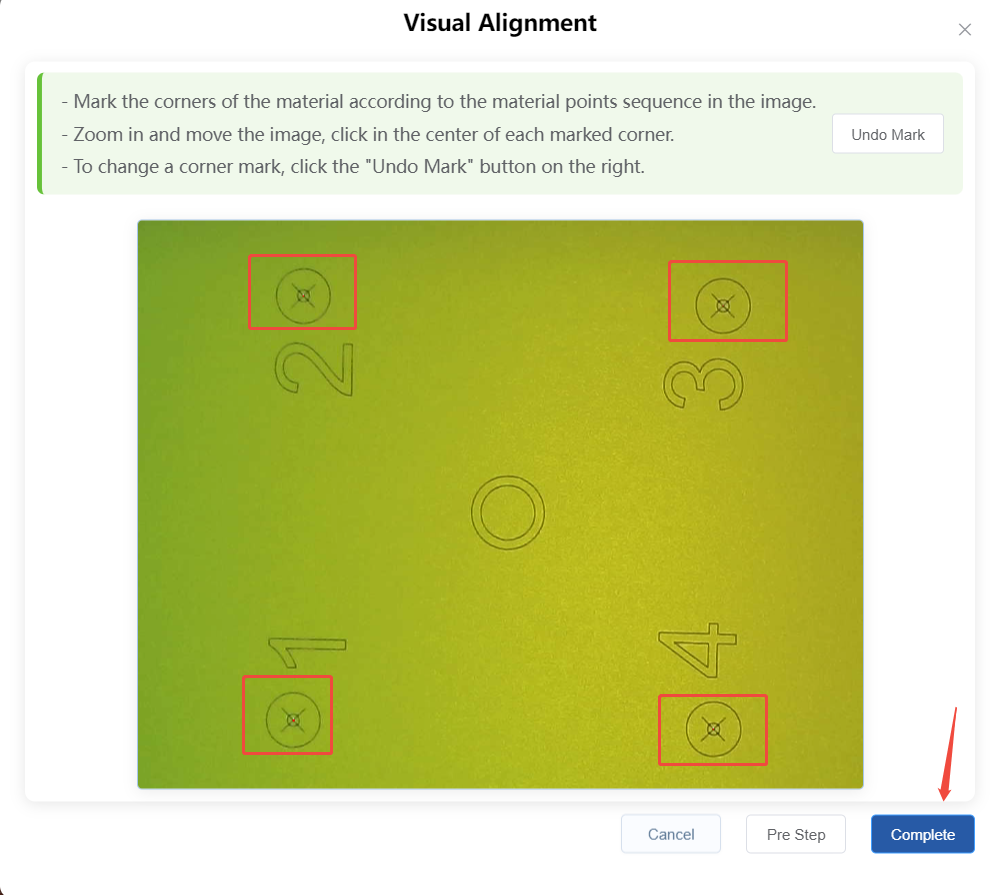
¶ Marking Targets
In this step, you need to mark each target by double-clicking in the center of each target in sequence.
Move the image with the mouse by holding down the spacebar, and use the scroll wheel to zoom the image to ensure that you click precisely in the center. Each time you double-click, a red mark will appear. If you make a mistake, click Undo Mark to remove it and try again. The order of double-clicking must be in the order (1,2,3,4) on the marking pattern. Once all four target points are marked, click Done to complete the process.
¶ Auto Focus
¶ Material requirements for autofocus
- A blank, flat, wrinkle-free ordinary white printing paper
¶ Precautions before autofocus
- Before focusing, make sure the machine has completed the focus calibration correctly
- Please do not operate any buttons on the machine during the autofocus process
- The distance between the red focus spots cannot be too far.
- The laser head will be raised and lowered during the autofocus process. You may use the light shield, but please observe carefully and be ready to manually intervene by cutting power if necessary, otherwise it may damage the motor.
- Before focusing, cover the focus target surface with a piece of white paper to help better identify the light spot;
The light spot picture on the white paper is roughly as shown below:
- Make sure the light spot is clearly visible. If it is not clear, you can use the focusing material we provide
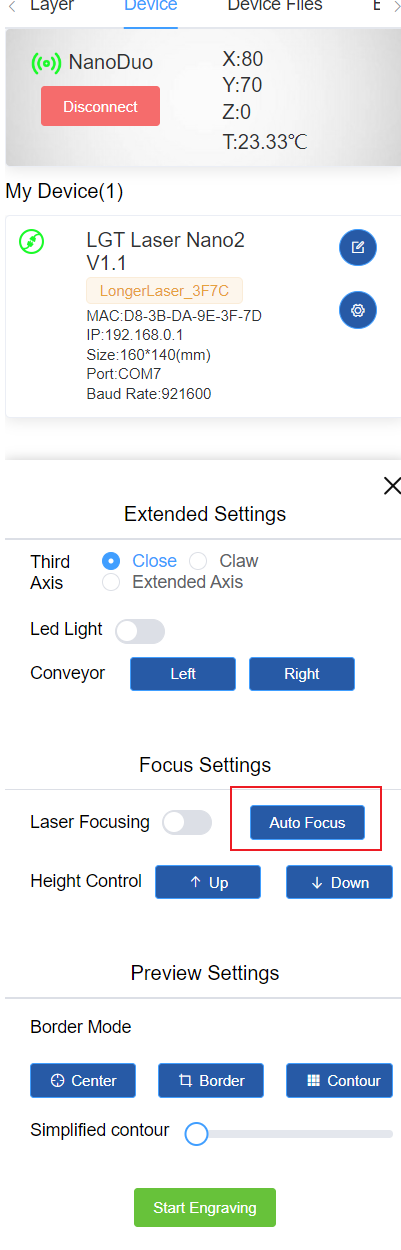
¶ AutoFocus steps
In this step, you click the Auto Focus button and the machine will automatically help you focus.
- After connecting the machine, draw on the canvas, then click the Engraving button to enter the engraving preparation interface. At this time, click the Auto Focus button and manually adjust the focus to a finger width to check whether the focus is clearly visible on the material.
- Click the auto focus button on the engraving preparation interface to auto focus.
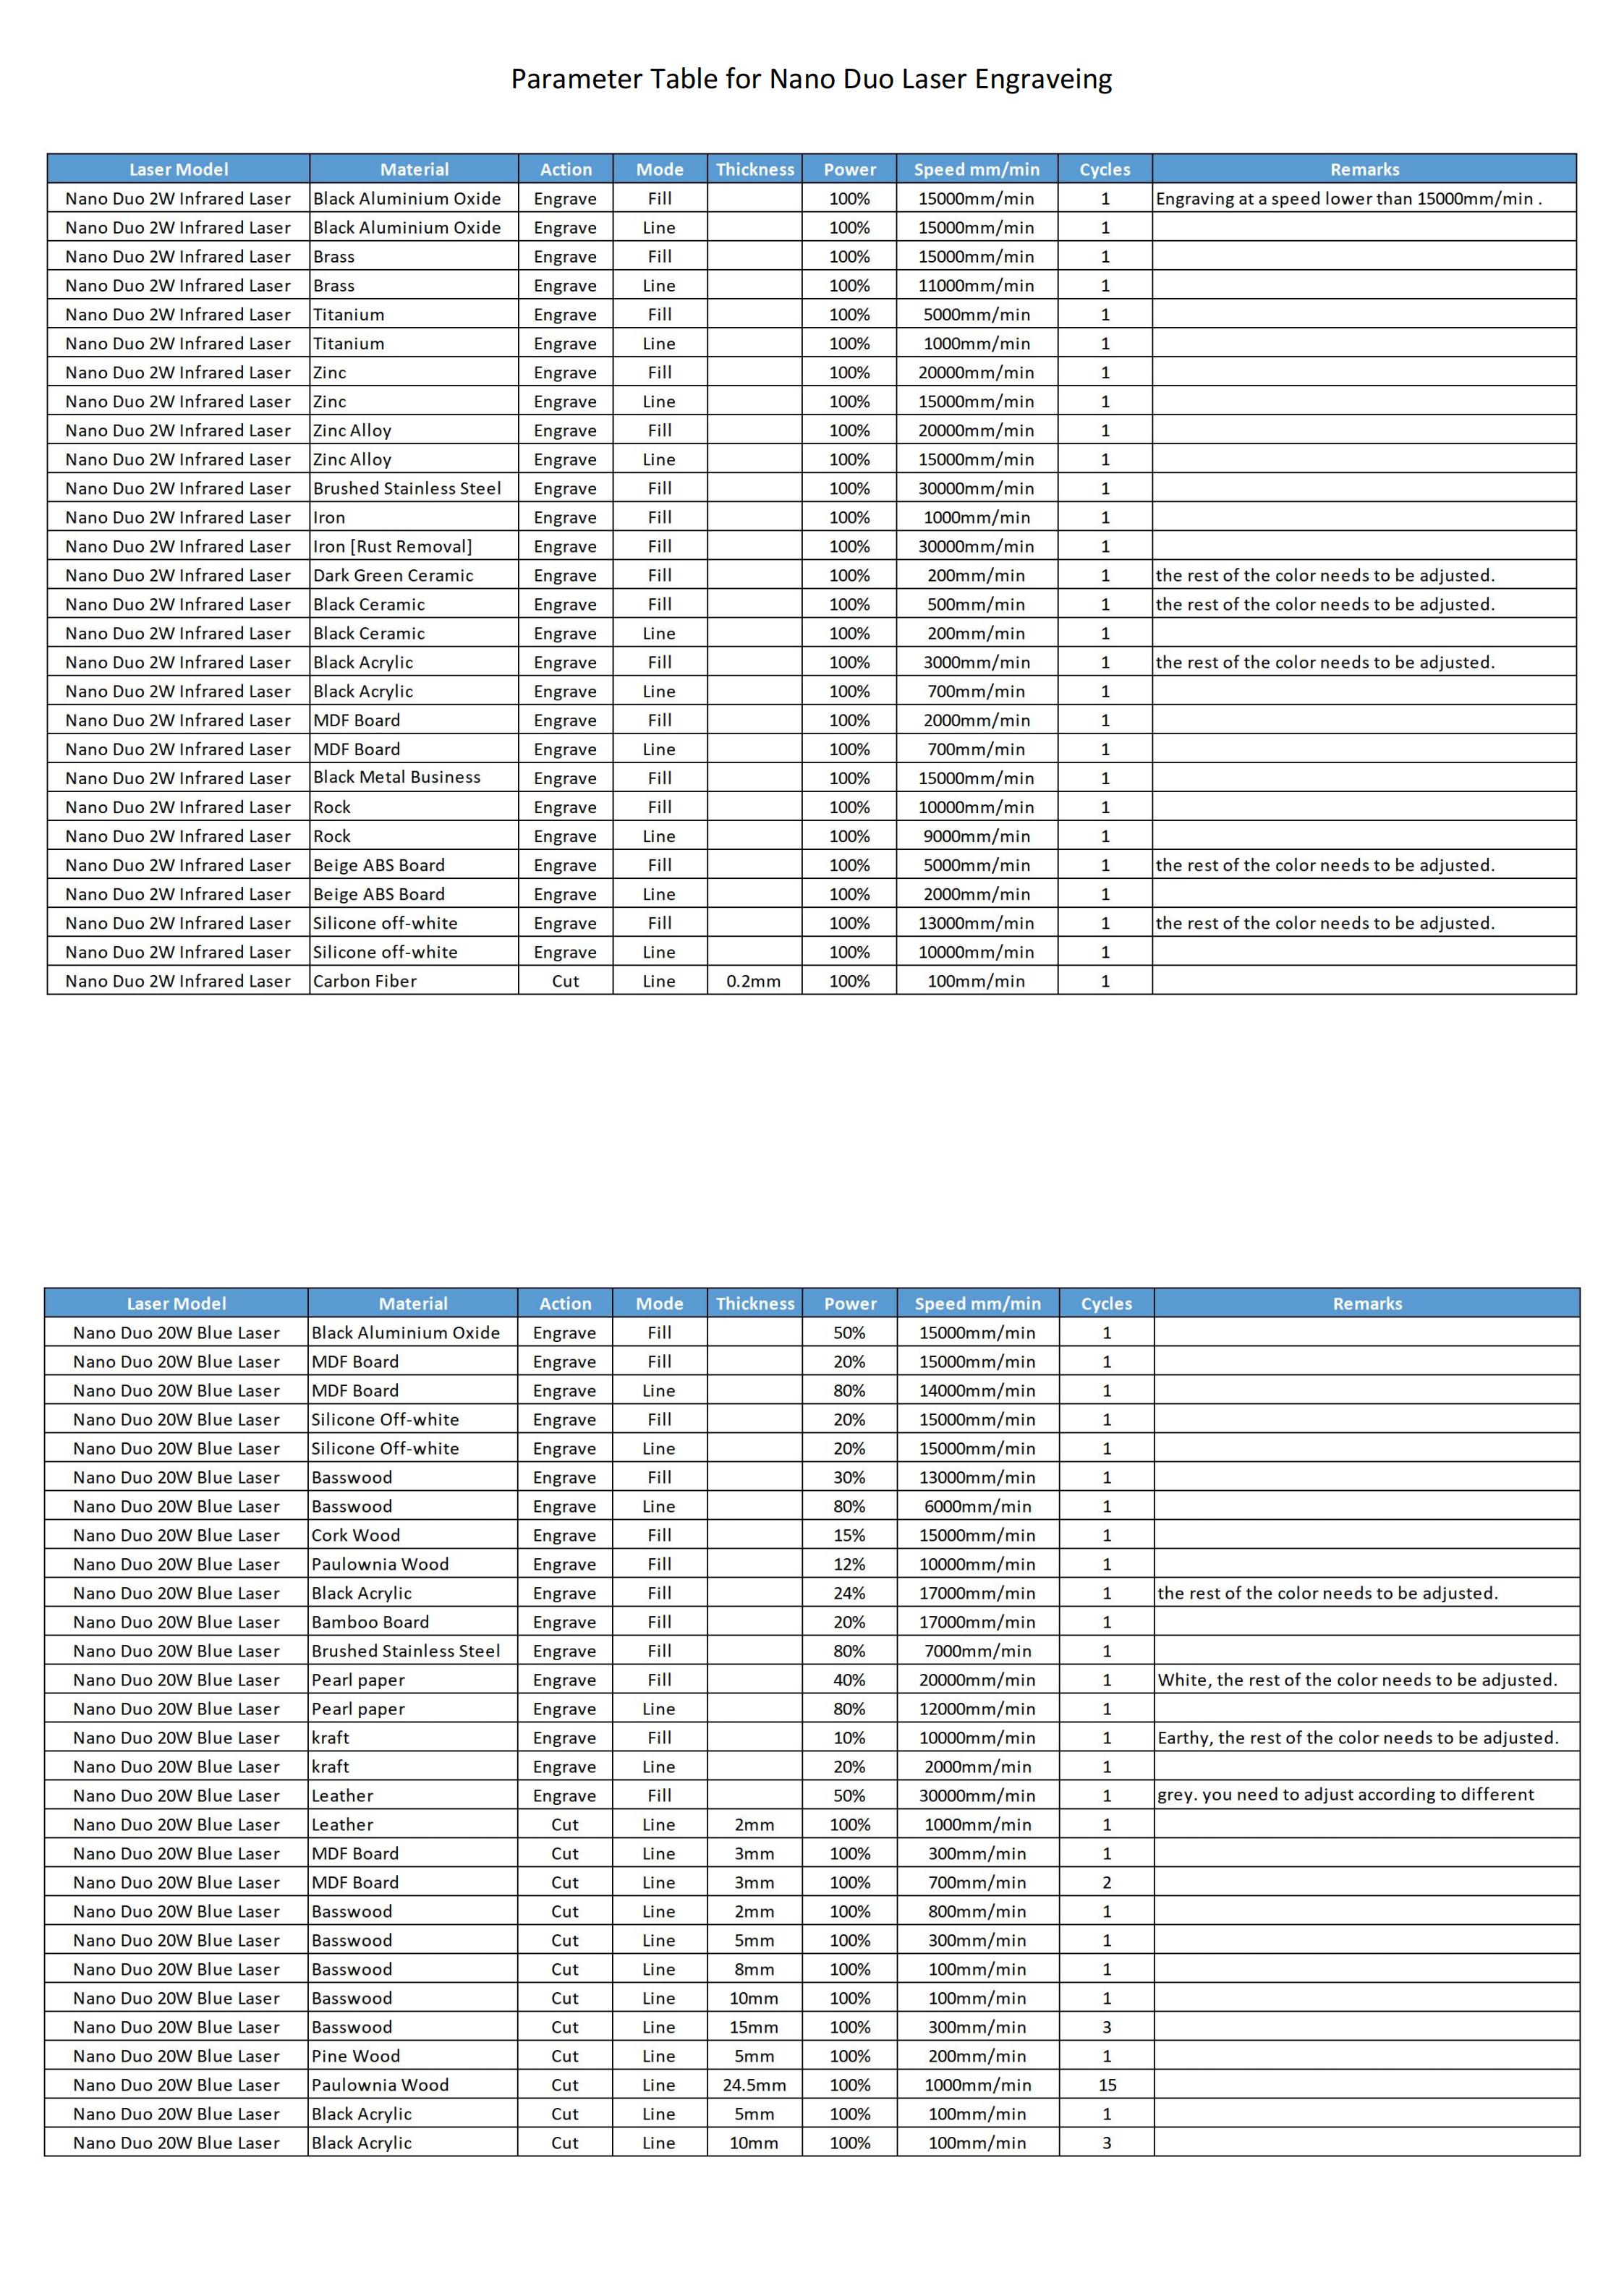
¶ 6. Parameter Table for Nano Duo Laser Engraver